1 Introduction
Short Intro
Integritee is a highly scalable, privacy-enabling network in the Polkadot ecosystem with parachains on Polkadot and Kusama. We seek to become the leading Web3 privacy solution - a blockchain network for developers and relevant to enterprises to build (decentralized) applications that benefit from unrivaled speed, verifiable confidentiality/privacy, and interoperability. At scale.
Our solution combines the security and trust of Polkadot, the scalability of second-layer solutions, and the confidentiality of Trusted Execution Environments (TEEs) - a special-purpose hardware inside which computations run securely, confidentially, and verifiably. Our technology is relevant to both Web3 developers and enterprises who would like to benefit from verifiable privacy and public auditability.
For Web3 developers, we offer powerful tools to build strong decentralized solutions for multiple use cases: From decentralized gaming providers who require low latencies and scalability to compete with traditional gaming, to decentralized exchanges (DEXs) wanting to avoid front-running, and identity protocols seeking to keep sensitive information private, the scope is ample. Integritee also bridges the gap between Web3 and Web2 with a trusted oracle framework to ensure interoperability with real-world data.
Through our technology, we solve pressing challenges that blockchain solutions currently face, namely performance, privacy, scalability issues, and a lack of interoperability. While this enhanced blockchain value proposition is highly relevant to Web3 projects seeking to overcome these challenges, we truly believe that we can greatly increase blockchain adoption also for enterprise stakeholders by enabling totally new and improved use cases for decentralized applications.
Apart from our strong Web3 value proposition, enterprises can leverage our unique solution for verifiable privacy and public auditability. Data is processed and applications run in a secure TEE. The integrity and genuineness of the TEE and the hash of the binary it is executing are subsequently verified and a respective proof registered on our public ledger, making it transparent to any third party. This combination of verifiable privacy and public auditability provides a significant benefit, e.g., for institutions that want to prove data security and sovereignty to their customers or in case of data sharing collaborations between multiple parties.
Overview
In the following chapters, we will offer insight into the fundamentals of the Integritee network, and its benefits for developers, companies, and users. We will also highlight and explain our main goals.
Further down, you will find Dev and DevOps-oriented content to guide those who wish to build on our platform.
Table of Contents
- 1 Introduction
- 2 Integritee Network
- 3 Our Technology
- 4 Development
- 5 Nodes & Infrastructure
- 6 Misc
- 7 Quickstart
2 Integritee Network
The Integritee network is a second-layer solution built on a Polkadot parachain. It aims to solve the three main challenges facing most blockchain solutions to date: scalability, interoperability, and confidentiality.
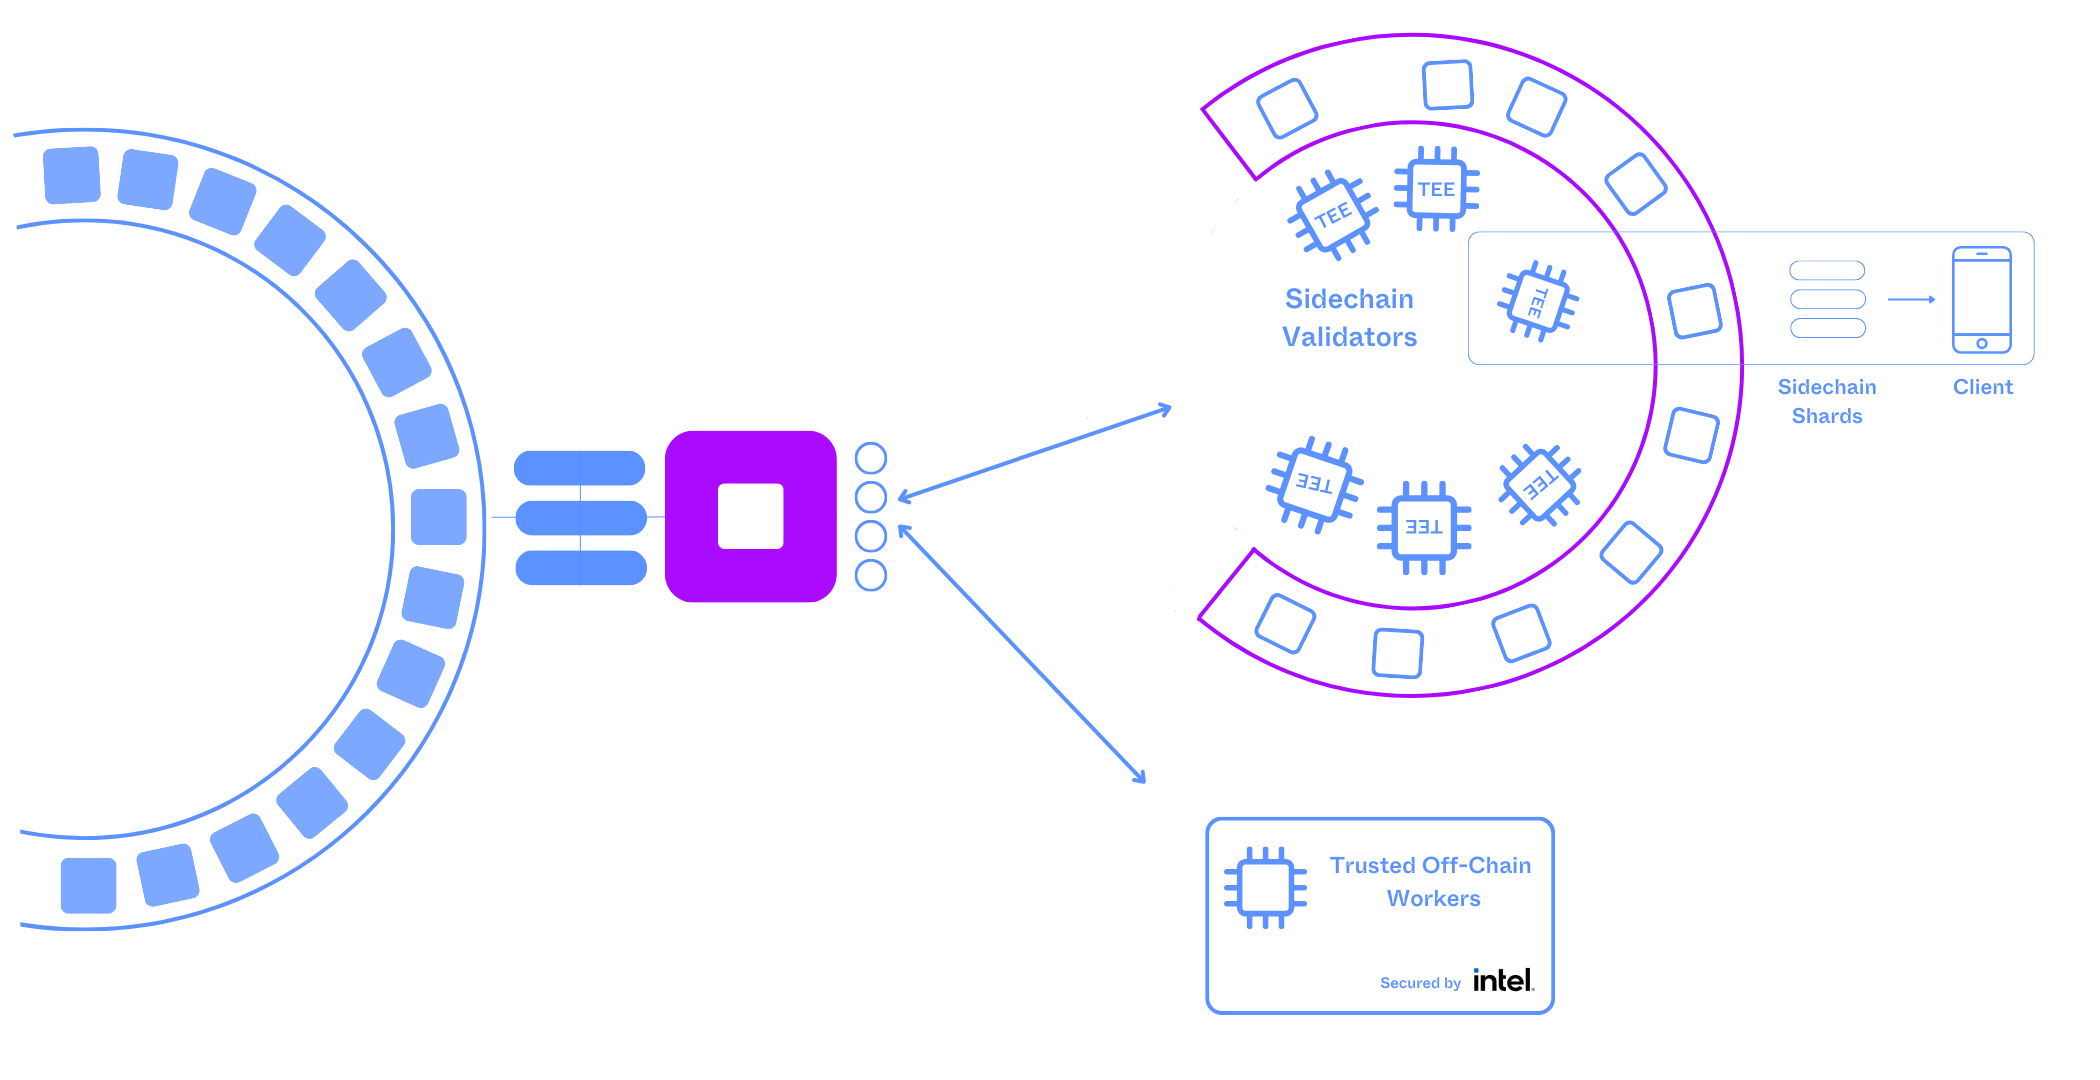
Integritee uses Polkadot's and Kusama’s Relay Chain as a security layer. Integritee itself is the trust anchor of public auditability, while leveraging hardware-based Trusted Execution Environments (TEE) enable the confidential processing of sensitive data one layer below. The aforementioned concept allows TEE-validated sidechains to be deployed on Integritee to achieve an expected throughput of up to 1,000,000 transactions per second.
These technical achievements combined, open the door to a new era of applications focused on confidentiality. Integritee can be used wherever sensitive information needs to be securely processed while providing verifiable proof that the underlying raw data remains confidential and inaccessible to unauthorized parties.
Table of Contents:
- 2.1 What is the function of the Integritee network?
- 2.2 Polkadot
- 2.3 Integritee Network Architecture
- 2.4 TEER token
- 2.5 Governance
- 2.6 Infrastructure
- 2.7 Privacy Technology: Trusted Execution Environments
- 2.8 History
- 2.9 Roadmap
2.1 What is the function of the Integritee network?
Integritee is a network of layer 2 solutions and a public unpermissioned trust anchor for verifiable and confidential computing. Through collaboration with third-party blockchain developers and enterprise clients, the Integritee parachain serves as a versatile planting ground for a vibrant array of scalable, interoperable blockchain dApps, services, and platforms.
Table of Content:
- 2.1.1 A public registry of remote attestation
- 2.1.2 Why not just use the Intel Attestation Service (IAS)?
2.1.1 A public registry of remote attestation
Remote attestation is the process of asking the TEE manufacturer to authenticate a TEE and provide the hash, i.e. the fingerprint, about its business logic. More in-depth details about remote attestation can be found here: 2.7.2. What is remote attestation?.
We store this remote attestation transparently on our decentralized network, which means that anyone can audit a TEE for its integrity. Thus, it is a public proof on a decentralized network that data is only processed in pre-agreed ways, fostering transparency and trust.
The attestation also contains the TEE’s public signing key; hence, users will always be certain that they are communicating with the correct TEE.
2.1.2 Why not just use the Intel Attestation Service (IAS)?
Remote users can request a remote attestation of the Intel Attestation Service (IAS). It enables them to interface with a TEE from a remote system, while having confidence that the application has not been tampered with and is running on a genuine TEE. However, to request a remote attestation, the user must be registered with IAS.
Integritee democratizes access to the technology by enabling firms to leverage remotely attested TEEs without needing their clients to individually register with the IAS. This greatly increasing practicability, and therefore lowers the border for adoption without compromising security. Blockchain developers and firms can create dApps with Integritee that process potentially sensitive data off-chain in a highly secure way.
2.2 Polkadot
Polkadot was founded to tackle key points of failure of the blockchain technology. It is a blockchain ecosystem consisting of parachains. The idea behind it is to connect different blockchain projects, allowing value and data to be sent across otherwise incompatible networks. Every project in the Polkadot ecosystem leverages its unique shared security system, called the Relay Chain.
The Relay Chain is Polkadot’s main network, offering security and interoperability between the different parachains. For more information on Polkadot, check their official documentation or their lightpaper.
Table of Content:
2.2.1 Shared security for parachains
Shared security is one of Polkadot’s unique features. It basically means that all the parachains connected to this ecosystem leverage the Relay Chain’s high level of security.
Polkadot’s logic differs greatly from interchain protocols – where you build with bridges – because it offers its projects freedom while keeping them safe through the Relay Chain. In other words, Polkadot is like a safety net that allows projects with different purposes to build and evolve. Economic security is another important aspect of Polkadot: independent projects outside the ecosystem often struggle with economic security due to a low market cap, projects on Polkadot benefit from their direct connection to the Relay Chain, where all the transactions take place.
2.2.2 Auctions
Polkadot introduced the idea of parachain auctions in late 2021, welcoming other blockchain projects to join the ecosystem through a bidding process. The idea is to have 100 parachain slots and launch auctions so different projects can become part of the Polkadot ecosystem. The auctions' dynamic is inspired by an auction system, popular in the 16th century to sell ships. A candle would be lit and the winner would be the one with the highest bid when its flame went out.
In order to benefit from Polkadot’s shared security features, Integritee intends to occupy parachain slots on both Polkadot and Kusama. A parachain slot is a limited resource. As demand for these slots is likely to exceed the supply, Polkadot has designed a unique auction framework to allocate the parachains to the projects generating the highest value for users. Each slot is allocated to the highest bidder in a modified candle auction.
2.2.3 Slot Lease periods
Projects bidding for a Polkadot parachain can aim for a 2-year lease (most sources will show 96 weeks), which is the maximum.
It’s also possible that a project wants to extend its 2-year lease. In that case, once the lease is over, it will have to enter a new auction and potentially face other competitors aiming for the same period.
Slots are technically not sold at the auction but leased against collateral locked in DOT. The bids are returned to their respective owners at the end of the lease period. Furthermore, the auction mechanism enables bidders to gather additional funds to bid for access to a parachain if they manage to mobilize holders of DOT to bond some of their holdings in support of a project. Such supporters incur only an opportunity cost when bonding their DOT. During the entire auction process and the lease period that follows, the bidder never gains custody over the tokens of such supporters.
2.2.4 Crowdloan
Crowdloans follow the same logic as crowdfundings. The “crowd” – communities, members, fans, supporters, etc – contribute to a specific project or cause. However, there’s a big difference between both concepts: in crowdfundings, the money goes to the project and doesn’t return to the investors, whereas crowdloans have a bonding logic, where the money contributors invested is later returned to them, and most of the time with rewards included.
In Integritee’s case, once the 96-week lease period has elapsed, all supporters will regain access to their DOT, but still get to keep any TEER rewards they have received. In addition, it is important to note that the DOT is simply locked for the duration of the lease, so crowdloan backers never lose ownership of their tokens during the entire process.
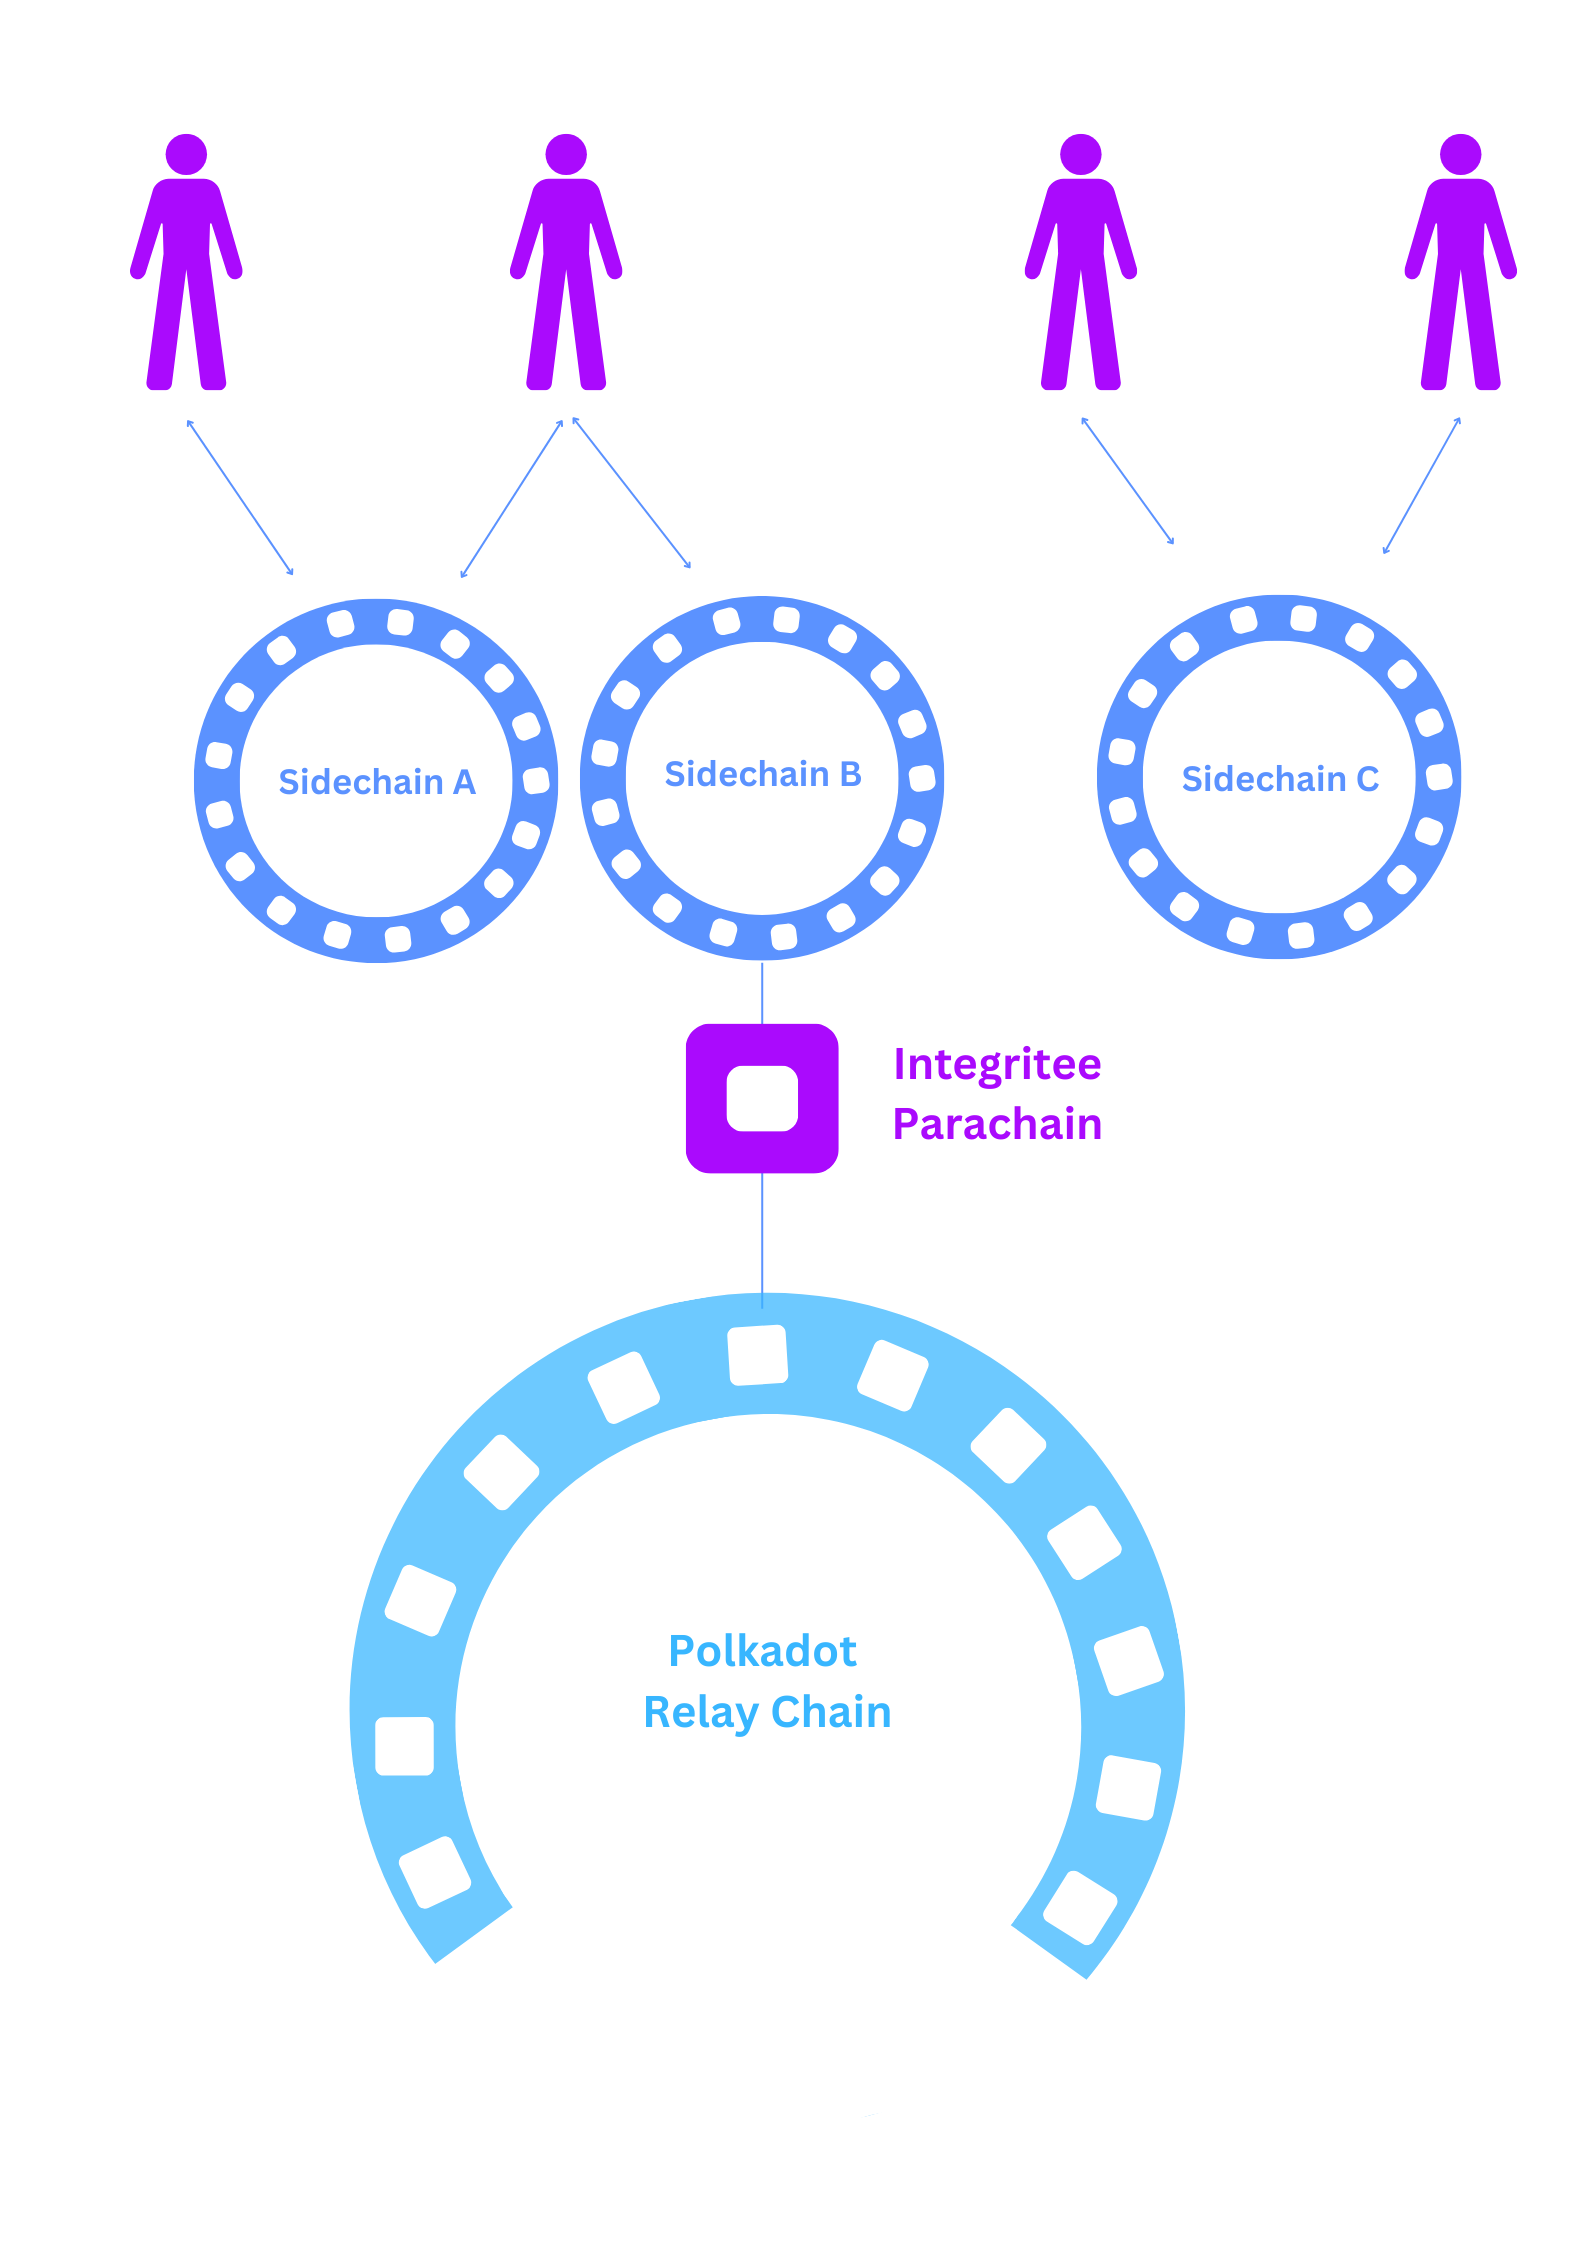
2.3 Integritee Network Architecture
Overview of how Relaychain, Integritee Parachain, Sidechains, TEEracles, Offchain workers are connected
2.4 TEER token
The TEER Token has a hard cap of 10M and is directed at utility and governance. A portion is allocated for our early contributors. Our token serves two main purposes: utility (paying using the services of the Integritee network, and governance (used for decision-making about the future of the network).
Table of Content:
- 2.4.1 How to Set Up a Wallet
- 2.4.2 Which wallets are supported?
- 2.4.3 How to get TEER ?
- 2.4.4 How to check the transaction history?
- 2.4.5 How to bridge TEER?
- 2.4.6 Tokenomics
2.4.1 How to Set Up a Wallet
There are different ways to set up a wallet. We recommend using the polkadot{.js}:
Install the Polkadot-js browser extension to manage accounts for substrate-based chains (like Integritee) for either Chrome or Firefox.
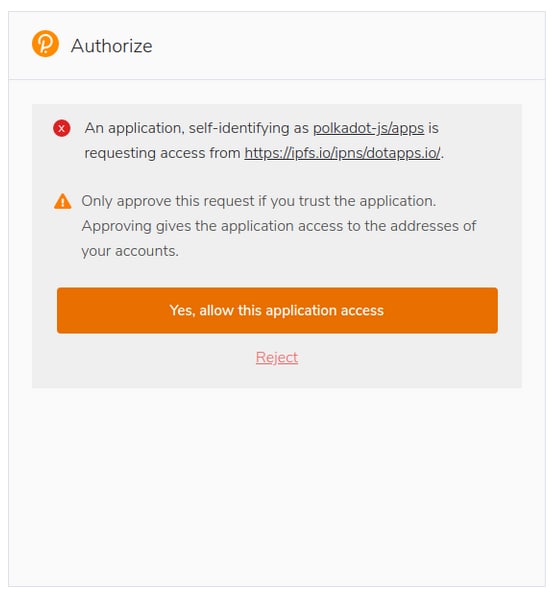
Visit the Integritee Network API endpoint and make sure you enable the extension for that site. When you visit that page for the first time, it will ask you to update your extension's metadata. Please do that.
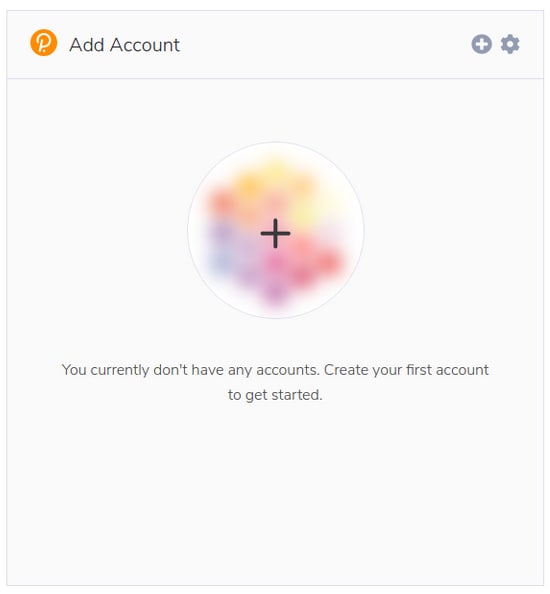
In the extension, create a new account and make sure you back up the seed phrase securely and protect the account with a strong password.
Then, select Integritee Network from the drop-down list.
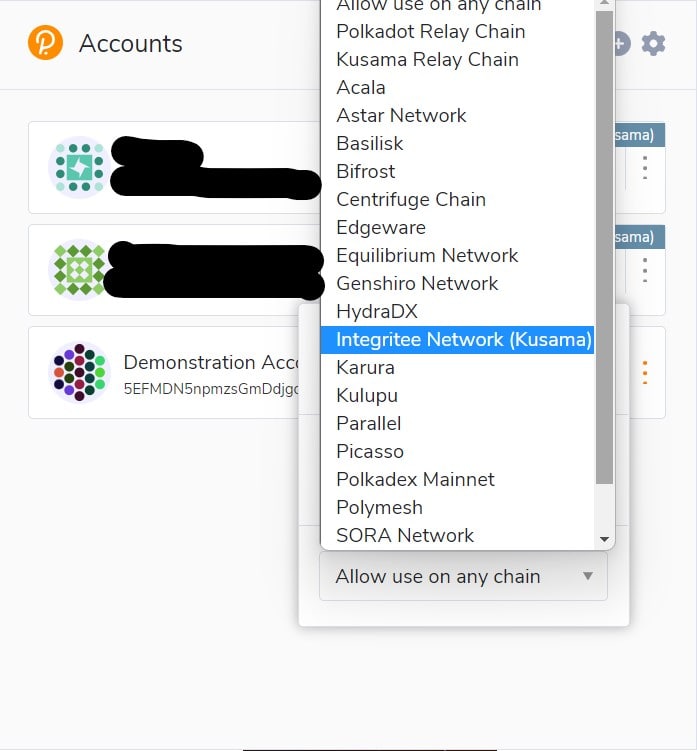
Integritee uses the Substrate-based chain address format SS58.
Integritee Network addresses start with the number 2. Polkadot addresses always start with the number 1. Kusama addresses always start with a capital letter like C, D, F, G, H, J, etc. Generic Substrate addresses start with 5. All those address formats are compatible, they're just an indication of the network they're meant to be used with.
2.4.2 Which wallets are supported?
Mobile Apps
Nova Wallet
- Download the app on the App Store or on Google Play
- Import or create and fund an account.
Learn how to use your ledger HW wallet with the Nova Wallet App. Make sure you install the Polkadot Generic App on your ledger first.
SubWallet
- Download the app on the App Store or on Google Play
- Import or create and fund an account.
Fearless Wallet
- Download the app on the App Store or on Google Play
- Import or create and fund an account.
Desktop Browser Extensions
Talisman
Talisman conveniently combines wallet management in a browser extension with a use friendly interface observe your balances and perform most common transactions.
- Download the Talisman extension talisman.xyz
- Import or create and fund an account.
(Optional) Connect Your Ledger HW wallet
- install the Polkadot Generic App on your ledger
- (+) Add Account -> Connect -> Connect Ledger
- Select Polkadot
- Choose Network "Polkadot"
- Choose Ledger App "Polkadot App" (we will use the generic app)
- Select the account you wish to connect
Polkadot {js} Extension
This is an expert tool and not recommended for general users. It does, however, provide unique privacy features as it allows fine-grained control over which APIs you share which account addresses with.
- Download the extensions via Bowser.
- For enhanced privacy:
- Manage Extensions -> set site access to "On click"
- Extension -> Settings -> Manage Website Access: Only enable accounts a specific site really needs to see
- Head to Polkadot-js/apps and connect the extension
(Optional) Connect Your Ledger HW Wallet
only for chome & brave. won't work with firefox
- install the Polkadot Generic App on your ledger.
- Click on the extension icon
- (+) icon in top right -> Attach ledger account
- Select network: Integritee
- give the account a name
- Select the derivation path. leave this a t 0/0 if unsure
Subwallet Extension
- Download the extensions via Bowser.
- Import or create and fund an account.
2.4.3 How to get TEER ?
Our token is listed and tradable. You can follow and buy our TEER token by accessing the following exchanges:
Centralized exchanges:
Decentralized exchanges:
Our DEX on Basilisk is discontinued and has no significant liquidity now.
2.4.3.1 Basilisk Guide
Dapp: https://app.basilisk.cloud
Docs: https://docs.bsx.fi/
Instructions
1. Buy TEER with already available KSM
- Connect wallet to Basilisk Dapp: https://app.basilisk.cloud
- Move KSM from Kusama to Basilisk: https://app.basilisk.cloud/cross-chain
.png)
- Check balance : https://app.basilisk.cloud/wallet/assets
- Buy TEER : https://app.basilisk.cloud/trade?assetIn=1&assetOut=17
.png)
- XCM TEER to Integritee Network
Option 1: via Basilisk UI Cross-Chain tab
Go down to section 3 for the details.
Option 2: via Polkadot.JS
Go down to section 5 for the details.
{% hint style="info" %} Don't send your TEER from Basilisk to a Centralized Exchange like Kraken or Gate, your funds will be lost, as they only listen to events coming from the Integritee Chain for TEER tokens. {% endhint %}
2. Buy TEER without KSM
- Go to the Basilisk Dapp and click on the "Fund Wallet" Button.
.png)
- Buy "KSM" Tokens via BANX using your credit card or via Kraken.
.png)
- Move your KSMs to a Polkadot wallet that is supported by Basilisk:
.png)
- Move KSM from Kusama to Basilisk: https://app.basilisk.cloud/cross-chain
.png)
- Check your balance : https://app.basilisk.cloud/wallet/assets
- Buy TEER : https://app.basilisk.cloud/trade?assetIn=1&assetOut=17
.png)
- XCM TEER to Integritee Network
Option 1: via Basilisk UI Cross-Chain tab: https://app.basilisk.cloud/cross-chain
(NOT YET AVAILABLE via Basilisk UI)
Option 2: via Polkadot.JS
Go down to section 3 for the details.
Check TEER transfers from Basilisk to Integritee via Integritee Subscan explorer: https://integritee.subscan.io/xcm_channel/2090-2015
{% hint style="info" %} Don't send your TEER from Basilisk to a Centralized Exchange like Kraken or Gate, your funds will be lost, as they only listen to events coming from the Integritee Chain for TEER tokens. {% endhint %}
3. Send TEER from Basilisk to Integritee via Basilisk UI
- Select Basilisk as a Source chain and Integritee as Destination Chain.
- Enter amount and address
- Click on the transfer button.
- Check TEER transfers from Basilisk to Integritee via Integritee Subscan explorer: https://integritee.subscan.io/xcm_channel/2090-2015
4. Send TEER from Integritee to Basilisk via Basilisk UI
- Select Integritee as a Source chain and Basilisk as Destination Chain.
- Enter amount and address
- Click on the transfer button.
- Check TEER transfers from Integritee to Basilisk via Integritee Subscan explorer: https://integritee.subscan.io/xcm_channel/2015-2090?tab=transfer
5. Send TEER from Basilisk to Integritee via Polkadot.JS
- Select your account from the "Extrinsics" page on the Basilisk Polkadot.JS app
https://polkadot.js.org/apps/?rpc=wss%3A%2F%2Frpc.basilisk.cloud#/extrinsics - Select "xTokens" as the extrinsic type.
- Enter "17" as currencyid.
- Enter the amount you wish followed by 12 zeros.
1000000000000 equals 1 Token. - Select "V3" as the destination version.
- Enter "1" as the parent ID.
- Select "X2" as the interior version.
- Enter "2015" as parachain ID.
- Select "AccountId32" as XCMV3Junction type.
- Enter the same wallet address as selected above as the receiver if you would like to use the same wallet on Basilisk as well.
- Submit the the transaction.
- Check your transfer here: https://integritee.subscan.io/xcm_channel/2090-2015
.png)
6. Send TEER from Integritee to Basilisk via Polkadot.JS
- Select your account from the "Extrinsics" page on the Integritee Network Polkadot.JS app https://polkadot.js.org/apps/?rpc=wss%3A%2F%2Fkusama.api.integritee.network#/extrinsics
- Select "xTokens" as the extrinsic type.
- Enter the amount you wish followed by 12 zeros.
1000000000000 equals 1 Token. - Select "V3" as the destination version.
- Enter "1" as the parent ID.
- Select "X2" as the interior version.
- Enter "2090" as parachain ID.
- Select "AccountId32" as XCMV3Junction type.
- Enter the same wallet address as selected above as the receiver if you would like to use the same wallet on Basilisk as well.
- Submit the the transaction.
- Check your transfer here: https://integritee.subscan.io/xcm_channel/2015-2090?tab=transfer
.png)
2.4.4 How to check the transaction history?
You can use our custom Integritee Subscan to see what's happening on-chain:
2.4.5 How to bridge TEER
The TEER token is available on multiple chains which are connected through trustless bridges. The following diagram shows an overview of all chains and relevant exchanges:

Most likely, your TEER tokens reside on our Kusama Parachain where we issued them as crowdloan rewards and where centralized exchanges currently withdraw and deposit from.
Bridging TEER between integritee-kusama and integritee-polkadot Parachains
TEER is the native token of both our parachains, integritee-kusama and integritee-polkadot. TEER can be bridged trustlessly and fungibly between these networks. We have simplified this process with the porTEER pallet
TEER Crosschain Tool Overview
The TEER Crosschain Tool has different sections to facilitate a transfer. The graphic below highlights these sections.
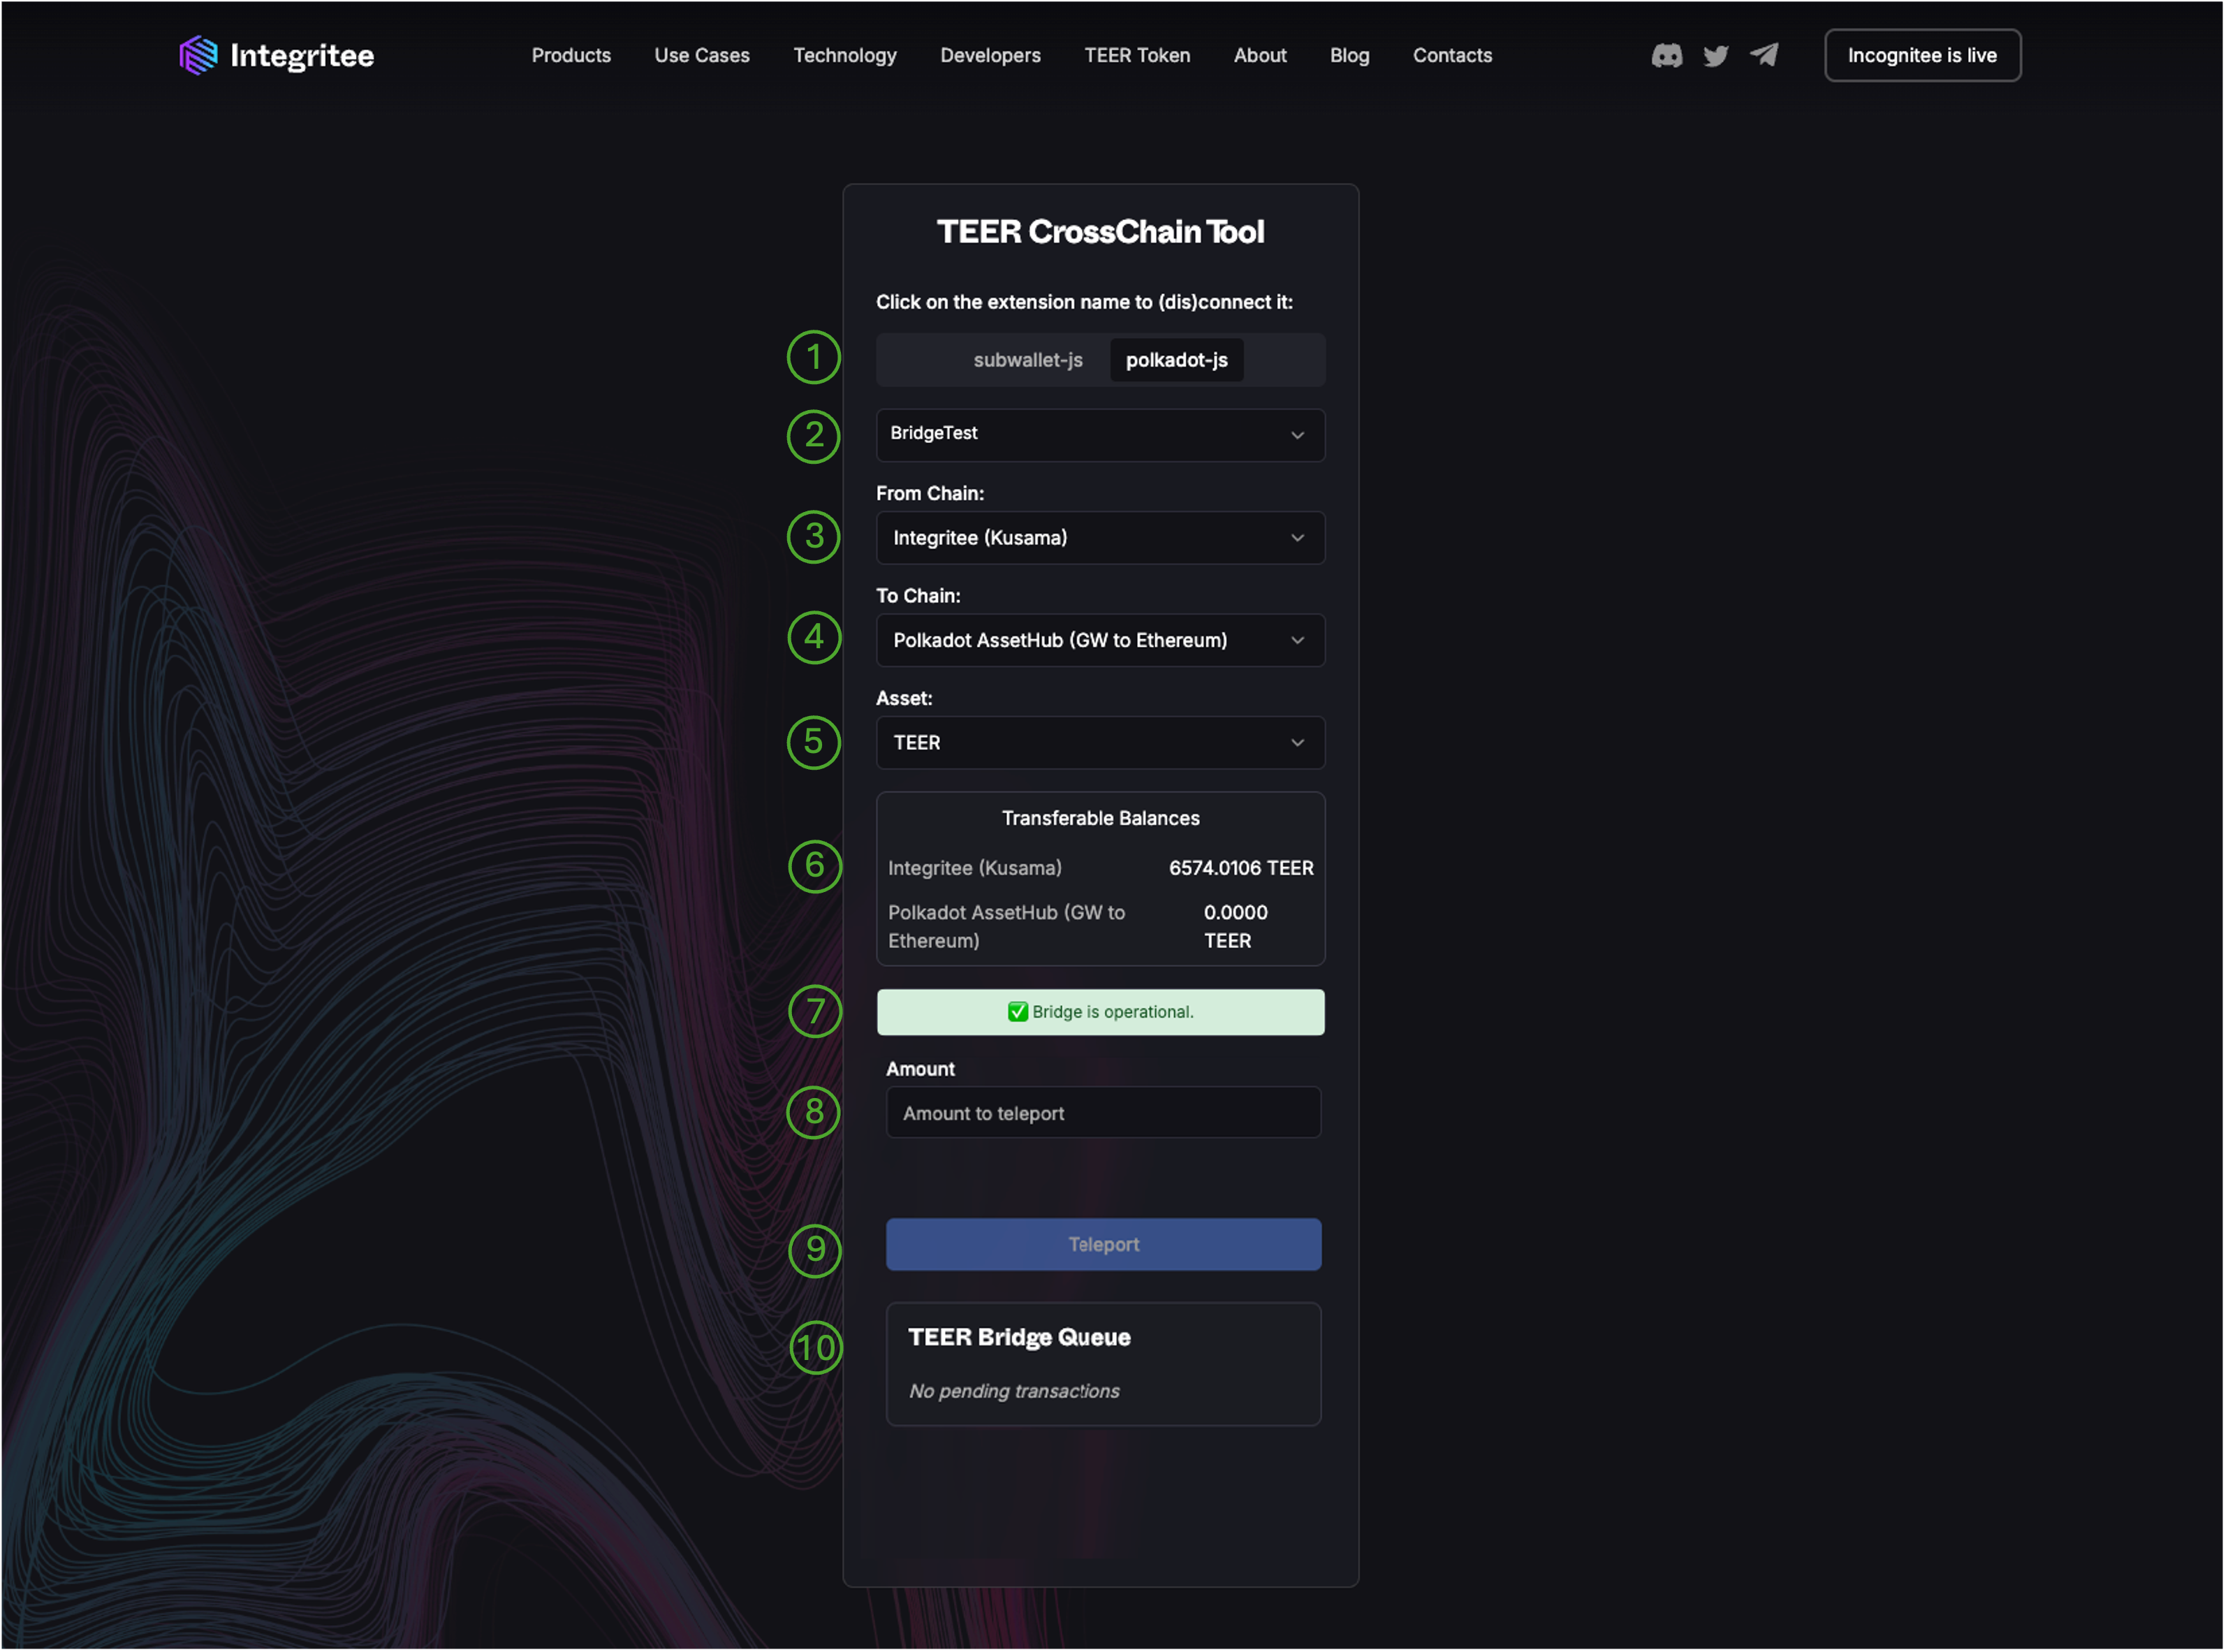
- Wallet extension selection. You can select different wallet extensions like PolkadotJS, Subwallet or others.
- Account selection. Select the account holding your TEER.
- Source chain selection. Select the source chain you want to transfer TEER from. The first time you will use this tool it will likely be “Integritee Kusama”.
- Target chain selection. Select the target chain you want to transfer TEER to. The first time you will use this tool you likely want to select “Polkadot Assethub”, especially if you'd like to bridge your TEER further to Ethereum using snowbridge.
- Asset selection.
Select the asset you want to use. Select “TEER”.
In the future we might support other assets as well, including TEERdays. - Balances overview. You can see your current balances on both the source and target chain.
- App notifications. This section holds important notifications about the current state of the bridge and other transfer related information.
- Amount entry field.
- Transfer button. Allows to finally submit a transaction
- Bridging queue status. This section holds information about the status of your submitted bridging transactions.
Bridge TEER from Integritee Kusama to Polkadot Assethub:
- Open the TEER Crosschain Tool in the browser or open Subwallet’s (mobile app) dApp browser and open
crosschain.integritee.network. - The “TEER CrossChain Tool” will open. All you need to do is choose the desired extension, for example subwallet-js or polkadot-js. Choose the account you want to transfer TEER from, and click “connect”.
- Select the account from the dropdown. “From chain” will say “Integritee (Kusama), and “To Chain” will, by default, present “Polkadot AssetHub (GW to Ethereum)".
- You’ll see the available transferable balances on both origin and destination networks. In “amount to teleport”, input the amount you wish to bridge.
Bridge TEER from back from Polkadot Assethub to Integritee Kusama:
- Open the TEER Crosschain Tool in the browser or open Subwallet’s (mobile app) dApp browser and open
crosschain.integritee.network. - The “TEER CrossChain Tool” will open. All you need to do is choose the desired extension, for example subwallet-js or polkadot-js. Choose the account you want to transfer TEER from, and click “connect”.
- Select the account from the dropdown. “From chain” will say “Polkadot AssetHub (GW to Ethereum )” and “To Chain” should be “Integritee Polkadot”.
- You’ll see the available transferable balances on both origin and destination networks. In “amount to teleport”, input the amount you wish to bridge.
- After this you would have to repeat the step 4. with “From chain” “Integritee Polkadot” and “To Chain” should be “Integritee Kusama”.
Watching Progress
Bridging TEER usually takes between 3-30min. The crosschain tool will keep watching the progress and show you when the funds have arrived at their destination.
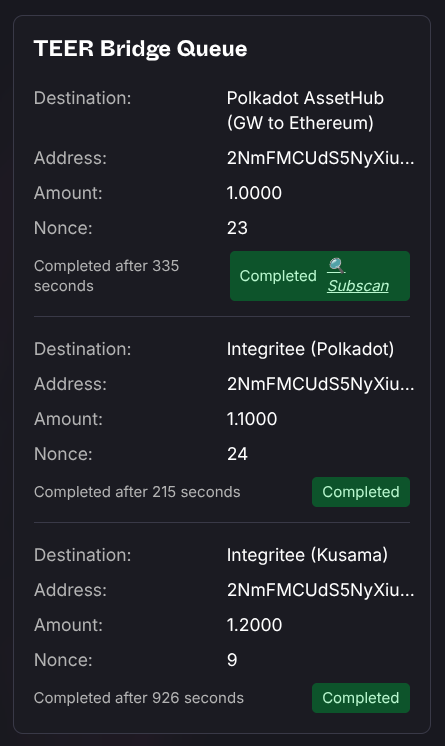
Keep your window open if you want to follow the process. If you closed the window you can still check subscan.io for the destination chain.
⚠️ Important ⚠️
-
By default, the bridge interface is set to transfer TEER to Polkadot AssetHub. This only works if you already have DOT on AssetHub, because TEER is not a sufficient asset on Polkadot Asset Hub. If you don’t have any DOT, the warning “Your account on the destination chain is not able to exist by only holding TEER. Please transfer some DOT first” will appear.
-
To get your TEER back to Integritee Kusama, the route you should follow is: Polkadot AssetHub ➡️ Integritee (Polkadot) ➡️ Integritee (Kusama)
-
If you want to use centralized exchanges, do not transfer your TEER from Integritee Kusama to Polkadot for now, as you won’t be able to send them to centralized exchanges from there. Having TEER on Polkadot will be useful to use different dApps and access other ecosystems like Uniswap on Ethereum, but transferring and receiving TEER via centralized exchanges is an operation done on our Kusama parachain for the time being.
Also note:
- bridging costs fees in TEER which will be charged on the source chain on top of the amount you choose to be bridged.
- If your destination is the Asset Hub, an additional tiny fee will be charged in TEER subtracted from the amount bridged.
- The Integritee team simulates the process every 30 seconds and monitors the bridges. However, we cannot guarantee that the bridge will always be available because it relies on external components like the asset hubs, bridge hubs and relayers which may change their fees and behavior over time and are out of our control. Moreover, we rely on asset swaps along the way and volatility in asset conversion can temporarily pause the bridge. Our monitoring ensures that the bridge will be swiftly paused in case of any issues until we can resolve them.
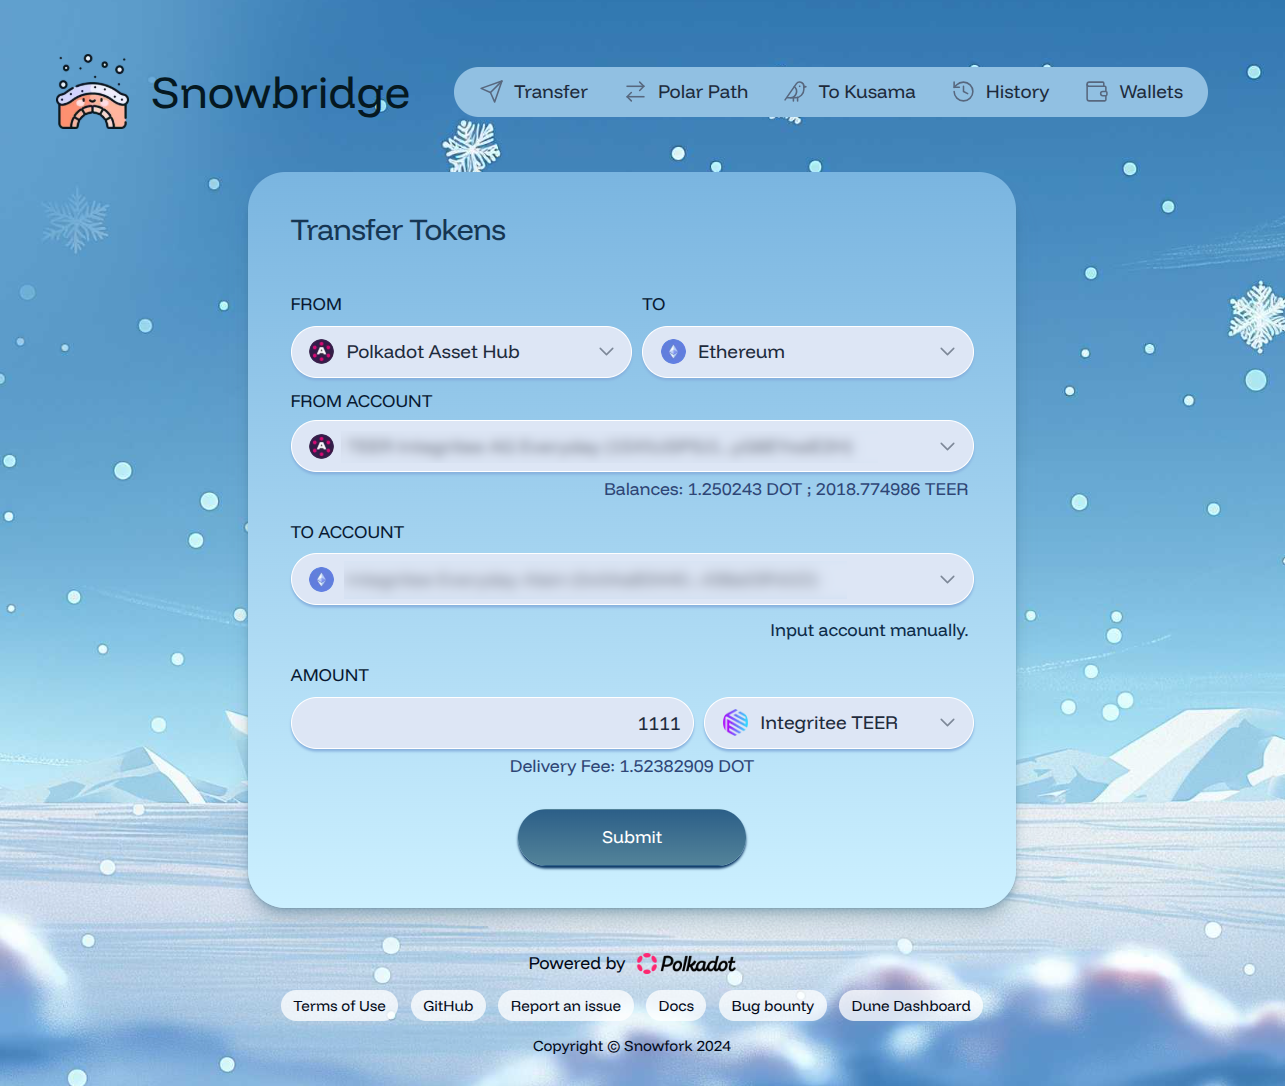
Bridging TEER between integritee-polkadot and Ethereum
TEER also exists as an ERC-20 token on Ethereum. Snowbridge is your go-to dApp to bridge TEER between Ethereum and asset-hub-polkadot. Once on Ethereum, you may want to use your TEER on Uniswap or other DeFi applications.
Usage
Assuming you already have TEER on AssetHub Polkadot and want to bridge them to Ethereum:
- visit Snowbridge dApp
- from "Polkadot Asset Hub"
- to "Ethereum"
- from account: connect your Polkadot wallet holding TEER on Polkadot Asset Hub
- to account: connect your Ethereum wallet which shall receive the bridged TEER
- amount: enter the amount of TEER you want to bridge
- select "Integritee TEER" as asset
- click "Submit" and follow the instructions
Of course, you can also bring TEER back from Ethereum to Polkadot Asset Hub via Snowbridge.
2.4.6 Tokenomics
By definition, the TEER token has an intrinsic value: users need it to pay for operating in the Integritee network. To ensure that costs are stable and predictable for Integritee users, the usage will be denominated in fiat.
What is the utility of the TEER?
The Integritee parachain will serve as a platform for off-chain computation and sidechains. Using this service will cost fees. Given that the Integritee parachain will be decentralized, this payment has to be made in tokens, hence the need for the TEER token.
Paying fees in tokens with possibly volatile value is not attractive for enterprise clients, who require predictable costs. Therefore, the Integritee parachain usage fees will be denominated in USD. Oracle services will ensure live tracking of the USD/TEER exchange rate in order to maintain stable usage fees. Firms do not only require predictable costs. They also still favor making payments in fiat currency over holding tokens on blockchains, as utility tokens tend to be highly volatile and there are as yet no widely adopted standards for payment interfaces or wallets.
Integritee AG, the company, is determined to guide firms and enterprises to public blockchains and will therefore serve as an optional intermediary (possibly one of many), allowing clients to pay predetermined fees in fiat currency in return for services provided by the decentralized Integritee parachain. Such intermediaries will buy TEER tokens on the open market and pay TEER fees on behalf of their enterprise customers to encourage widespread adoption. As the intermediary service will take on the exchange rate risk of the TEER token, it is expected that paying in TEER directly will be cheaper than contracting an intermediary.
Integritee has an initial hard cap of 10m tokens and only a single native token, the TEER, which can freely float among multiple parachains and ecosystems. A portion is allocated for our early contributors, for the slot auctions to secure parachain slots, for the further development of the network and ecosystem, and long term the treasury, which will be governed by one chain and decentralized by token holders in the future. A burning function burns a fraction of each transaction fee, while the rest is put to the treasury. Emphasizing this point again: each time a user pays for Integritee's service with TEER tokens, a fraction of the TEER token transaction is burned, which implies a strictly deflationary token supply.
Stable Fees
Mechanisms – introduced in our Token Economics – such as the burn rate, the lock drop, and the incentive campaigns aim to ensure Integritee’s sustained access to Polkadot parachains while guaranteeing stable fees for service users and an appreciation of the TEER token.
2.5 Governance
TEER token holders can participate in the parachain governance process. Decision-making is based on coin-voting. Voters will lock a freely choosable fraction of their TEER for a certain amount of time and declare their desired outcome.
Their vote will be weighted with the amount of TEER they have locked. During the lock period, the TEER holder is still in the custody of her funds but the lock prevents transferring tokens or using them to pay fees. The following is a non-exhaustive list of governance actions that TEER holders can vote on:
- parachain runtime code upgrades
- adjusting fees
- election of council members (a representative body that will decide how treasury funds are to be spent).
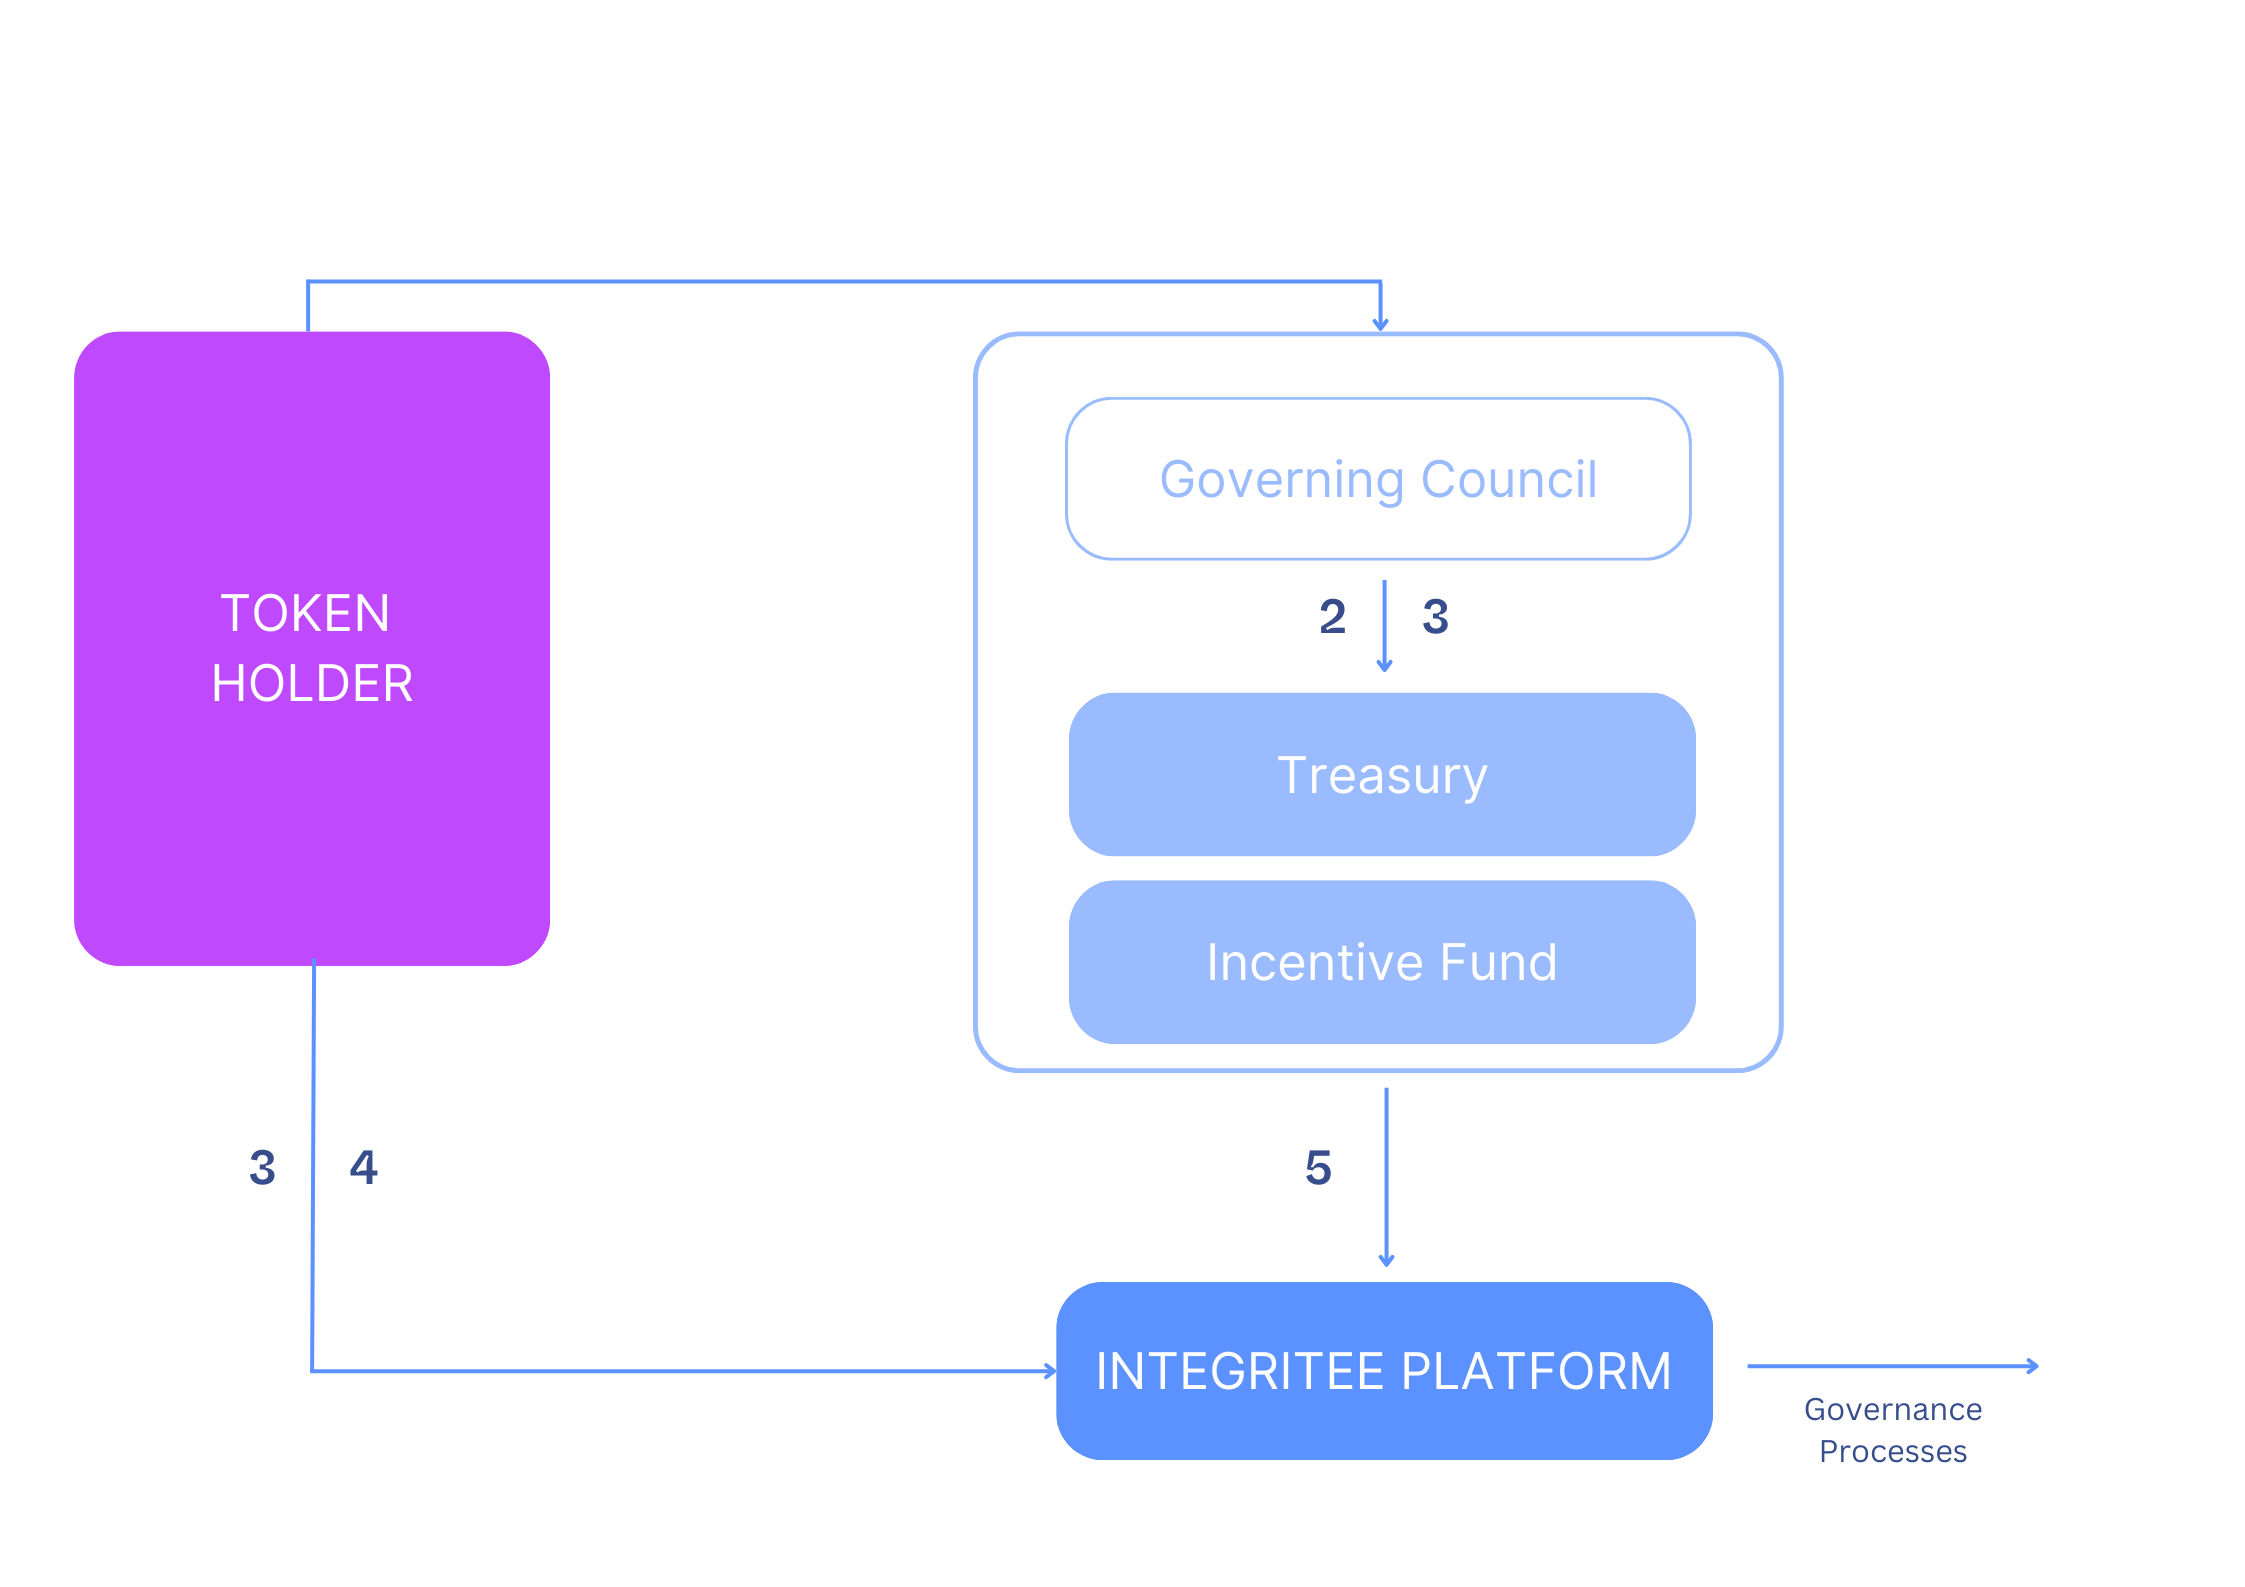
Table of Content:
2.5.1 Council
The Integritee Council is responsible for the parachain’s control. The TEER token allows its holders to vote for individuals or entities seeking election to the council.
The TEER token will soon freely float among multiple parachains. Thus, governance — which relies on coin voting — should also be unified. Therefore, a single elected council and all acts involving coin voting will be aggregated across all parachains/parathreads. Service providers can request funds to deliver their services and the council will evaluate proposals and allocate funds at its discretion.
The TEER token allows its holders to vote for individuals or entities seeking election to the council. This means that every token holder will have the power to drive the future development of the platform and the future of privacy-preserving apps and ecosystems.
2.5.2 Technical Committee
The Technical Committee (TC) consists of technical experts with a lot of knowledge about the Integritee architecture. Members are added or removed from the TC via a simple majority vote of the Council.
The purpose of the TC is to safeguard against malicious referenda, implement bug fixes, reverse faulty runtime updates, or add new but battle-tested features. The TC has the power to fast-track proposals by using the Democracy pallet and is the only origin that can trigger the fast-tracking functionality. We can consider the TC to be a "unique origin" that cannot generate proposals, but can fast-track existing proposals.
Fast-tracked referenda are the only type of referenda that can be active alongside another active referendum. Thus, with fast-tracked referenda, it is possible to have two active referenda at the same time. Voting on one does not prevent a user from voting on the other.
2.5.3 Treasury
Fees are collected in an on-chain treasury. Treasury funds are used for ongoing maintenance and operation of the parachain’s infrastructure and software, as well as ecosystem development and community activity rewards.
The allocation of treasury funds is delegated to an on-chain council (see Section 7). Service providers can request funds to deliver their services and the council will evaluate proposals and allocate funds at its discretion.
2.5.4 Democracy
Participate in Democracy
The public Referenda Chamber is one of the three bodies alongside the Council and the Technical Committee governing the Integritee network. Public referenda can be proposed and voted by any token holder with a bond. Every voting period, one proposal with the most support (# of seconds) will be moved to the referenda table for public voting. Voters who are willing to lock up tokens for a greater duration of time can have their votes amplified. This is conceptually equivalent to Polkadot.
Propose a Referendum
A referendum consists of some action that you want to propose. If voted in by token holders, then the action will be enacted on-chain automatically. You are required to bond some tokens to propose an action. Once a proposal is submitted, it cannot be cancelled.
A new proposal can be formed in the Polkadot-js/apps [Democracy](Polkadot/Substrate Portal ) tab. The action, such as 'force transfer balance from account A to account B', is encoded in a preimage, and the hash of the action is called preimage hash.
Since the preimage can be quite large (hence costly to submit), you can submit a Proposal first which includes the preimage hash only, and submit the preimage (or have someone else submit it for you) later but before voting completes.
Step 1: Submit a Proposal
By clicking on the Submit preimage button, then fill in the action you want to propose, copy and note down the preimage hash 0xf7b547b996c77dd7ac16685dbf47bf34eb9c6643b8e94d7d2e16db400c0c556a. Once you noted down the hash, you can now cancel the prompt.
Submit a proposal by clicking on the Submit a proposal button, and pasting in the preimage hash to submit it. Then the proposal will appear in the proposal table.
Step 2: Submit the Preimage
Before voting of your proposal completes, you will need to submit the actual preimage. Otherwise, it cannot be enacted on-chain. You can repeat the ‘Submit a preimage’ process as previously mentioned, and click the ‘Submit preimage’ button to send the transaction.
Vote on a Referendum
Once a proposal has been promoted to a referendum, it must collect sufficient votes to be enacted. Voting on a referendum requires bonding of tokens with a conviction of choice. High conviction means the tokens will be bonded and therefore locked for a longer time, but in turn we vote has more weight.
For more details, see the [Voting on a referendum]( Governance · Polkadot Wiki )
The active referenda are found in the [Democracy](Polkadot/Substrate Portal ) tab of Polkadot-js/apps.
2.6 Infrastructure
Table of Content:
2.6.1 What are Collators and who runs them?
Collators produce parachain blocks and send them together with a proof-of-validity (PoV) to Relay Chain validators for validation and finalization. Collators do not need to be trusted because the security of parachains comes from the Relay Chain validators.
Collators are, however, necessary for availability and their operation comes at the cost of infrastructure and maintenance. To keep a healthy market for collator operation, Integritee Network accepts treasury proposals where expenses must be detailed transparently to get reimbursement in TEER.
2.6.2 What are Sidechain Validators?
Sidechain validators (SCVs) operate second-layer sidechains. Block production and validation happen in TEEs. Therefore, the validators can trust each other and the consensus protocol is greatly simplified, leading to superior scalability in terms of both latency and throughput. It is expected that sidechains will need to operate no more than a handful of SCVs to guarantee availability.
SCVs pay fees in TEER in order to register their TEE’s remote attestation (RA) on the parachain, and to gain finality on the sidechain blocks. RA is needed to know the exact software that is executed on the SCV and it also guarantees that this software is executed by genuine TEE hardware operated with the latest security patches.
SCVs have to regularly renew their RA and pay fees in TEER, so they should only be relied upon by their users if they can show they have enough TEER to pay fees during a reasonable upcoming time span. Integritee does not incentivize SCVs because they are dApp-specific. It is up to the stakeholders of each dApp project that deploys on Integritee to incentivize infrastructure providers. This gives projects deploying on Integritee a great deal of independence.
2.7 Privacy Technology: Trusted Execution Environments
A Trusted Execution Environment (TEE) is an isolated environment that uses both special-purpose hardware and software to protect data. In general, TEEs provide a “trusted environment” inside which computations and analysis can be run while remaining invisible to any other process on the processor, the operating system, or any other privileged access.
Moreover, the manufacturer can authenticate each TEE and provide remote attestation to a user to confirm that her untampered program is actually running on a genuine TEE, even if the machine is physically located in an off-site data center.
Assuming we trust TEE manufacturers’ integrity and design competence, TEEs allow us to execute any state update without sharing our data with the blockchain validator or other users. Private token transfers, private smart contracts, and private state channels thus become possible, with little computational effort.
Table of Content:
- 2.7.1 What is a TEE?
- 2.7.2 What is remote attestation?
- 2.7.3 How we use the technology to make confidential computation publicly verifiable
- 2.7.4 Intel SGX
2.7.1 What is a TEE?
A TEE is a secure part of the CPU, or you may envision it as a coprocessor. It manages its own cryptographic keys, where the hardware manufacturer guarantees by the design that nobody, not even the system administrator or the OS, have access to those keys of the TEE or can read its memory. These characteristics allow completely confidential and untampered execution of software. It is commonly used to store secrets like fingerprints in encrypted form.
2.7.2 What is remote attestation?
The goal of attestation is to convince a third party that a specific piece of code is running on a genuine and secure TEE. This is initiated by the TEE upon a request of the third party. Usually, the process is as follows. It compiles some data about itself in a so-called enclave quote, which might contain the following:
- The TEEs unique identifier
- Security related hardware context, e.g. the microcode version.
- The enclave measurement, .i.e, essentially the hash of the enclave binary
- Maybe some software vendor information.
Subsequently, this data is sent to the hardware manufacturer, which verifies the report and responds with the remote attestation, signed by the hardware manufacturer's well-known certificate. This attestation confirms:
- That the enclave is indeed a genuine TEE of the hardware manufacturer.
- That the TEE microcode is up-to-date (to guarantee patches against the latest known security vulnerabilities).
- The specific software running in the enclave.
By verifying the remote attestation’s signature, the user has a proof that the TEEs is genuine, secure, and that it is running the expected software.
2.7.3 How we use the technology to make confidential computation publicly verifiable
In 2.7.1.) we have seen that a TEE can execute operations confidentially. In 2.7.2) we have shown how a third party can verify what kind of computations are run within a TEE. Here, we demonstrate how Integritee uses these features to make computations publicly verifiable.
A classical use case for remote attestation involves a service provider (SP) like a video streaming service which wants to be sure his viewer application runs on a genuine SGX hardware and respects the digital rights management (DRM). The SP therefore requests a quote from the application and sends that quote to Intel Attestation Services (IAS) who sign off the quote if it is genuine. The issue here is that IAS only talks to registered clients. You need to register in order to get a service provider ID (SPID), which needs to be supplied along with requests.
The above is practically infeasible, as every client needs to sign up with IAS, which is why Integritee has changed the protocol. The service provider’s application and the enclave run on the same hardware. The integrite-worker itself will request a remote attestation with its enclave, and write the response by IAS to the public registry on chain. With this scheme, only Integritee operators need to register with IAS, while the clients can be sure that the operator run the correct application, without harming confidentiality of the user data.
\*Integritee-worker: Overarching term for a hardware running any kind of business logic in a TEE.
2.7.4. Intel SGX
Intel’s SGX is a specific TEE technology developed by Intel. It comes in the form of hardware-based encryption that is built-in to many Intel processors released in the last years. It enables system memory to be split into so-called enclaves — private, hardware-encrypted areas within RAM. Enclaves operate a bit like a secret vault, where applications can process sensitive data without the risk of it being exposed.
Table of Content:
2.7.4.1 Why SGX and not other technologies
There are other approaches on how to provide confidentiality and verifiability, where the most famous are probably zero-knowledge-proofs. However, there are always trade-offs. As an example, zero-knowledge proofs do not scale at all with the current technology. We claim that it will take years for the technology to evolve to be performant enough for many business cases.
From a security perspective, however, TEEs are the only solution providing an additional security layer to prevent attacks with system admin privileges. Not even the OS, nor the system admin, can read and execute data within a TEE. The last open question here would be: Why SGX and not other TEE technologies? Here the answer is simple; only Intel SGX currently provides remote attestation. As soon as other technologies become available, we will consider incorporating them into our repertoire.
2.7.4.2 Intel SGX Security Design
Intel SGX solves many security issues. Nevertheless, there are some known security exploits that should be mentioned because knowing them, allows mitigating them. One should be aware that this is probably incomplete, even if it is to the best of our knowledge.
Attack Vectors & Mitigations due to SGX properties
The following enclave properties could be used in attack vectors.
- An enclave has no way to control how many instances of that enclave are instantiated
- An enclave process can be interrupted at any point.
- An enclave is stateless. The encrypted state lives on the untrusted host and is therefore subject to interference, like deletion or providing an old state.
- Monotonic counter and trusted time provided by Platform Services (PSE) rely on Intel ME, which doesn't have a good reputation for security.
These properties should be generally considered, when designing enclave code, but they also lead to a few attack vectors that are discussed below.
Rollback/Replay Attack
Attack: Provide an outdated state to the enclave to re-execute an already executed operation. This could be used to trigger a double spending attack, but also to re-execute random operations, which might leak secrets if the randomness is not strong enough.
Cause: 3.)
Countermeasure: Blockchain registers the hash of the latest state, so a state update is only valid when it refers to the latest registered state.
Global State Malleability
Attack: An enclave ecall can be interrupted at any time by interrupts. Instead of returning after the interrupt, an attacker can then call the same ecall again.
Cause: 2.)
Countermeasure: Apply verify-first-write-last paradigm, not only for sealed storage, but also for global state variables.
Reentrancy & Global State Malleability
Can be considered a special case of the Rollback attack, which is similar to the smart contracts reentrancy attack.
Cause: 2.) & 3.)
Countermeasure: Apply verify-first-write-last paradigm.
Other Attack Vectors & Mitigations
Man-In-The-Middle-Attack (MITM-Attack) by Intel
Attack: Intel could attack a service provider by always replying to RA requests positively, and put a simulated enclave as a MITM. Intel could target specific providers as it knows which SP is requesting a RA based on the SPID.
Countermeasure: None, but trusting Intel is part of the security model anyhow.
For further education, please see the black hat presentation by Swami at 34:50.
Foreshadow
Foreshadow is a specific side-channel attack, which compromised both integrity, confidentiality, and therefore remote attestation. It has been fixed in Intel’s recent microcode.
Countermeasures: Update the SGX hardware, and verify that SGX is up-to-date for all enclaves. IAS contains that information and will issue a warning if the SGX microcode is outdated.
WireTap
WireTap allows an attacker with physical access to the machine to extract secrets from an SGX enclave and to fake remote attestation by means of DRAM interposition.
Countermeasures:
- Make sure to only authorize machines located in a secure environment for your application where physical access is restricted.
- Use CPU families which are not yet (or no longer) affected by this attack.
- Read Intel's guidance
2.8 History
Integritee is a Zurich-based startup that was founded in 2021 by Alain Brenzikofer and Waldemar Scherer. However, the technical work on the project started in 2018. As of now, we plan to execute and deliver on our roadmap for this year. If you see our planned roadmap for 2021, you can see we’ve delivered on everything we said we would in a very short period of time. We will be focusing on a Polkadot parachain slot and on becoming the leading privacy solution in the Polkadot/Kusama space.
2.9 Roadmap
2024
Q4
- Launch of Incognitee in Beta on Integritee Network Mainnet
- Launch of Incognitee in Beta on Polkadot and Kusama Mainnet
- Ledger support for TEER
- Launch of Guess the Number Contest
- Launch of Referral Campaign
- Release Sidechain SDK v 0.15.0
Q3
- Release Sidechain SDK v 0.14.0
- Participation in Polkadot Decoded
- Launch of Incognitee TEERdays campaign
- TEER available on Telenova Telegram app
Q2
- Launch of Incognitee User & Bounty Campaign
- Launch of treasury grant program
- Release Sidechain SDK v 0.13.0
- Release of unpermissioned Collators
Q1
- Launch of Incognitee Public Testnet
- Launch of Public referenda for TEER holder
- Issue of first Treasury grant
- Listing on Basilisk DEX
- Participation in Polkadot Sub0
2023
Q4
- Implementation of final fee burning mechanism
- Launch treasury grant program and bounties
- Release of Sidechain SDK v 0.13.0
- Brand refresh and new Website
- Go-Live of first projects on Integritee Mainnet
- DEX Listing
Q3
- Release of DCAP Attestation on Integritee Network
- Release of Attesteer service for TEEs via API
- Integration of Attesteer service with Securitee
- Release of Sidechain SDK v0.12.0
- Winner of Security Vertical at Top100 Swiss Start-up Awards
Q2
- Release of DCAP Attestation on Integritee Network
- Release of Attesteer service for TEEs via API
Q1
- Partnership with Enclaive
- Launch of Securitee Confidential Computing Platform
- Launch of Integritee Governance Platform on Polkassembly
- Release of Teeracle as Add-on on Securitee Platorm
2022
Q4
- Partnership and XCM Integration with Bifrost
- Release of Sidechain SDK v.0.10.0
- PoC for EVM compatible Sidechains
Q3
- XCM Integration with Karura and Moonriver
- Polkadot Parachain slot secured
- Partnership with Crust
- Release of Sidechain SDK v.0.9.0
Q2
- Migration from Solo to Kusama
- Parachain Release of Sidechains Benchmark
- Network Decentralization: Remove Sudo and enable coin voting with
- TEER Listing on Kraken Exchange
- Finals of eurobits ESCO Startup Award 2022
Q1
- Kusama Parachain slot secured
- Release of Sidechain Demo
- Collaboration with OVH Cloud and Intel
- Named 1 of 10 promising Swiss startups by EU Startups
2021
Q4
- Mainnet & Token Launch
- First deployment and practical use case hosted on the Integritee mainnet: the US dollar exchange rate oracle
- List TEER on major exchange Gate
- Start of Integritee Ambassador Program
- Partnership with Ajuna, KILT, Fractal
Q3
- New Brand and Website relaunch
- Move from SubstraTEE to Integritee
- Release Tokenomics paper
- Participation in public slot auctions on Kusama
- Start of Community Growth
- Series A Round Close
Q2
- Spin-off from SCS and birth of Integritee AG
- Seed Round Close
Q1
- Launch Rococo Testnet Parachain
- Conceptualize and Preparation of Spin-off
2020
- Polkadot Treasury Grant “SubstraTEE scalability”
- Development Prototype Platform based on SubstraTEE
- First deployed and running use case with Encointer on the Platform
- 3rd Web3 Grant for: SubstraTEE extension pack
2028-2019
- First SubstraTEE Meetup to demonstrate private token transactions.
- Release of the Encointer Whitepaper – “Local Community Cryptocurrencies with Universal Basic Income” and start of the SubstraTEE journey\
3 Our Technology
Integritee offers a wide range of products and services based on blockchain technology. These are suitable for developers, but also companies who are looking to keep their data confidential while it’s being processed. Our list includes a software development kit, for trusted off-chain workers, L2 sidechains and oracles, and a decentralized attestation service for TEEs. All these are TEE-based, so security and confidentiality are natively considered. Take a deeper dive into our products and services.
Software Development Kit
We make developers' life easier who wish to build sidechains or trusted of chain workers on our network by providing them with our own Software Development Kit (SDK) and hide most of the complexity of dealing with TEEs.
Attesteer
As the name suggests, the Attesteer is an attestation service designed to authenticate the validity of Trusted Execution Environments in a decentralized and permissionless way.
TEEracle
Our TEEracle bridges the gap between web2 and Web3 and is a trusted oracle framework that makes Web2 data available to all projects in the Polkadot ecosystem, fostering interoperability. TEEracle is a solution that provides API data to any Substrate-based blockchain in a secure and efficient way.
Table of Contents:
- 3.1 Software Development Kit
- 3.2 Attesteer
- 3.3 Deployment Options
- 3.4 Scalable Secure Kubernetes Cluster for TEEs
- 3.5 Use cases
3.1 Software Development Kit
With our SDK, we give everyone the opportunity to use our technology exactly in the way you want. With the very liberal Apache2 license, you are free to develop, distribute and deploy your product any way you see fit.
Substrate Runtime Compatibility
Have you already developed substrate pallets for your (para-)chain but now want to add confidentiality and scalability?
The Integritee SDK is compatible with substrate runtime pallets. With a few lines of glue-code you can reuse your pallets and instantiate them inside an Integritee off-chain worker or sidechain. It is even possible to trustlessly interact between on- and off-chain runtimes
Table of Content:
3.1.1 Sidechains
Sidechains are L2 blockchains connected to our public Integritee Network parachain (L1). Scalability is one of any blockchain projects' toughest challenges. Sidechains emerged to tackle that issue. Moreover, they provide confidential state and processing of transactions.
But how does it tackle the scalability problem, exactly? Transactions to different sidechains (or shards) can be processed in parallel leading to much higher throughput over the entire network. TEEs allow for a simplified consensus algorithm which yields very fast block times, leading to low transaction latency. Another benefit of TEE-based sidechains is the fact that they can provide a very high degree of privacy in executed business logic.
While Polkadot itself already offers highly competitive scalability and flexibility compared to other L1 protocols, Integritee multiplies this potential on L2 and offers much lower latency. One other matter is Polkadot’s transparency: this feature might not be beneficial for everyone, especially if there is information one wants to keep confidential. Integritee’s sidechain allows a high degree of privacy. Performance is yet another issue. Although Polkadot is one of the fastest blockchains, some projects need even more. Responsiveness is key for many industries, such as gaming.
Direct Invocation
With direct invocation, a requester chooses one of the sidechain validators to send her trusted call to over an encrypted channel. The validator produces a sidechain block, executing pending transactions. The block gets finalized on the Integritee parachain and the state diff is broadcast to the other validators, who simply apply the diff to their copy of the state. The sidechain validators produce blocks with a customizable block time T and broadcast them to the other validators. Should a validator fail to broadcast a block (or the block doesn’t reach the next validator) that validator is skipped after a timeout.
.png)
Finality
Sidechain blocks are produced asynchronously to layer one at a higher block rate. Despite the integrity guarantees provided by the TEEs, these blocks are not final because forks on the sidechain can happen. Every sidechain block hash is anchored to the layer-one blockchain and gets finalized on layer one along with the block that includes its anchoring extrinsic.
3.1.2 Trusted Off-Chain Computing
Regular off-chain computing refers to offloading on-chain computation tasks to off-chain when they are expensive. However, the chain needs to be able to verify that the computation is legit. Our trusted Off-chain Workers (TOCW) are doing more than that and should not be confused with parity substrate’s off-chain workers. Our TOCW execute a custom operation in a TEE, and the chain can be assured that this operation has been executed correctly. This enables many more operations to be off-loaded off-chain, not only those that can be verified on-chain.
- ) Operations that should be executed confidentiality
- ) Any operation that is too computationally complex and does not need to be executed within one block.
- ) Operations that need to interact with other ecosystems, e.g., bridges to other blockchains or the Web2 (like oracles). See the chapter on the oracle framework below as an example.
We will go a bit more into detail here for case 1.). Those state transitions are triggered through on-chain extrinsics with encrypted payloads (indirect invocation).
Indirect Invocation
With indirect invocation, a requester calls a confidential dispatchable function (state transition) by signing a trusted call and encrypting it with the worker enclave’s shielding key. She then wraps the ciphertext into an extrinsic which she sends to the chain. The worker forwards all new blocks to the light client within the worker enclave where the ciphertext gets decrypted and the trusted call is executed in an encrypted state.
When using indirect invocation, all trusted calls need to pass through the chain to gain consensus on the ordering of transactions.
.png)
3.1.3 Oracle Framework
⚠️ Warning:️ The recently published WireTap attack affects the security of the TEEracle. Please carefully review the threat model for your application.
Blockchain oracles are entities that connect blockchains to external systems, thereby enabling, e.g., smart contracts to execute based upon inputs and outputs from the real world. Integritee aims to maximize interoperability by bridging the gap between Web3 and Web2. We provide a trusted oracle solution, which makes Web2 data available with non-repudiation to all projects in the Polkadot ecosystem and beyond: TEEracle.
TEEracle is a customizable framework to easily build trusted oracles that provide API data to any Substrate-based blockchain in a secure and efficient way. Source-authenticated data is served to our Integritee parachain and can subsequently be consumed by any other parachain in the network, through means of XCMP or read proofs. While TEEracle is currently tailored for projects in the Polkadot ecosystem, we are working on extending our oracle framework to build services that can provide oracle data also to block-chains outside the Polkadot ecosystem.
Our framework allows to implement timestamped custom oracle services, i.e., queries can be customized according to a project's specific needs:
- Custom data requests: The source of data, the content to be retrieved as well as the returned data type can be customized.
- Custom schedule: The frequency and duration of the queries can be flexibly adjusted.
TEEracle is relevant to any dApp provider in need of Web2 data. Let’s consider a flight delay insurance dApp. For the smart contract, Web2 information about delays must be transmitted to the blockchain. TEEracle enables to quickly build an oracle service that retrieves the required flight delay data for the smart contract logic. Another example use case that has been built on our network with TEEracle is the query and registration of the USD/TEER exchange rate on our parachain.
Using our framework, the oracle service is instantiated within a Trusted Execution Environment (TEE). The integrity of the TEE and the code executed within (in this case: the oracle service) can regularly be verified on our parachain through our complementary remote attestation service (see Attesteer). By setting the oracle service up in a TEE and verifying the services’ integrity, we can offer the security of a decentralized oracle and match the efficiency of a centralized provider. Some of the benefits of using our trusted oracle framework are the following:
- Secure and trustworthy by design: Instantiating the oracle within TEEs ensures the service’s cyber security, as the code is processed in a safe environment.
- Verifiable integrity: The integrity of the oracle service running within TEEs can be verified and registered on our Parachain, fostering transparency and user trust.
- Superior interoperability: Oracle services built with TEEracle can provide information to any blockchain.
- Highly flexible and customizable: TEEracle allows building custom oracle jobs – for example, freely choose the data source, content, data type, transformation and schedule.
Setting up the infrastructure for TEEracle-built oracles requires using nodes that support Intel Software Guard Extension (SGX) technology. We readily offer the required secure infrastructure with our subsidiary Securitee (see chapter 3.5).
3.2 Attesteer
⚠️ Warning:️ The recently published WireTap attack affects the security of the Attesteer. Please carefully review the threat model for your application.
The Attesteer is an API to the decentralized remote attestation on the Integritee Network. Remote attestation is a crucial aspect of deploying software within a TEE. It verifies the integrity and genuineness of the TEE and the software it is executing. The Attesteer ensures that a specific service is:
- running inside a genuine TEE enclave (guaranteed by manufacturer)
- on a fully updated system with the latest security patches applied
- genuine: that the software has not been tampered with or modified in any way.
Instead of registering with Intel, operators of TEE technology can use Integritee’s Attesteer service, which carries out remote attestation regularly. It is relevant to any user of TEEs seeking to benefit from public auditability and an effortless, seamlessly integrable service. While the information obtained using Attesteer is the same as with Intel’s remote attestation service (see 1-3 above), it becomes available on Integritee’s public unpermissioned network. In contrast to Intel’s offering, where only registered clients can verify the integrity of the TEE and process, Attesteer makes the process available and verifiable to any third party – a significant benefit, e.g., for institutions that want to prove data security and sovereignty to their customers or in case of data sharing collaborations between multiple parties.
The main benefits in brief of using Attesteer are:
- Verifiable Computing: The integrity of the processes running within TEEs is verified and registered on our public network, fostering transparency and user trust.
- Technology-Agnostic: The Attesteer aims to attest any type of enclave that supports remote attestation and implements its interface. Be it web3, web2 or enterprise infrastructure. In the near future, the Attesteer will also be able to verify the integrity of other manufacturers' TEEs (e.g., AMD SEV).
If you want to start using the API, check out the integration guide in section 4.5 .
3.3 Deployment Options
Integritee offers a range of possible deployment options. From single company services to consortial setups to entirely unpermissioned operation.
.png)
Unpermissioned operation
Even if we trust the TEE manufacturer’s ability and integrity, a decentralized application (dApp) should be operated by an unpermissioned set of infrastructure providers. Anyone who owns suitable TEE hardware should be able to support the dApp. Integritee allows you to establish unpermissioned operation of your off-chain workers or sidechain validators, while still ensuring integrity and confidentiality through remote attestation.
Permissioned operation
You may choose to operate all TEE hardware yourself or rent it with an SLA in a jurisdiction of your choice. It is up to you to define who may validate on your sidechain or run your off-chain workers. In any case, the Integritee parachain provides a remote attestation registry for public auditability of your services.
3.4 Scalable Secure Kubernetes Cluster for TEEs
Deployment of use cases built with Integritee’s SDK require server infrastructure that supports TEE technology. Via Securitee (Home - Securitee), our subsidiary, we offer infrastructure with a pre-installed scalable secure Kubernetes cluster for TEEs. It enables customers to deploy sidechain validator nodes and off-chain workers seamlessly and to scale up server capacities at any time if needed. It works in the same way as the open-source Kubernetes software, which takes care of container orchestration, management and scaling - just for TEE-based applications. In short, it is a great shortcut for deployment of any use case built with Integritee’s SDK, as you do not have to worry about infrastructure and configuration.
For more detailed information on the offering and the concrete steps to deployment, please check section 5.3.3. Securitee Offering.
3.5 Use cases
Our frameworks and products (SDK, TEEracle, Attesteer) serve a broad range of use cases. Our SDK can be used to develop any blockchain-based solution in need for speed, confidentiality and scalability. The TEEracle framework is equally flexible and can retrieve data for basically any smart contract application. Attesteer provides verifiable computation and privacy for all users of TEE technology - totally independent of the application or data processed within the TEE. Below, we listed only some of the typical use cases that we have seen evolving over the past months.
3.5.1 Sidechains
Gaming
Our shardable second-layer sidechains are an excellent fit for decentralized gaming providers. Blockchain-based gaming comes with exciting opportunities, such as asset tokenization associated with ownership for gamers and the opportunity for users to participate in steering the game through governance processes. However, decentralized gaming solutions often cannot compete with centralized gaming platforms with respect to performance. Also, game states must be kept confidential, so public on-chain data cannot be exploited by players' opponents. Integritee’s sidechain technology is used by decentralized gaming projects to leverage the benefits of blockchain-based gaming, while overcoming its current challenges. Sidechains' sub-second block production times (low latencies), their independent scalability of around 2,000 tps per Sidechain as well as the confidentiality of gaming states enable a high-quality decentralized gaming experience that will certainly increase the adoption of blockhain-based gaming.
Metaverse
The Metaverse is supposed to change our lives - a virtual parallel world based on Web3 full of engagement and opportunities for individuals. Each of us will be able to create new worlds and spaces, an individual avatar and decide in which world/room/environment, or even social interaction to engage. Nevertheless, similar challenges as for decentralized gaming have to be overcome. The Metaverse must be built on an infrastructure that offers a high-quality and high-performance experience. Moreover, the Metaverse will store much more than your email addresses and passwords. It will store your behaviors too. With such a large pool of senstive data, privacy and security of personal data must be guaranteed. Integritee’s sidechain technology is optimally suited to serve as the infrastructure layer for Metaverse projects by delivering speed and confidentiality. At scale.
Decentralized Identity
Decentralized identity (DID) is an emerging concept that gives back control of identity to consumers through the use of an identity wallet in which they collect verified information about themselves from certified issuers, such as service providers. The identity wallet with its stored identity-linking information then allows users to create their decentralized identity (in the form of cryptographic keys) and manage their access to service providers. DID providers use our technology to ensure the privacy, anonymity and sovereignty of their users' sensitive identity data. Integritee sidechains can be used to securely and confidentially store identity-linking information without opening up new security and privacy attack fields. Moreover, our Attesteer verifies that the identity-linking information is kept confidential and only used as pre-agreed - a strong enhanced value proposition for our DID partner projects, as its greatly increases the transparency and trust for their users.
Health and Wearables
Wearable and connected devices like smartwatches, fitness trackers and connected weighing scales have been a big growth sector in recent years. This upward trend is projected to continue. The shipment volume of connected wearable devices globally is projected to almost triple from 266 million units in 2020 to 776 million units in 2026. This is a highly competitive market with tech giants like Apple and Samsung joined by watch manufacturers and fashion brands seeking to diversify such as Casio, Fossil and Emporio Armani. Such devices rely on data-driven apps that enable users to upload their personal metrics, share their running routes, and compare their progress to the average for users of a similar age, weight, etc.
To achieve greater market penetration, consumers need reassurance that their health, location and other personal data will be securely managed. Challenger manufacturers need more data to compete with the biggest players. They could pool data insights with similar-sized firms, but this could potentially breach privacy laws and/or reveal sensitive business information to competitors.
Integritee can enable groups of manufacturers to engage in cooperative competition by pooling data insights. No participant has direct access to the underlying dataset, and all data can only be processed in pre-agreed ways. We would provide public auditability so that users can verify that no personally identifiable data is revealed to the device manufacturer or any third party.
Privacy Messenger Bridge
As users become increasingly aware of data privacy, encrypted messaging apps like Signal and Threema have exploded in popularity. In May 2021, it was reported that Telegram and Signal had achieved a 1,200% year-on-year increase in users. While it is great that so many people are placing greater value on their privacy, this has resulted in a fragmentation of messaging services.
Users need to manage multiple incompatible privacy apps. It can be difficult to remember which app to use to message a particular contact.
Integritee could be used to create a secure bridge between privacy apps. This would mean that you could message contacts from a range of privacy services with one app. All interfacing with messaging APIs would be carried out within a trusted execution environment (TEE), making data inaccessible to any other actor. Thanks to the public auditability , end-users could verify that their data was only processed within a TEE and was therefore never accessible to a third-party in an unencrypted state.
Smart Contract Sidechain with EVM for private and scalable DeFi without frontrunning
Integritee’s sidechains can be leveraged to deploy any smart contract logic, including smart contracts enabled by EVM, with privacy and scalability as additional benefits. A specific example is a DeFi application in need for scalability and/or privacy. With validators running inside a TEE, any sensitive information can be kept confidential, so malicious behavior like frontrunning can be avoided.
3.5.2 Trusted Off-Chain Computing
Digital Asset Exchanges
The majority of digital asset transactions currently take place through centralized digital asset exchanges. While they are fast and cost-efficient, the trader risks losing all deposited tokens in the case of hacking or fraud. Decentralized exchanges (DEXs) have seen rapid growth recently, which enable users to trade without a centralized intermediary and retain custody of their digital assets. However, these benefits come at the cost of high fees at times of peak demand, and latency of at least a few seconds.
Centralized exchanges are fast and cost-efficient but vulnerable to security breaches. Ultimately, the trader needs to trust the exchange owner. Decentralized exchanges tend to lack scalability, which leads to volatile costs and slower transaction times. They suffer from front-running because bids are transparent and can be arbitrarily ordered by a validator.
Integritee enables a hybrid exchange design that combines the speed of a centralized exchange with the trust and control of a DEX. All balances are managed in a trusted execution environment. This prevents any third-party from accessing a trader’s digital assets. The order matching engine is kept off-chain, which reduces the risk of frontrunning by other market participants.
CDN Subscriptions
Integritee could be used to restrict (narrow- or broadband) content delivery to paying users. Examples could be blogs, articles, video streaming, video-on-demand or music streaming.
Subscriptions are managed on-chain, as are payments (can be flat subscription fees or pay-per-use). A integritee-worker holds the content-encryption key pair (CEK). Only the worker enclave(s) can read this RSA private key. No consumers or publishers nor operators have access. Publishers commit their content (encrypted with the CEK (RSA+AES)) to IPFS and register the content on-chain, providing the IPFS url. Consumers request content from the integritee-worker over a TLS channel (can be https, wss, json-rpc, REST), which authenticates the consumer and looks up subscription status on-chain, fetches the requested content from IPFS, decrypts the content, and sends the content to the consumer over the previously established TLS channel.
Because the private CEK is known to all worker enclaves and never needs to be known to publishers or subscribers we do not need to trans-encrypt content. It doesn't matter at what time a consumer subscribes. The worker can deliver all prior content to the subscriber. The subscription metadata can include restrictions on archive access.
Pay per use bears the risks of leaking private information. We'd suggest maintaining subscription balances within the worker enclave, not onchain. This way, the public doesn't learn detailed usage patterns.
NFT-based access management
Our technology could allow inheritance schemes like passing all your passwords to your children in the case of death. Instead of a notary confirming your death, you could use a “dead man switch”, a regular confirmation every few weeks that you are still alive.
Storing encrypted shards of the shamir secret sharing scheme inside multiple Intel SGX enclaves operated by different service providers and combining multiparty-computation (MPC) and trusted execution environments (TEE) allows to safely authorize data retrieval and transmission only to the NFT holders, thereby mitigating the risk of leakage of private data, even if a few SGX enclaves should be compromised.
Such storage is much more secure than Dropbox or iCloud, where the administrators of these platforms, or hackers who achieve privilege elevation, have full access to all data stored on their machines. Such architecture also allows the aforementioned transmission of data access in the shape of an NFT from one user to another.
Various other use cases
Trusted off-chain workers provide similar advantages to the sidechains, without the high speed and the low latency, which means for use cases that don't require high performance and transaction throughput, a Trusted off-chain worker might be a less complex option.
\
3.5.3 TEEracle - Oracle Framework
⚠️ Warning:️ The recently published WireTap attack affects the security of the TEEracle. Please carefully review the threat model for your application.
There are many use cases for off-chain data in smart contracts. Here are some examples:
Gaming
Buying and selling virtual goods inside a game and trading it on a blockchain or using location data to unlock a new level requires a connection to off-chain events. Oracles come in handy here too.
Data markets
A data market simply provides (sells) data without caring about its use or who’s buying it. This information can be related to customers, the weather, the economy, and even machine operating parameters. In this sense, oracles that act like a data market are useful to increase the trustworthiness of the provided data. How? By verifying it.
Decentralized finance
Buy and sell rates from other markets are needed for smart contracts to make profound pricing decisions, and data is also important to assess the customer’s credit risks.
Prediction markets
When resolving a prediction market, off-chain data about the outcome of the predicted event is necessary, and oracles can provide that.
Decentralized Energy
This is yet another use case for an oracle, where data regarding consumption is essential. Renewable energy is a good example: wind power stations, solar panels, and plants are becoming more and more popular. Records of produced and consumed energy have to be recorded and made available to the underlying smart contract.
Supply chain
Oracles can also be used to improve the data quality in a supply chain and aid in its mass-market adoption. Applications could be customs declarations, location services with automatized payment, transport insurances, and much more.
Insurance
A reliable data source is crucial for insurances. It can bring great benefits in the case of smart contracts, by automatically calculating insurance premiums and releasing the amount in case of a loss.
In sum, there are countless use-cases for oracles. Although blockchains can deliver and store almost any kind of data, there is still the need to connect both on-chain and off-chain worlds. Oracles act as the connecting piece, delivering necessary – sometimes live – results to the on-chain layer.
3.5.4 Attesteer
⚠️ Warning:️ The recently published WireTap attack affects the security of the Attesteer. Please carefully review the threat model for your application.
The Attesteer is less about individual use cases. It is more about massively streamlining the process to have any kind of software in a TEE, and get public auditability via the on-chain attestation registry. This basically means that all aforementioned benefits about the confidentiality of a TEE and public auditability apply here.
Hence, the Attesteer is relevant for any use case handling data that falls under the GDPR law, or other user-sensitive data that the operator or business is prohibited to have insight on. Additionally, any mistrust an end-user has against the operator or business is removed due to the public TEE registry.
Particularly interesting use cases might be multi-party data analytics or secret provisioning.
Secret Provisioning
The more sensitive the data, the better it should be secured. Thus, secrets that are being provisioned should be handled in the most secure manner only, verifiably. This makes the Attesteer an excellent fit for attesting any kind of policy manager that, honestly, should always store its secrets in a TEE anyhow. We will soon offer some integrations with the Attesteer of well-known key stores, which will simplify the attestation of your existing keystore. The Attesteer could also function as the secret provisioner itself. An outlook of potential key stores we will support in the future:
- Hashicorp Vault
- Hardware Security Modules (HSM) supporting PKCS11 or KMIP APIs
- AWS Key Management Service (KMS)
- Azure Key Vault
- GCP Cloud KMS
- Venafi Encryption Director
Data collaboration/Multi-party analytics
Attesteer provides verifiable privacy together with public auditability - valuable features, especially in cases where trust between mutual stakeholders is required. An example use case is the collaboration on sensitive data between two or more parties. For example, imagine Company A and Company B seek to pool their customer data and Company C, a data analytics firm, provides an algorithm to analyze the data and derive innovative insights. Using TEE technlogy to process the data and the Attesteer service, the data is analyzed securely and privately and the integrity of the data and process is verified and registered on our public network. This way, all participating parties can transparently track whether their data has been secure and confidential at all times. Companies A and B can be sure that their data has not been exposed to the other involved parties, Company C is assured that its IP for the provided algorithm is protected and even the customers of Companies A and B can transparently monitor and verify that their data has been confidential at all times.
4 Development
Table of Contents:
- 4.1 High-level overview of components
- 4.2 SDK Versioning
- 4.3 Design
- 4.4 SDK
- 4.5 Attesteer
- 4.6 Demos
- 4.7 Performance Benchmarking
- 4.8 Hardware Diversification
- 4.9 Development Environment
4.1 High-level overview of repositories
This document describes the SDK version 0.13.0.
The SDK spans components from multiple Integritee GitHub repositories:
The SDK on each of these repositories has a release branch sdk-v0.13.0-polkadot-v0.9.42.
These repositories are interdependent, as described in the following diagram:
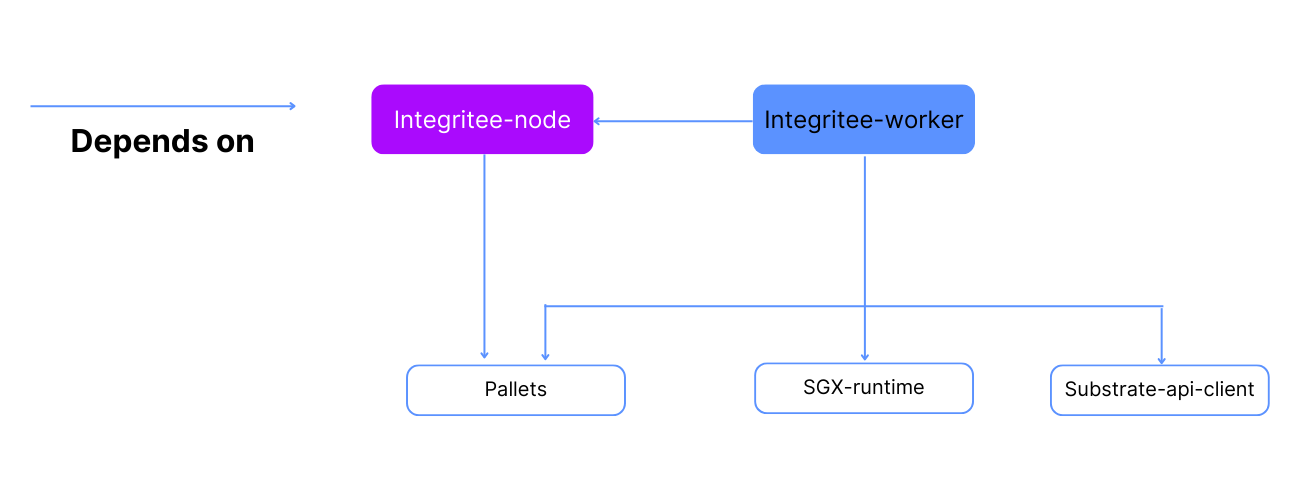
The different variants of SDKs are:
4.2 SDK Versioning
Our SDK is released on stable release branches. An SDK release branch is available for all the above mentioned repositories. Their respective cargo dependencies point to the correct release branches. E.g. the cargo.tomlin the worker will have the dependencies sgx-runtime and node-runtime defined as:
sgx-externalities = { ..., git = "https://github.com/integritee-network/sgx-runtime", branch = "sdk-v0.13.0-polkadot-v0.9.42" }
my-node-runtime = { ..., git = "https://github.com/integritee-network/integritee-node, branch = "sdk-v0.13.0-polkadot-v0.9.42", ... }
The versioning scheme of these release branches is sdk-v0.13.0-polkadot-v0.9.42. The first part (sdk-v0.13.0) denotes the version of the SDK itself, the second part is the substrate version that this SDK version is based on (polkadot-v0.9.42 in this example).
4.3 Design
Table of Content:
4.3.1 L2 Sidechain
Table of Content:
- 4.3.1.1 Motivation & Introduction
- 4.3.1.2 Multi-validateer setup
- 4.3.1.3 Block production
- 4.3.1.4 Validateer components
- 4.3.1.5 On-boarding of new validateers
4.3.2.1 Motivation & Introduction
What are the applications of such a sidechain, and what are its benefits?
In short, the sidechain allows us to synchronize state transitions and updates across multiple validateers. Being a blockchain, the sidechain can guarantee consistency, ordering of state transition executions, and traceability. We can decentralize a specific business logic and run it on many validateers independently while maintaining state consistency. A further benefit of running multiple validateers is scalability and load-balancing.
This section explains what a sidechain is and how it can be used to enable a coordinated multi-validateer setup.
First some clarification of terminology:
Validateer: Combination of the two terms validator and TEE. A validator in Polkadot is an agent that produces blocks for the blockchain, and TEE is a 'Trusted Execution Environment'. So, a validateer is an agent that produces blocks in a trusted execution environment. This represents a specialization of the more general Integritee 'worker', which does not necessarily incorporate a sidechain.
Sidechain: The sidechain is a blockchain collectively maintained by validateers (i.e. workers that produce sidechain blocks). In the context of Polkadot, this would be a layer 2 blockchain (0 being the relay chain, 1 the 'parent chain' or Parachain).
Parentchain: The layer 1 blockchain that is used by any Integritee worker (including the validateer). When run in the Polkadot ecosystem, this is the Parachain - otherwise, it's a solo chain.
4.3.1.2 Multi-validateer setup
.png)
Validateers use their light-client and 'node API' to communicate with the parent chain, which is maintained by a substrate node.
4.3.1.3 Block production
The block time of the parentchain is currently set to 12s. The validateers themselves produce sidechain blocks in intervals of 300ms. The block production and consensus algorithm used to produce sidechain blocks, is AURA. This means we have a defined set of authorities (i.e. validateers) that take turns in producing blocks. Each validateer (or more general, Integritee worker) is registered to the parentchain, thus defining the set of authorities. Time is then partitioned into slots of 300ms and each slot is assigned to a validateer in a round-robin fashion. As an example, with 3 validateers, each validateer will produce a sidechain block every third slot.
When a validateer produces a sidechain block, it broadcasts this new block to all of its peer validateers. How does it know its peers? As mentioned above, all validateers are registered on the parent chain. A validateer queries the parent chain to get the identities and URIs to communicate with all its peers.
Block production cycle
Depiction of the cycle each validateer runs for a slot. This is done in the slot worker component of a validateer. A cycle is triggered every 300ms.
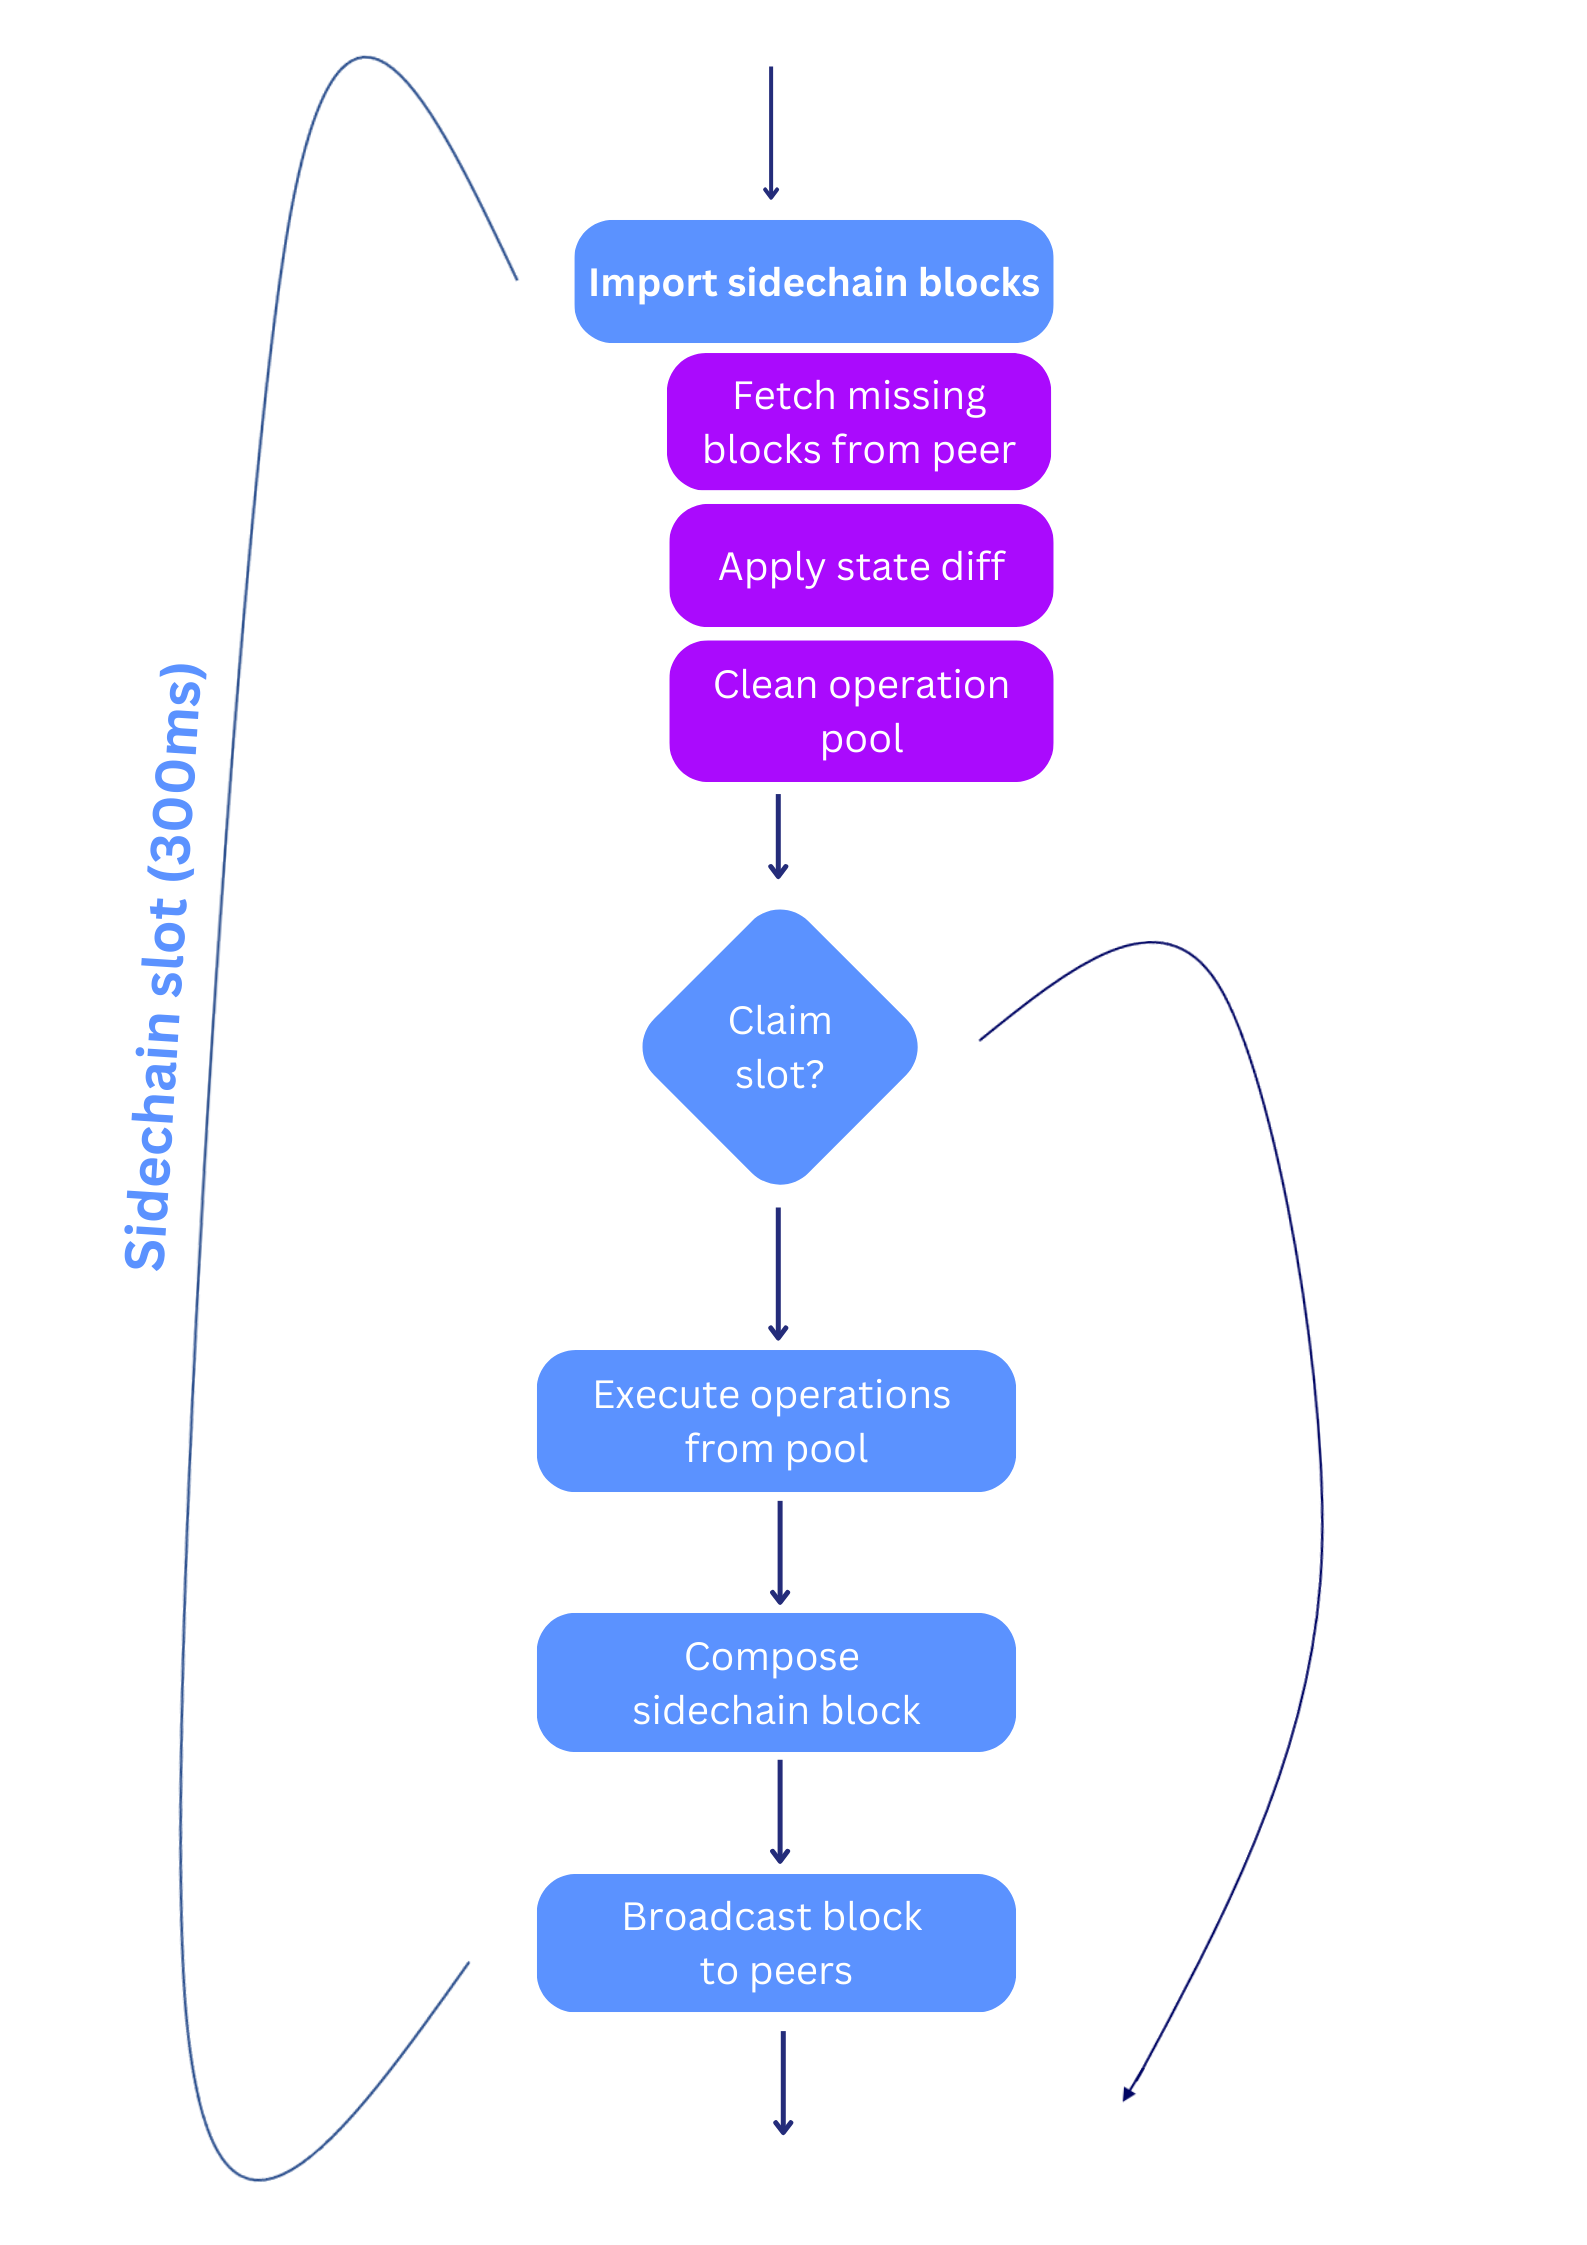
Explanation of the sequence:
First, the validateer processes the sidechain import queue. Sidechain blocks from the queue are imported until the queue is empty. Importing a sidechain block results in applying the state diff and removing executed operations from the trusted operation pool. It also includes potential fetching of sidechain blocks from a peer in case missing blocks were detected.
The next step is determining if the current slot should be claimed, meaning determining if it is this validateers turn to produce a block. If not, the slot cycle ends here.
In case the slot is claimed, a validateer starts executing trusted operations from the trusted operation pool until the allocated time limit is reached. The time limit is a configurable fraction of the slot time, currently set to 80%. The result of the trusted operations is a state diff which will be included in the sidechain block. With this information, the sidechain block will be composed. Once a sidechain block is composed, the validateer checks the slot time to ensure it's still within its claimed slot. If not, the block is discarded and the cycle ends. Otherwise, this new sidechain block is broadcasted to all peers, a parent chain extrinsic with confirmation of all executed operations composed and sent.
Note on the slot time: At various points during the cycle the slot time is checked, to ensure the slot time of 300ms is not exceeded. There are several cases where it still can happen. In order to prevent forks in the sidechain from happening, a sidechain block is only produced and broadcast when all the steps can be executed within the 300ms time window. Otherwise, it is discarded or not produced in the first place.
Scenarios where the slot time can be exceeded:
Block import stage:
The block import stage will import all the sidechain blocks it finds in the queue. This might also trigger a fetching of sidechain blocks from a peer when missing blocks are detected (further described in the on-boarding process). This whole process might take considerably longer than the slot time, but is necessary for further execution. If the time is exceeded here, the slot cycle will end after the import and be triggered again at the next point in time when a slot starts. This can potentially skip multiple slots including ones where this validateer should have produced a block. This is however not a problem, not producing a block during a slot does not endanger the integrity of the sidechain. And furthermore, the exceeding of the slot time because of block import should only happen in rare cases, e.g. during on-boarding or after being offline for period of time.
Trusted operation execution:
Slot time is checked after each trusted operation execution. Only a defined fraction (80% by default) of the slot time is allocated for trusted operation execution. Despite this precaution however, it is possible that the last executed operation takes too long and exceeds the allocated slot time fraction. In that case no block will be produced.
4.3.1.4 Validateer components
Let's have a brief, high-level look at the main components inside a validateer for the sidechain block production.
.png)
The validateer component is split into two areas, untrusted and trusted. The trusted area is everything inside the enclave (TEE) and what is exclusively accessible by the enclave, such as the state. Both the trusted and untrusted areas have an RPC interface. The trusted RPC interface is used to send direct invocation calls, which are then added to the trusted operation pool. The trusted RPC interface is also used when we broadcast sidechain blocks. This then internally fills the sidechain block import queue.
The slot worker component runs for every slot, imports sidechain blocks, executes trusted operations, and updates the state, as described in the chapter above. On the untrusted side we have a store for sidechain blocks, where we cache the last 100 blocks. This can be done on the untrusted side because sidechain blocks are signed, and any tampering could be noticed by verifying the signature. This store allows us to provide an RPC interface from which sidechain blocks can be fetched. This is relevant for the on-boarding process of new validateers which will be explained later.
4.3.1.5 On-boarding of new validateers
Onboarding is the process that happens when a new validateer is started and joins the set of validateers that have already been producing sidechain blocks for some time. On-boarding allows a new validateer to catch up on state and sidechain blocks to then start producing sidechain blocks itself.
Sequence diagram of onboarding a new validateer
In this scenario, validateer 1 has been producing sidechain blocks for some time and is then joined by validateer 2. The following diagram illustrates the sequence from the point of view of validateer 2 undergoing the onboarding process.
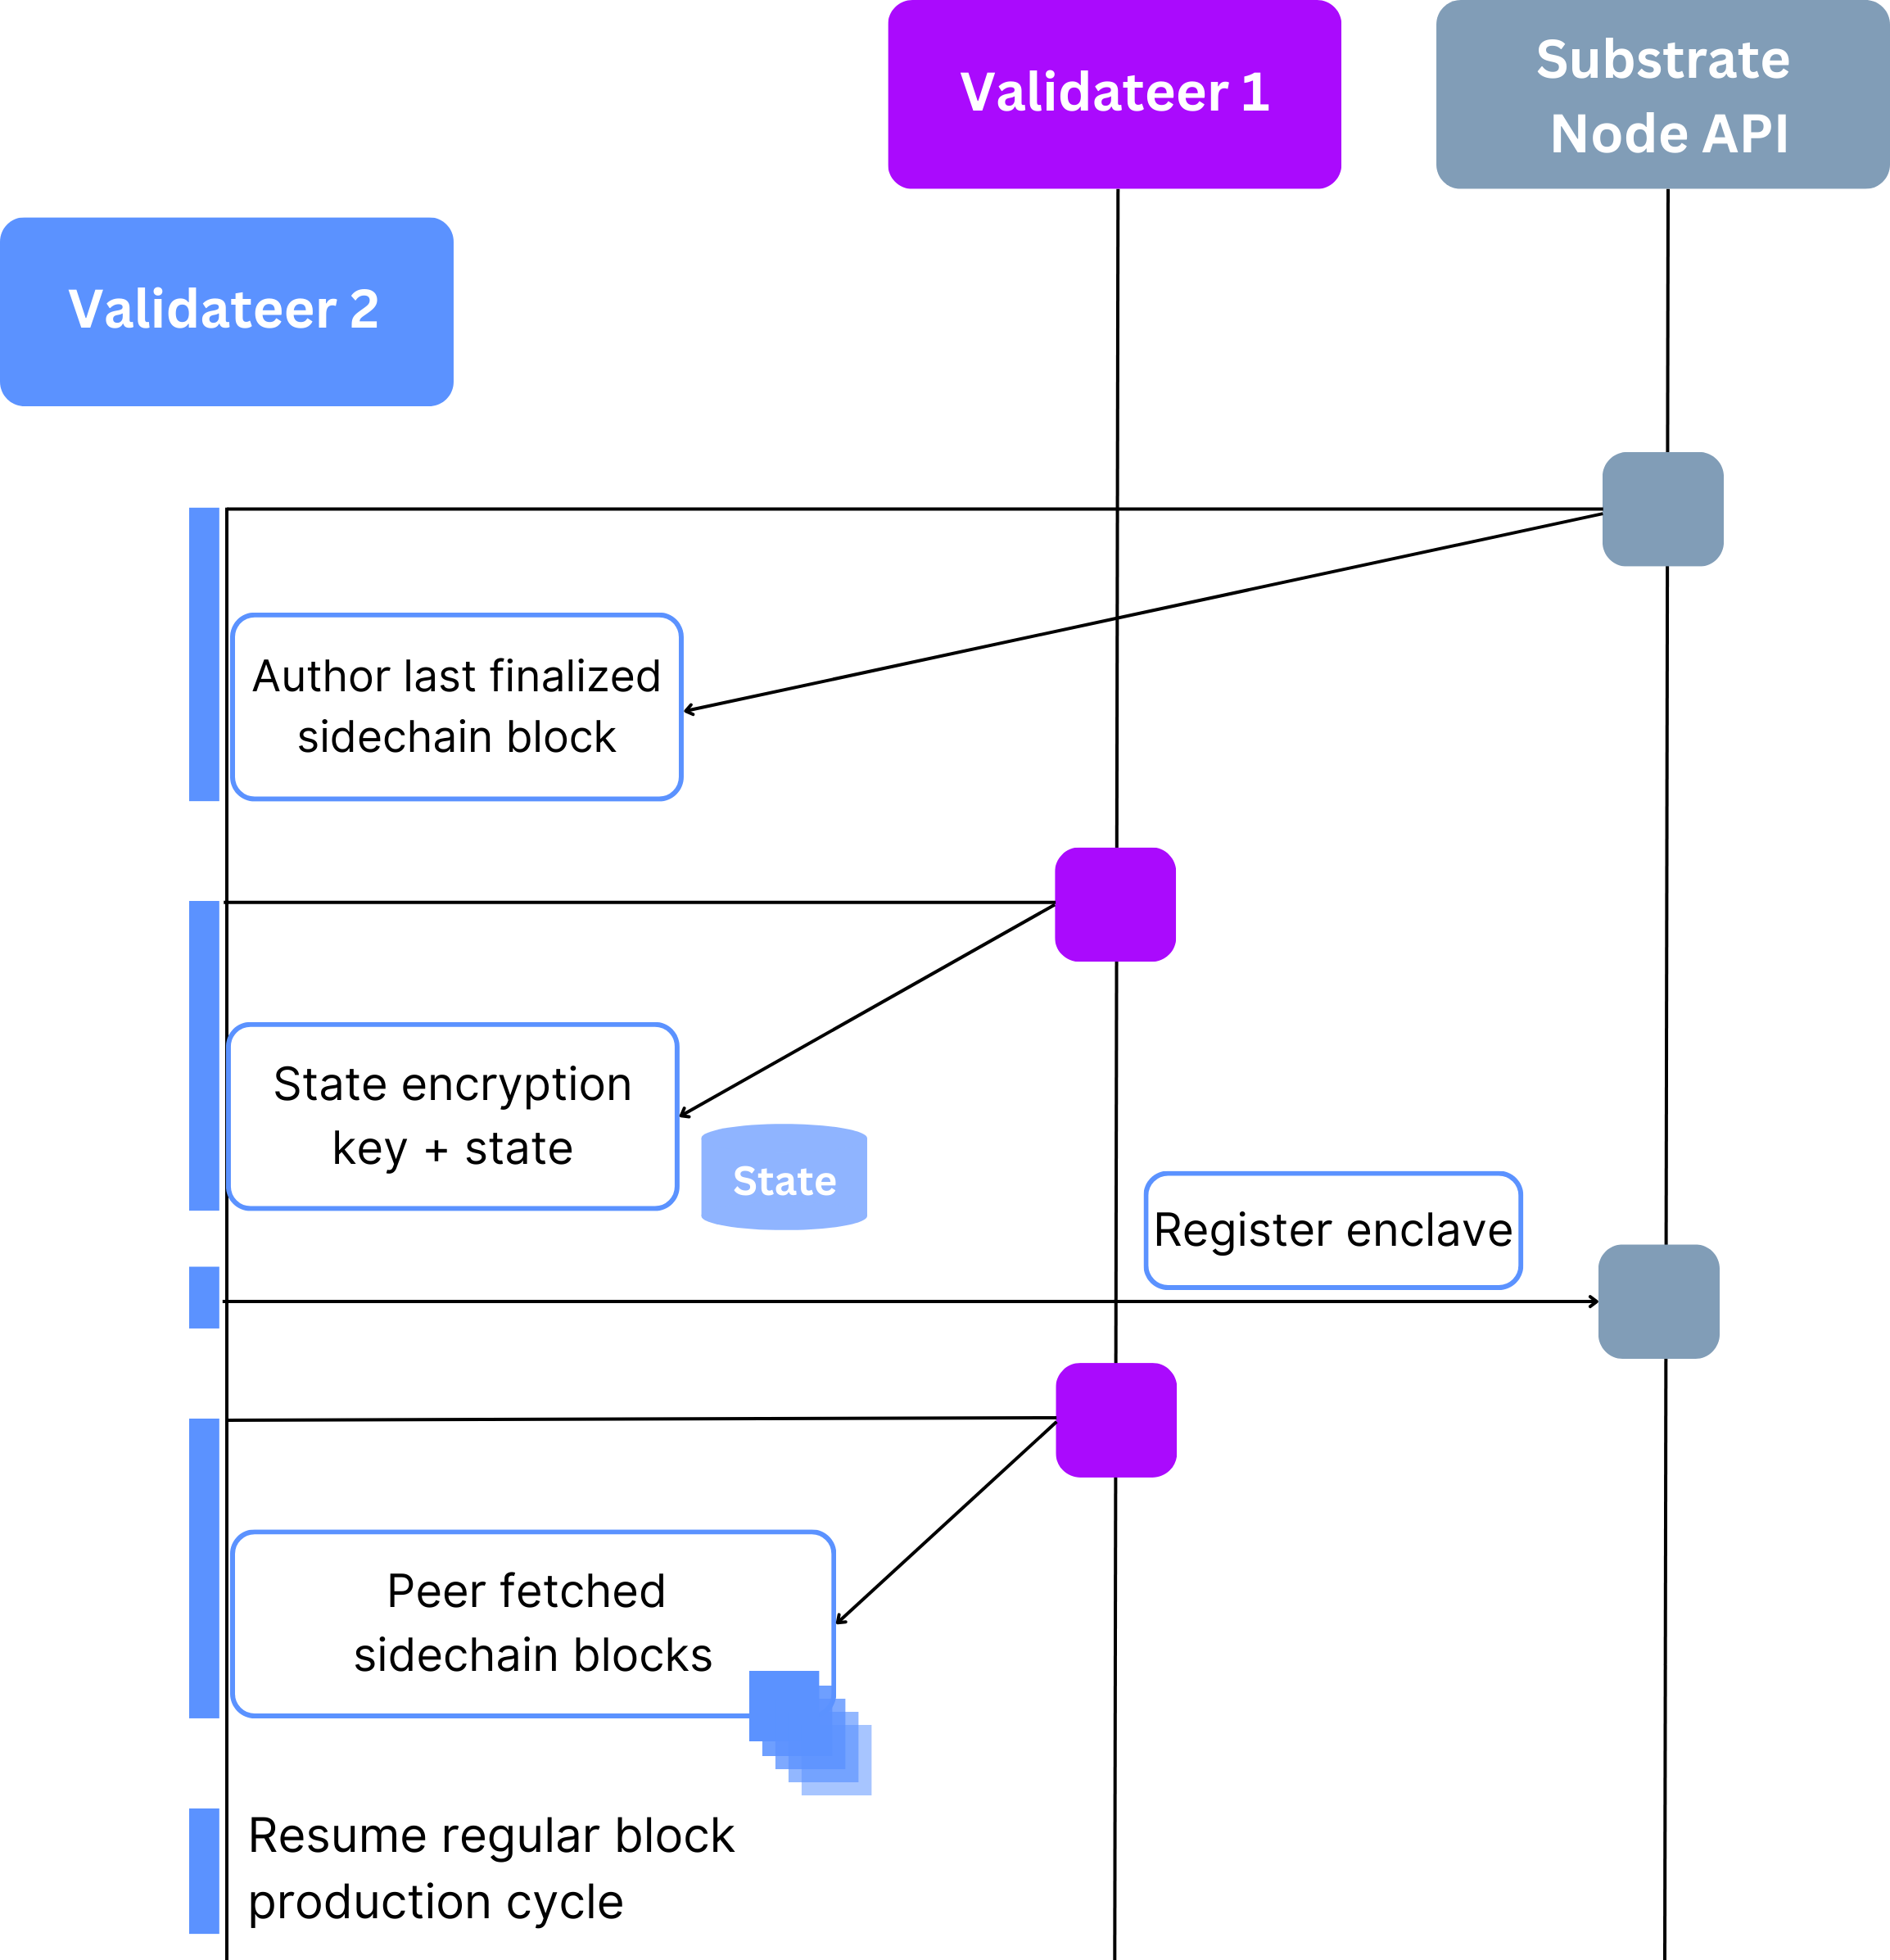
- On-boarding starts off with determining if there are other running validateers that have produced sidechain blocks. This is done by querying the parentchain about the author of the last sidechain block. As a result validateer 2 learns about the identity and URI of validateer 1.
- Note that in case there is no previous sidechain block and therefore no author, a validateer concludes that it's the first (or
primary) validateer.
- Note that in case there is no previous sidechain block and therefore no author, a validateer concludes that it's the first (or
- Validateer 2 then uses this information to fetch the state encryption key and state from this peer (validateer 1).
- Once this is done, validateer 2 registers itself to the parent chain and becomes part of the active (i.e. block producing) validateer set.
- Upon running the first slot cycle and importing sidechain blocks from the queue, validateer 2 notices it's missing sidechain blocks. Again it communicates with its peer, validateer 1, to directly fetch these missing blocks. As explained above, validateer 1 stores a certain amount of sidechain blocks in a database. Once these peer-fetched blocks are transferred and imported, the importing from the regular import queue resumes.
- And with that, validateer 2 is fully synced and can continue with the regular block production cycle, producing blocks itself now, every second slot.
Relationship between 'state' and sidechain blocks
In the onboarding process, both 'state' and sidechain blocks are transferred from one validateer to another. What is the difference and why are both required? In theory, all state information is contained in the sidechain blocks. In order to know what the current state is, all transactions/operations in the sidechain blocks from genesis can be computed and accumulated. This however means that computing the current state becomes more time-consuming as the blockchain grows. That is where the 'state' comes into play. The 'state' is a snapshot of the blockchain at a certain time (or block number). For example in a blockchain with 100 blocks, a state snapshot might be taken at block number 95. So in order to know the latest state (at block number 100), the state snapshot is taken and the last 5 blocks are applied to this state. This dramatically reduces the amount of computation required to arrive at the latest state.
In the current configuration, a sidechain state snapshot is taken after each sidechain block. So why do we need to transfer the state and then still fetch missing sidechain blocks? Because in between the time of fetching the state snapshot and starting the sidechain block production cycle, more sidechain blocks were already produced. Furthermore, only a certain number (currently 100) of sidechain blocks are cached in each validateer. This cache size has to be large enough to bridge the gap between receiving the state snapshot and starting the block production cycle. A cache size of 100 blocks and a block production time of 300ms means that a gap of maximum 30s can be bridged, which imposes an upper limit to the duration of the onboarding process.
\
4.3.2 System and Networking Overview
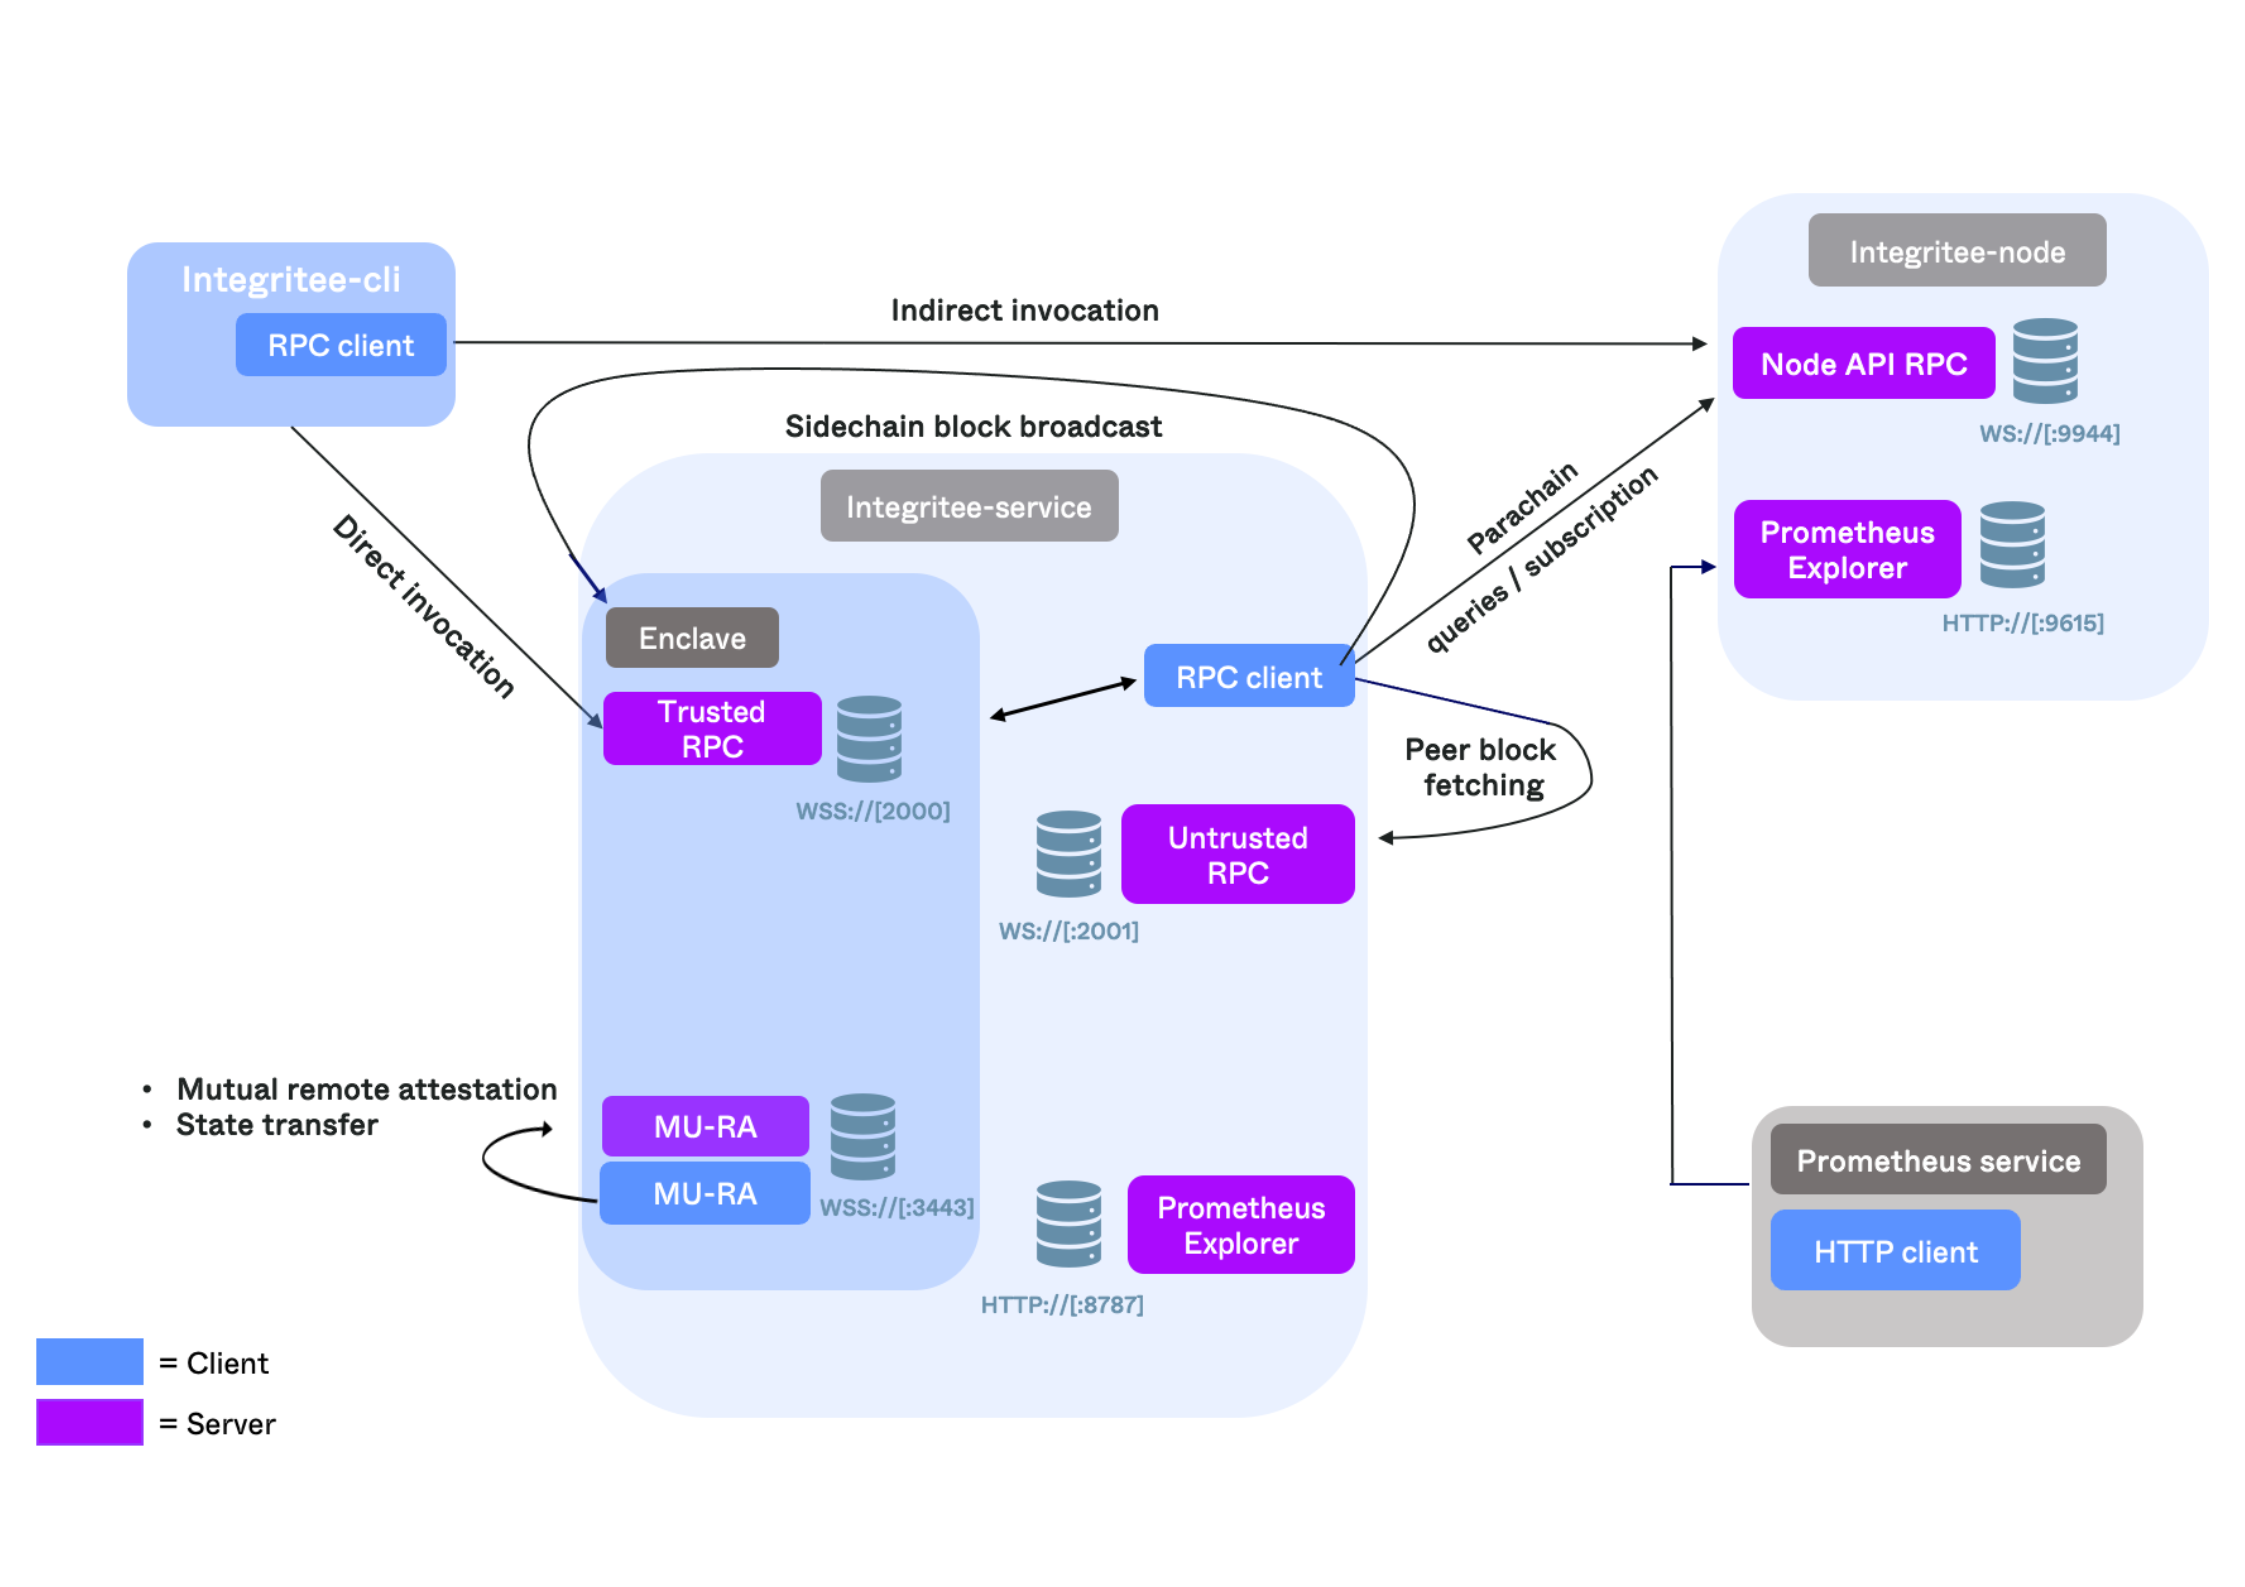
The diagram shows the system and networking overview of a possible Integritee deployment:
- integritee-service : The core Integritee service, hosting the TEE (enclave). Called
validateerin case sidechain blocks are produced - integritee-node : Substrate node for the layer 1 (aka parentchain) blockchain or parachain
- integritee-cli : Command-line interface client to interact with both the Integritee-service and the integritee-node
Server ports in the diagram are default values. They can also be set explicitly by command line arguments.
The Prometheus Service is an external monitoring service, scraping metrics from the integritee-service and integritee-node.
The integritee-service communicates among instances of itself. The following use-cases rely on this peer-to-peer communication:
- Mutual remote attestation (MU-RA), uses TLS secured websocket connection
- Sidechain block broadcasting, receiving end is an secure websocket server on the trusted side (enclave)
- Sidechain block fetching for on-boarding (provided by untrusted sidechain block storage)
The integritee-cli uses RPC to communicate with both the integritee-node, for parentchain state queries and indirect invocation, and the integritee-service, for direct invocation and sidechain state queries.
Networking example for a multi-validateer setup with local nodes
The following diagram depicts a multi-validateer setup with integritee-nodes running locally (i.e. on the same machine or container as the validateer itself). The integritee-nodes maintain the parentchain, the validateers the sidechain. Both blockchains use peer-to-peer communication to exchange blocks on their respective blockchain. A client like the integritee-cli can send extrinsics to any integritee-node (indirect invocation). The diagram shows the case of one that is running independently of any validateers. Or it can send an extrinsic directly to a validateer, using its RPC interface (direct invocation), again it does not matter which one, they are all synchronized.
.png)
4.4 SDK
Table of Content:
- 4.4.1 Sidechain SDK
- 4.4.2 Trusted Off-chain Worker
- 4.4.3 TEEracle - Oracle Framework
- 4.4.4 Custom Business Logic / STF
- 4.4.5 How To Access On-chain Storage
- 4.4.6 RPC Interface
- 4.4.7 Integritee Parachain Integration
4.4.1 Sidechain SDK
How to use the SDK
- Experiment with the template, running the sidechain demo.
- Fork the worker repository
https://github.com/integritee-network/worker.gitfrom the SDK release branch (sdk-v0.13.0-polkadot-v0.9.42). - Build the worker in sidechain mode.
- Write and integrate your own #business-logic-stf, e.g. in a substrate pallet.
- Deploy on the Integritee parachain or your own testnet.
Building the worker in sidechain validateer mode
In order to build the worker in sidechain mode, the corresponding cargo feature sidechain needs to be set. In the Makefiles, the environment variable WORKER_MODE is used to set the cargo features for the worker mode.
In case you build with make directly, do so with:
WORKER_MODE=sidechain make
In case you use docker with our build.Dockerfile, use --build-arg WORKER_MODE_ARG=sidechain to set the corresponding docker ARG.
An example of a docker build command (as currently used for GitHub CI):
{% code lineNumbers="true" %}
docker build -t integritee-worker --target deployed-worker --build-arg WORKER_MODE_ARG=sidechain -f build.Dockerfile .
{% endcode %}
Customizing a sidechain
Business logic / STF
This is the core part of the code changes necessary to turn the generic worker into your specific use-case. Read more in #business-logic-stf.
RPC Interface
In case you want to extend the existing RPC interface, #rpc-interface tells you how.
CLI Client
A simple CLI client implementation is available in the worker repository, to showcase communication with the worker, either by 'direct invocation' or 'indirect invocation'. For a sidechain validateer, 'direct invocation' will likely be the predominant way of communicating with a worker.
The CLI client uses JSON RPC 2.0 over web-socket to communicate with a worker (direct invocation and trusted getters), as can be seen here for example. The web-socket connection is secured by TLS with an enclave self-signed certificate.
4.4.2 Trusted Off-chain Worker
What is an off-chain worker?
A TEE off-chain worker (TOCW) is used to execute arbitrary computing in a trusted manner. A client submits these operations to a substrate 'parentchain', which can be either a parachain or a solochain. Usually, this will be the Integritee Parachain. The operations are opaque to the parent chain because they are encrypted. Only the client and the TOCW TEE can see the operation's content.
Sending an encrypted operation to the parent chain, which is then picked up and executed by a TEE off-chain worker, is called indirect invocation. An off-chain-worker only supports indirect invocation and 'getters'. In order to encrypt the operation, a client can query the off-chain worker directly (with a 'getter') for the 'shielding key', which is an RSA 3072 public key.
Multiple off-chain workers running in parallel share only the shielding key, but nothing else. They arrive at the same state independently by executing all the operations found on the parent chain, which guarantees ordering of operations.
What is the difference between an off-chain worker and a sidechain validateer?
An off-chain worker supports only 'indirect invocation', which means it executes only operations that are submitted to the parent chain (encrypted, in an extrinsic). As a result, the operation throughput is limited by the block production cycle on a parent chain. 'Direct invocation', available in a sidechain validateer, allows a client to send operations directly to a worker, allowing for much higher operation throughput. This is possible because the sidechain allows sharing and synchronizing states between workers, without having to rely on the parent chain.
How to use the SDK
- Experiment with the template, running the offchain-worker demo
- Fork the worker repository
https://github.com/integritee-network/worker.gitfrom the SDK release branch (sdk-v0.13.0-polkadot-v0.9.42) - Build the worker in offchain-worker mode
- Write and integrate your own business logic, e.g. in a substrate pallet
- Deploy on the Integritee parachain or your own testnet
Building the worker in off-chain worker mode
In order to build the worker in off-chain worker mode, the corresponding cargo feature offchain-worker needs to be set. In the Makefiles, the environment variable WORKER_MODE is used to set the cargo features for the worker mode.
In case you build with make directly, do so with:
WORKER_MODE=offchain-worker make
In case you use docker with our build.Dockerfile, use --build-arg WORKER_MODE_ARG=offchain-worker to set the corresponding docker ARG.
An example of a docker build command (as currently used for GitHub CI):
{% code lineNumbers="true" %}
docker build -t integritee-worker --target deployed-worker --build-arg WORKER_MODE_ARG=offchain-worker -f build.Dockerfile .
{% endcode %}
Customizing an off-chain worker
In case there are multiple off-chain workers, any of them will work, since they all share the same shielding key
- Business logic / STF
****This is the core part of the code changes necessary to turn the generic worker into your specific use-case. Read more in this dedicated section. - RPC Interface
****In case you want to extend the existing RPC interface, this section tells you how. - CLI Client
****A simple CLI client implementation is available in the worker repository, to show case communication with the worker, either by 'direct invocation' or 'indirect invocation'. For a sidechain validateer, 'direct invocation' will likely be the predominant way of communicating with a worker.
The CLI client uses JSON RPC 2.0 over web-socket to communicate with a worker (direct invocation and trusted getters), as can be seen here for example. The web-socket connection is secured by TLS with an enclave self-signed certificate.
Default client workflow for indirect invocation
Default workflow for executing operations on an off-chain worker from a client's perspective:
- Compose your trusted call, e.g.
TrustedCall::balance_transfer - Get the shielding key from an off-chain worker
- In case there are multiple off-chain workers, any of them will work, since they all share the same shielding key
- Encode and encrypt the operation using the shielding key
- Wrap the encrypted operation into a parentchain extrinsic
- Send the extrinsic to the parent chain
- Wait for the
ProcessedParentchainBlockevent, with the hash of the parent chain block including your extrinsic.
Examples of this workflow can be found in our CLI client implementation, here and here.
4.4.3 TEEracle - Oracle Framework
⚠️ Warning:️ The recently published WireTap attack affects the security of the TEEracle. Please carefully review the threat model for your application.
The TEEracle SDK facilitates submission of trustworthy oracle data into the Integritee parachain. It retrieves website or API data and serves source-authenticated data to the parachain.
Generic TEEracle
Coming soon!
Exchange rate oracle
We already have a running TEEracle connected to the Integritee parachain that supplies the TEER-USD exchange rate. This exchange rate will be used to offer stable USD fees.
The exchange rate values are from two different sources:
https://www.coingecko.com/
https://coinmarketcap.com/api/
These sources and are updated once per day.
How to use the SDK
- Experiment with the template running the teeracle demo.
- Fork the worker repository
https://github.com/integritee-network/worker.gitfrom the SDK release branch (release will be done in the next two weeks). - Build the worker in teeracle mode.
- Customize your own exchange rate oracle.
- Deploy on the Integritee parachain or your own testnet.
- Add the trusted sources to the Teeracle whitelist.
- Try the tutorial How to build a USD-DOT Oracle from the Template on your own testnet.
Building the worker in teeracle mode
In order to build the worker in teeracle mode, the corresponding cargo feature teeracle needs to be set. In the Makefiles, the environment variable WORKER_MODE is used to set the cargo features for the worker mode.
In case you build with make directly, do so with:
WORKER_MODE=teeracle make
Alternatively you can use docker with our build.Dockerfile. Then use the --build-arg WORKER_MODE_ARG=teeracle. An example of a docker build command (as currently used for GitHub CI):
docker build -t integritee-worker --target deployed-worker --build-arg WORKER_MODE_ARG=teeracle -f build.Dockerfile
Customizing an Exchange Rate Oracle
The following example customization describes how to add another currency pair because it is the easiest example. However, having an entirely customized teeracle with arbitrary is also possible with reasonable effort! A streamlined SDK flavor is coming soon! See #generic-teeracle.
Relevant code of the Teeracle:
- The core part of the exchange oracle-specific code is in the ita-exchange-oracle crate.
- The Teeracle is launched at the start of the service.
- The exchange rate value is fetched and updated within the enclave.
Scheduling
To change the update rate interval, you can change the default setting value or use a CLI argument**:**
./integritee-service run --teeracle-interval 5s15m2h1d
Trading pair
The trading pair consists of a crypto- and a fiat currency symbol. Ex: {"TEER", "USD"}. It is set at the start of the oracle service : teeracle-service.
To convert the currency symbols into the unique identifiers according to the source API standards, we use a map: Coinmarket Cap and CoinGecko. If your currency is not already listed in our mapping already, you will need to add it. It can be looked up in:
- https://coinmarketcap.com/api/documentation/v1/#section/Standards-and-Conventions
- https://www.coingecko.com/en/api/documentation
See How to build a USD-DOT Oracle from the Template on your own testnet as an example.
API Keys
Our Teeracle reads the API-Key from an environment variable.
- CoinGecko: Does not need an API-Key for the free plan.
- Coinmarket Cap needs an API-Key, which has to be set in the environment variable COINMARKETCAP_KEY.
Exchange Rate Oracle Source
To add a new exchange rate oracle, you need to :
- Create an oracle with a new source in the ita-exchange-oracle crate.
- New source
We query the exchange rate value via the REST API of the desired source. We use a TLS RestAPI client and explicitly check that the source's TLS-Root-Certificates are correct. This gives us non-repudiation, i.e, it is guaranteed that the result is indeed from the advertised source.
The code for our two sources can be found in Coinmarket Cap and CoinGecko.
The new ExchangeRateSource must:- Implement the OraclSource.
- Provide a valid root certificate and the HTTP request to the right endpoint.
- Define the mapping between the currency symbols and the ID used to identify the exchange rate endpoint.
- Implement the parsing of the JSON response data to get the exchange rate value.
- New oracle
Define a new type for your oracle in lib.rs and add thecreatefunction.
2. Get the exchange rate and create an extrinsic from within the enclave
In update_market_data_internal add your new oracle.
To remove an existing exchange rate oracle source, you need to: remove the oracle from update_market_data_internal
Add trusted source to whitelist
The teeracle pallet maintains a whitelist of trusted exchange rate oracles. A trusted source can be added to the whitelist with a privileged call via Sudo or Democracy.
Call : teeracle, addToWhitelist ( dataSource , 0x mrenclave_hex)
The dataSource is the base URL of the source: https://pro-api.coinmarketcap.com/ or https://api.coingecko.com/. The mrenclave_hex is written to the logs when the teeracle service starts.
{% hint style="info" %} Warning: The dataSouce must have
- no whitespaces at the end
- must have a "/" at the end. {% endhint %}
How to build a USD-DOT Oracle using the Template on your own testnet
-
Fork the worker repository
https://github.com/integritee-network/worker.gitfrom the SDK release branch (TODO release) -
Customize the trading pair:
- Replace "TEER" with "DOT" in file
- The DOT currency is listed in the: Coinmarket Cap and CoinGecko maps.
-
Build the worker in teeracle mode
-
Run an Integritee solo node in dev mode. The node runtime has the teeracle pallet
-
Coinmarket Cap needs an API-Key. Get it from https://coinmarketcap.com/api/documentation/v1/#section/Introduction and set it as an environment variable:
COINMARKETCAP_KEY="xxxxxxxxxxxx" export COINMARKETCAP_KEY` -
Run the teeracle service in dev mode with a smaller update rate interval 24s
cd bin ./integritee-service --clean-reset run --node-url <yournodeip> --node-port <port> --dev --teeracle-interval 24s -
Add Coingecko and Coinmarket_CAP to the whitelist with a SUDO call.
-
Check the events in https://polkadot.js.org :
teeracle.ExchangeRateUpdated.
You should get every 24s an event for https://api.coingecko.com/ and an event for https://pro-api.coinmarketcap.com/ with the USD/DOT exchange rate value
4.4.4 Custom Business Logic / STF
When building your own solution, based on the sidechain SDK or the offchain-worker SDK, a key task is to integrate your own business logic (also called STF, state transition function). Here we will show you how that is done in the Integritee worker.
General Concept
Introducing your own business logic is mostly done in the STF crate ita-stf. The template declaration contains some basic logic for transferring, shielding and unshielding funds, which you can expand according to your needs.
#![allow(unused)]
fn main() {
pub enum TrustedCall {
	balance_set_balance(...),
	balance_transfer(...),
	balance_unshield(...),
	balance_shield(...)
}
}
#![allow(unused)]
fn main() {
pub enum TrustedGetter {
	free_balance(...),
	reserved_balance(...),
	nonce(...),
}
}
The TrustedCall and TrustedGetter structs are the declarations of the business logic interfaces and should be extended to match your use-case by:
- Adding an enum variant of your call/getter
- Implementing what should be done for your enum variant in the ExecuteCall or ExecuteGetter block.
How to do that will be shown below.
Using Substrate Pallets
For developers who are used to writing substrate pallets, they can do so for the Integritee worker as well: Pallets can be imported and used inside the worker STF. This is possible thanks to our own adaptation of the substrate runtime to SGX (see the sgx-runtime crate).
An example is the existing implementation of balance_transfer, using the standard substrate Balance pallet (imported here):
{% code overflow="wrap" %}
#![allow(unused)]
fn main() {
TrustedCall::balance_transfer(from, to, value) => {
    let origin = sgx_runtime::Origin::signed(from.clone());

    // ...

    sgx_runtime::BalancesCall::<Runtime>::transfer {
        dest: MultiAddress::Id(to),
		value,
	}
	.dispatch_bypass_filter(origin)
	.map_err(|e| {
		StfError::Dispatch(format!("Balance Transfer error: {:?}", e.error))
	})?;

	Ok(())
},
}
{% endcode %}
This code snippet is from the app-libs/stf directory, and more specifically here.
Using your own code
You don't need to use a substrate pallet to implement some business logic there, you could also implement your own function like:
#![allow(unused)]
fn main() {
// This should be put in the `ExecuteCall` implementation block.
TrustedCall::set_magic_value(value) => {
    // All the code here is executed in the scope of the `state.with` function, see:
    //
    //     https://github.com/integritee-network/worker/blob/master/app-libs/stf/src/stf_sgx.rs#L130
    //
    // This gives you access to the underlying database via the `sp_io::storage` module.

    // Write value to state, which will be encrypted afterwards
    sp_io::storage::set(
        &storage_value_key("MyModule", "MyMagicValue"),
        &value.encode(),
    );

    Ok(())
},


// This should be put in the `ExecuteGetter` implementation block.
TrustedGetter::magic_value => {
    // All the code here is executed in the scope of the `state.with` function, see:
    //
    //     https://github.com/integritee-network/worker/blob/master/app-libs/stf/src/stf_sgx.rs#L146
    //
    // This gives you access to the underlying database via the `sp_io::storage` module.

    // Read value from state, which has been dencrypted before the trusted getter execution.
    let maybe_value_encoded =
	sp_io::storage::get(&storage_value_key("MyModule", "MyMagicValue"));

    match maybe_value_encoded {
        Some(ref value) => debug!("Found Magic Value: {:?}", value),
	None => debug!("Magic Value not found!"),
    };

    maybe_value_encoded
},
}
CLI Client
The CLI client in the worker repository is used as a driver for worker request (both direct and indirect invocation). So after you have implemented your business logic in the stf crate of the worker, you will want to extend the CLI client to support the new operations.
Main CLI
The overarching CLI is defined in the commands.rs, and looks as follows:
We observe that we have divided the commands to different categories, where the BaseCommand contains regular commands talking to the service or the parentchain node, the TrustedCli contains the subcommands talking to the enclave, and the OracleSubCommand is only for oracle related stuff.
#![allow(unused)]
fn main() {
use crate::{base_cli::BaseCommand, trusted_cli::TrustedCli, Cli};
use clap::Subcommand;

#[cfg(feature = "teeracle")]
use crate::oracle::OracleCommand;

#[derive(Subcommand)]
pub enum Commands {
	#[clap(flatten)]
	Base(BaseCommand),

	/// trusted calls to worker enclave
	#[clap(after_help = "stf subcommands depend on the stf crate this has been built against")]
	Trusted(TrustedCli),

	/// Subcommands for the oracle.
	#[cfg(feature = "teeracle")]
	#[clap(subcommand)]
	Oracle(OracleCommand),
}

pub fn match_command(cli: &Cli) {
	match &cli.command {
		Commands::Base(cmd) => cmd.run(cli),
		Commands::Trusted(trusted_cli) => trusted_cli.run(cli),
		#[cfg(feature = "teeracle")]
		Commands::Oracle(cmd) => cmd.run(cli),
	};
}
}
Extending the TrustedBaseCli
The overarching CLI proxies the arguments to the TrustedBaseCli, which looks like this:
#![allow(unused)]
fn main() {
#[derive(Subcommand)]
pub enum TrustedBaseCli {
	/// generates a new incognito account for the given shard
	NewAccount,

	/// lists all incognito accounts in a given shard
	ListAccounts,

	/// send funds from one incognito account to another
	Transfer(TransferCommand),

	/// ROOT call to set some account balance to an arbitrary number
	SetBalance(SetBalanceCommand),

	/// query balance for incognito account in keystore
	Balance(BalanceCommand),

	/// Transfer funds from an incognito account to an parentchain account
	UnshieldFunds(UnshieldFundsCommand),
}

impl TrustedBaseCli {
	pub fn run(&self, cli: &Cli, trusted_cli: &TrustedCli) {
		match self {
			TrustedBaseCli::NewAccount => new_account(trusted_cli),
			TrustedBaseCli::ListAccounts => list_accounts(trusted_cli),
			TrustedBaseCli::Transfer(cmd) => cmd.run(cli, trusted_cli),
			TrustedBaseCli::SetBalance(cmd) => cmd.run(cli, trusted_cli),
			TrustedBaseCli::Balance(cmd) => cmd.run(cli, trusted_cli),
			TrustedBaseCli::UnshieldFunds(cmd) => cmd.run(cli, trusted_cli),
		}
	}
}
}
As an example, we will look at the TransferCommand.
#![allow(unused)]
fn main() {
#[derive(Parser)]
pub struct TransferCommand {
	/// sender's AccountId in ss58check format
	from: String,

	/// recipient's AccountId in ss58check format
	to: String,

	/// amount to be transferred
	amount: Balance,
}

impl TransferCommand {
	pub(crate) fn run(&self, cli: &Cli, trusted_cli: &TrustedCli) {
		let from = get_pair_from_str(trusted_cli, &self.from);
		let to = get_accountid_from_str(&self.to);
		info!("from ss58 is {}", from.public().to_ss58check());
		info!("to ss58 is {}", to.to_ss58check());

		println!("send trusted call transfer from {} to {}: {}", from.public(), to, self.amount);
		let (mrenclave, shard) = get_identifiers(trusted_cli);
		let nonce = get_layer_two_nonce!(from, cli, trusted_cli);

		/// Construct the `TrustedOperation` containing the `TrustedCall` that we have
		// defined as interface to the business logic above.
		let top: TrustedOperation =
			TrustedCall::balance_transfer(from.public().into(), to, self.amount)
				.sign(&KeyPair::Sr25519(Box::new(from)), nonce, &mrenclave, &shard)
				.into_trusted_operation(trusted_cli.direct);


		// Send an RPC request to the enclave and execute the trusted call/getter
		// inside the STF and return the result.
		let _ = perform_trusted_operation(cli, trusted_cli, &top);
		info!("trusted call transfer executed");
	}
}
Conclusively, adding a new trusted command looks like this:
- Write the
MyCustomCommandstruct and define the arguments it should take. - Implement the
runfunction for it. - Extend the
TrustedBaseCliwith another enum variantCustomCommand(MyCustomCommand)
That's it. Simple, isn't it?
Example
4.4.4.1 Example: Encointer
Encointer is an example of a custom business logic implemented in a substrate pallet and then integrated into an Integritee validateer (i.e. with sidechain).
The basics of developing your own substrate pallet are explained in the substrate dev docs.
Encointer Pallets
Encointer has been developed as a substrate chain with 4 custom pallets added to the node-template:
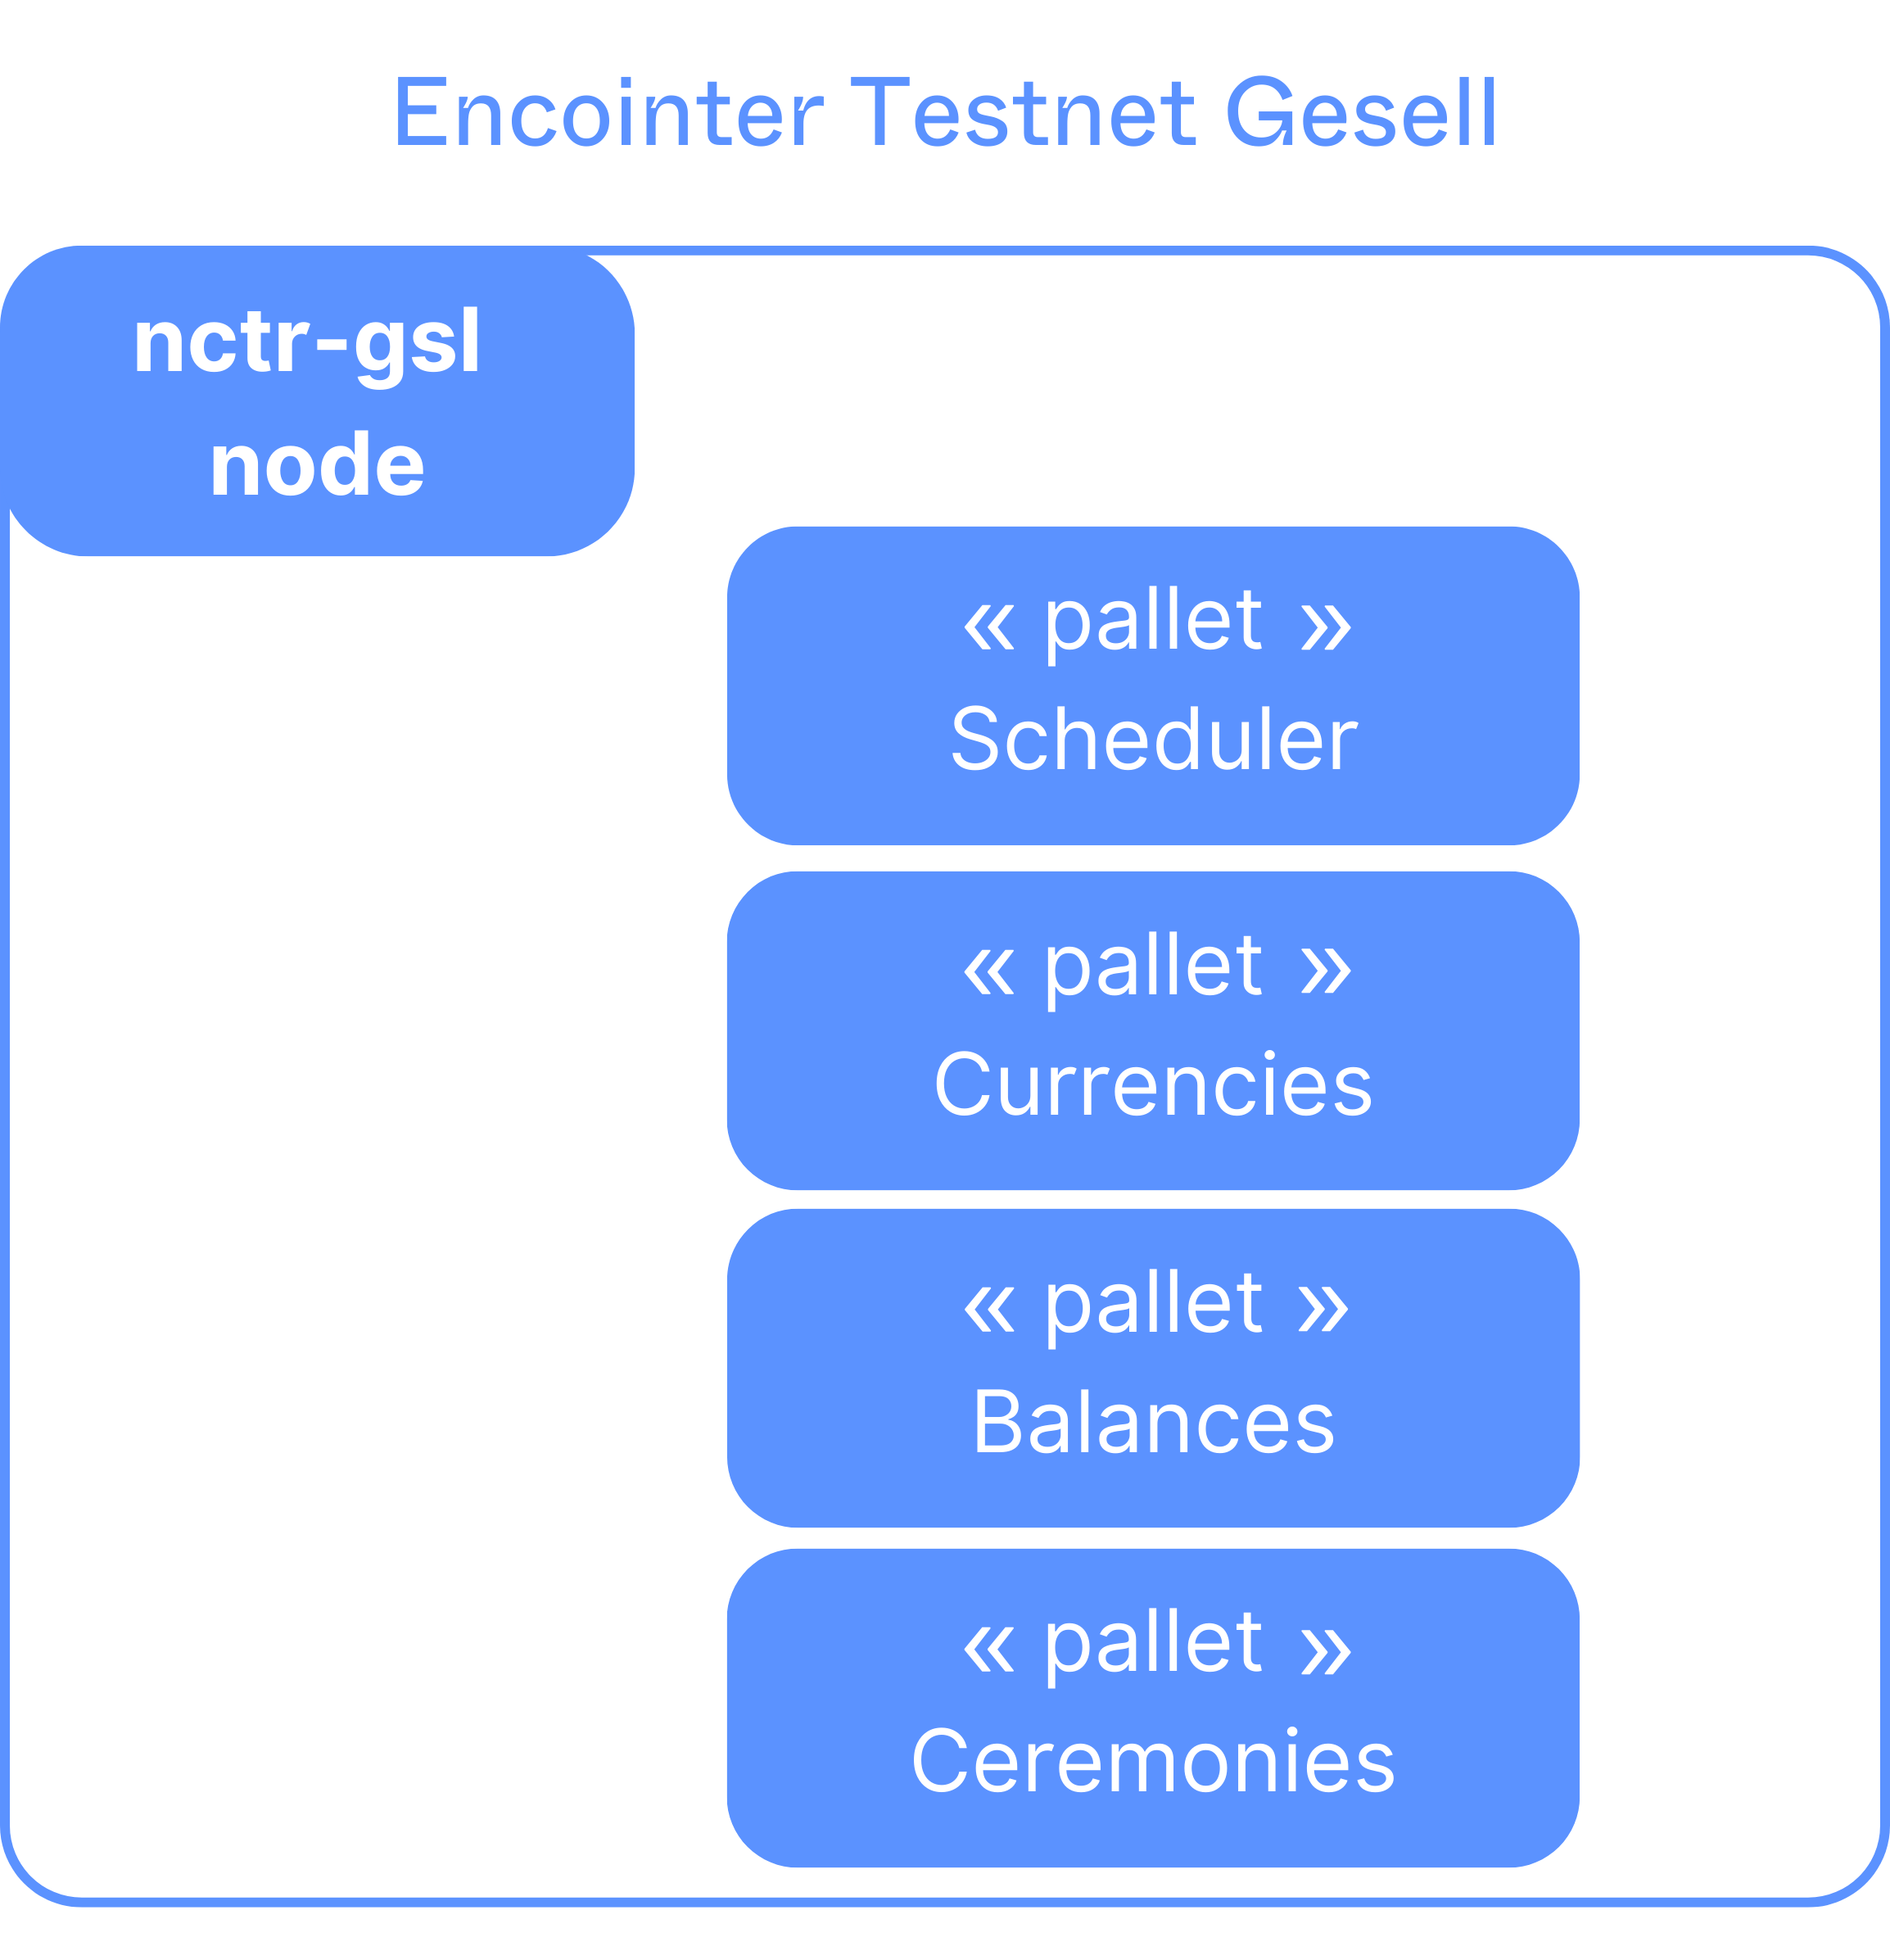
We will now show you how we can turn Testnet Gesell (all public) in to Testnet Cantillon, featuring confidentiality for sensitive pallets.
In order to protect the privacy of users, we will move the balances and ceremony pallets into the Integritee enclave. These pallets will still need to interact with the on-chain state, as indicated in the diagram below:
.png)
The final code can be inspected on encointer github.
TEE Runtime
Substrate chains wrap all their business logic into a runtime made up of pallets. Integritee does so too, so let's create our TEE runtime:
git clone https://github.com/integritee-network/sgx-runtime.git
this is actually a fork of substrate node-template, stripped from everything we don't need for our case.
Now we need to include our pallets balances and ceremonies exactly the way you're used to from substrate:
runtime/src/lib.rs
#![allow(unused)]
fn main() {
construct_runtime!(
    pub enum Runtime where
        Block = Block,
        NodeBlock = opaque::Block,
        UncheckedExtrinsic = UncheckedExtrinsic
    {
        System: system::{Module, Call, Config, Storage, Event<T>},
        Timestamp: timestamp::{Module, Call, Storage, Inherent},
        Balances: balances::{Module, Call, Storage, Config<T>, Event<T>},
        TransactionPayment: transaction_payment::{Module, Storage},
        Sudo: sudo::{Module, Call, Config<T>, Storage, Event<T>},
        EncointerCeremonies: encointer_ceremonies::{Module, Call, Storage, Config<T>, Event<T>},
        EncointerBalances: encointer_balances::{Module, Call, Storage, Event<T>},
    }
);
}
Looks familiar? If not, learn from the best
We will skip the nitty gritty of including your pallets
Integritee-node
The blockchain we'll be using is based on parity's node-template with one Integritee specific pallet that will take care of the worker registry and will proxy TrustedCalls
git clone https://github.com/integritee-network/integritee-node
Encointer will add its public pallets to this node template: scheduler and currencies. See encointer-node
Trusted Call
Now we need a way to call our custom pallet functions isolated in a TEE.
Integritee encapsulates all the application-specific stuff in its integritee-stf crate that you can customize.
git clone https://github.com/integritee-network/worker
Let's start by defining a new TrustedCall:
encointer-worker/stf/src/lib.rs
#![allow(unused)]
fn main() {
#[derive(Encode, Decode, Clone)]
#[allow(non_camel_case_types)]
pub enum TrustedCall {
    balance_transfer(AccountId, AccountId, CurrencyIdentifier, BalanceType),
    ceremonies_register_participant(AccountId, CurrencyIdentifier, Option<ProofOfAttendance<MultiSignature, AccountId32>>)
}

impl TrustedCall {
    fn account(&self) -> &AccountId {
        match self {
            TrustedCall::balance_transfer(account, _, _, _) => account,
            TrustedCall::ceremonies_register_participant(account, _, _) => account,
        }
    }
...
}
Important: The first argument of each TrustedCall has to be the incognito AccountId which will sign the TrustedCallSigned which will then be encrypted and sent to the worker through the blockchain as a proxy.
Now that we defined a new call we need to execute it:
encointer-worker/stf/src/sgx.rs
#![allow(unused)]
fn main() {
    pub fn execute(ext: &mut State, call: TrustedCall, _nonce: u32, calls: &mut Vec<OpaqueCall>) {
        ext.execute_with(|| {
            let _result = match call {
                TrustedCall::balance_transfer(from, to, cid, value) => {
                    let origin = sgx_runtime::Origin::signed(AccountId32::from(from));
                    sgx_runtime::EncointerBalancesCall::<Runtime>::transfer(AccountId32::from(to), cid, value)
                        .dispatch(origin)
                }
                TrustedCall::ceremonies_register_participant(from, cid, proof) => {
                    let origin = sgx_runtime::Origin::signed(AccountId32::from(from));
                    sgx_runtime::EncointerCeremoniesCall::<Runtime>::register_participant(cid, proof)
                        .dispatch(origin)
                }
            };
        });
    }
}
Now you see that TrustedCall::ceremonies_register_participant() calls register_participant() in our ceremonies pallet.
This function call depends on the scheduler and currencies pallets which are not present in our TEE runtime. It is on-chain. So we need to tell Integritee that it needs to fetch on-chain storage (and verify a read-proof) before executing our call:
encointer-worker/stf/src/sgx.rs
#![allow(unused)]
fn main() {
    pub fn get_storage_hashes_to_update(call: &TrustedCall) -> Vec<Vec<u8>> {
        let mut key_hashes = Vec::new();
        match call {
            TrustedCall::balance_transfer(account, _, _, _) => { },
            TrustedCall::ceremonies_register_participant(account, _, _) => {
                key_hashes.push(storage_value_key("EncointerScheduler", "CurrentPhase"));
                key_hashes.push(storage_value_key("EncointerScheduler", "CurrentCeremonyIndex"));
                key_hashes.push(storage_value_key("EncointerCurrencies", "CurrencyIdentifiers"));
            }
        };
        key_hashes
    }
}
See How to access on-chain storage for more details.
Important: Make sure your on-chain runtime and TEE runtime depend on the same version of substrate. Otherwise, mapping storage keys between the two runtimes might fail.
Finally, we will extend our CLI client to allow us to call our function:
encointer-worker/stf/src/cli.rs
#![allow(unused)]
fn main() {
 ...
         .add_cmd(
            Command::new("register-participant")
                .description("register participant for next encointer ceremony")
                .options(|app| {
                    app.arg(
                        Arg::with_name("accountid")
                            .takes_value(true)
                            .required(true)
                            .value_name("SS58")
                            .help("AccountId in ss58check format"),
                    )
                })
                .runner(move |_args: &str, matches: &ArgMatches<'_>| {
                    let arg_who = matches.value_of("accountid").unwrap();
                    let who = get_pair_from_str(matches, arg_who);
                    let (mrenclave, shard) = get_identifiers(matches);
                    let tcall = TrustedCall::ceremonies_register_participant(
                        sr25519_core::Public::from(who.public()),
                        shard, // for encointer we assume that every currency has its own shard. so shard == cid
                        None
                    );
                    let nonce = 0; // FIXME: hard coded for now
                    let tscall =
                        tcall.sign(&sr25519_core::Pair::from(who), nonce, &mrenclave, &shard);
                    println!(
                        "send trusted call register_participant for {}",
                        tscall.call.account(),
                    );
                    perform_operation(matches, &TrustedOperationSigned::call(tscall));
                    Ok(())
                }),
        )
}
This will allow us to call
encointer-client trusted register-participant //AliceIncognito --mrenclave Jtpuqp6iA98JmhUYwhbcV8mvEgF9uFbksWaAeyALZQA --shard 3LjCHdiNbNLKEtwGtBf6qHGZnfKFyjLu9v3uxVgDL35C
The --mrenclave identifies the Trusted Computing Base (TCB) while --shard identifies the local currency we're registering for.
Sharding
As you may have guessed by now, Encointer uses sharding. Encointer maintains a global registry of local currencies on-chain (with the currencies pallet). The balances for each local currency are maintained confidentially within Integritee. One shard for each currency. This means that a worker has to decide what shard it operates on.
Trusted Getter
Now that everything is super-isolated and confidential, how should we know if our call actually worked?
That's why the Integritee worker exposes an RPC interface for encrypted and authenticated queries.
We will now implement a getter that can only be called by the AccountId it refers to.
encointer-worker/stf/src/lib.rs
#![allow(unused)]
fn main() {
#[derive(Encode, Decode, Clone)]
#[allow(non_camel_case_types)]
pub enum TrustedGetter {
    balance(AccountId, CurrencyIdentifier),
    ceremony_registration(AccountId, CurrencyIdentifier)
}

impl TrustedGetter {
    pub fn account(&self) -> &AccountId {
        match self {
            TrustedGetter::balance(account, _) => account,
            TrustedGetter::ceremony_registration(account, _) => account,
        }
    }
    ...
}
Again, the first argument specifies the AccountId that is allowed to read its part of the state, authenticated by a signature.
encointer-worker/stf/src/sgx.rs
#![allow(unused)]
fn main() {
    pub fn get_state(ext: &mut State, getter: TrustedGetter) -> Option<Vec<u8>> {
        ext.execute_with(|| match getter {
            TrustedGetter::balance(who, cid) => {
                Some(get_encointer_balance(&who, &cid).encode())
            },
            TrustedGetter::ceremony_registration(who, cid) => {
                Some(get_ceremony_registration(&who, &cid).encode())
            }
        })
    }
    ...

fn get_ceremony_registration(who: &AccountId, cid: &CurrencyIdentifier) -> ParticipantIndexType {
    let cindex = match sp_io::storage::get(&storage_value_key(
        "EncointerScheduler",
        "CurrentCeremonyIndex")) {
            Some(val) => if let Ok(v) = CeremonyIndexType::decode(&mut val.as_slice()) { v } else { 0 },
            None => 0
    };
    info!("cindex = {}", cindex);
    if let Some(res) = sp_io::storage::get(&storage_double_map_key(
        "EncointerCeremonies",
        "ParticipantIndex",
        &(cid,cindex),
        &StorageHasher::Blake2_128Concat,
        who,
        &StorageHasher::Blake2_128Concat,
    )) {
        if let Ok(pindex) = ParticipantIndexType::decode(&mut res.as_slice()) {
            pindex
        } else {
            debug!("can't decode ParticipantIndexType for {:x?}", res);
            0
        }
    } else {
        debug!("no registration for caller");
        0
    }
}
}
Note: Currently, the STF is not aware of the runtime metadata, so we have to hard-code hashers for StorageMap and StorageDoubleMap.
Again, we will introduce our getter in the CLI:
encointer-worker/stf/src/cli.rs
#![allow(unused)]
fn main() {
.add_cmd(
    Command::new("ceremony-registration")
        .description("query state if registration for this ceremony")
        .options(|app| {
            app.arg(
                Arg::with_name("accountid")
                    .takes_value(true)
                    .required(true)
                    .value_name("SS58")
                    .help("AccountId in ss58check format"),
            )
        })
        .runner(move |_args: &str, matches: &ArgMatches<'_>| {
            let arg_who = matches.value_of("accountid").unwrap();
            println!("arg_who = {:?}", arg_who);
            let who = get_pair_from_str(matches, arg_who);
            let (mrenclave, shard) = get_identifiers(matches);
            let tgetter =
                TrustedGetter::ceremony_registration(sr25519_core::Public::from(who.public()), shard);
            let tsgetter = tgetter.sign(&sr25519_core::Pair::from(who));
            let res = perform_operation(matches, &TrustedOperationSigned::get(tsgetter));
            let ind = if let Some(v) = res {
                if let Ok(vd) = ParticipantIndexType::decode(&mut v.as_slice()) {
                    vd
                } else {
                    info!("could not decode value {:x?}", v);
                    0
                }
            } else {
                0
            };
            println!("{}", ind);
            Ok(())
        }),
)
}
Note: Encointer in this example still uses the outdated clap v2 syntax to define the command line interface. Any SDK versions released will already be using the more recent v3 format.
So we can query our index in the particpant registry with our CLI
encointer-client trusted ceremony-registration //AliceIncognito --mrenclave Jtpuqp6iA98JmhUYwhbcV8mvEgF9uFbksWaAeyALZQA --shard 3LjCHdiNbNLKEtwGtBf6qHGZnfKFyjLu9v3uxVgDL35C
4.4.5 How To Access L1 Parentchain Storage
Integritee isolates confidential state (what the STF TrustedCall operates on inside the SGX enclave) from on-chain state (what is plaintext readable by the entire network of integritee-nodes). Some use cases, however, require read access to parentchain storage for their TrustedCalls. As the enclave can't trust its worker service, it has to request and verify read proofs from the integritee-node.
Our goal is that you can use the same pallets that you use on-chain also inside Integritee enclaves. Therefore, we are mapping storage keys directly between confidential state and parentchain state. Your TrustedCall has to specify what storage keys it requires and these will be mapped to the confidential state before executing the call.
For this to work, the sgx-runtime must be compatible with the node-runtime. This means that the same substrate version must be used. However, it does not mean that the same pallets must be instantiated.
Until #837 is resolved, we also have the restriction that StorageMap and StorageDoubleMap must use StorageHasher::Blake2_128Concat.
Trusted Time Example
Inside the enclave we don't have a trusted time source (We could use Intel's AESM with sgx_get_trusted_time but that would extend our trust assumptions). The blockchain delivers trusted time because every block includes a UTC timestamp which is agreed upon by consensus (within a certain tolerance).
For this example, we access parentchain time using substrate's timestamp pallet. More precisely, we will enable you to call Timestamp::<T>::now() from any pallet in your STF. You will get the UTC timestamp from the block that includes your TrustedCall.
Key Mapping
In your STF, you'll have to define what parentchain storage keys shall be mapped for each TrustedCall:
#![allow(unused)]
fn main() {
pub fn get_storage_hashes_to_update(call: &TrustedCall) -> Vec<Vec<u8>> {
    let mut key_hashes = Vec::new();
    match call {
        TrustedCall::your_time_aware_call(_) => {
            key_hashes.push(
                storage_value_key("Timestamp","Now"));
        }
        // more calls ....
    };
    key_hashes
}
}
This part of the code can be found here in the worker repository.
In your pallet you can now query timestamp as usual
#![allow(unused)]
fn main() {
decl_module! {
    pub struct Module<T: Trait> for enum Call where origin: T::Origin {
        #[weight = 10_000]
        pub fn your_time_aware_call(origin) -> dispatch::DispatchResult {
            ensure!(Timestamp::<T>::now() > EARLIEST_TIME_OF_EXECUTION,
                "too early to call this");
            // ...
}
4.4.6 RPC Interface
A worker provides a JSON RPC interface that runs on a secure websocket server inside the enclave. The web-socket connection is secured by a TLS connection with a certificate signed with the enclave signing key.
The rpc method names of the worker are chosen such that they match the naming scheme of the rpc calls of substrate: https://docs.substrate.io/v3/runtime/custom-rpcs/
Available RPC calls
General
rpc_methods(no params): List all available (though maybe unimplemented) rpc methods. Example:{"jsonrpc": "2.0", "method": "rpc_methods","id": 1}author_getShieldingKey(no params): Retrieves the public shielding key, which the client can use to encrypt the messages before sending it to the worker. Beware: unlike openssl, intel sgx encryption uses little endian (le) for interpreting the shielding key.author_getMuRaUrl(no params): Retrieves the mutual remote attestation url of the worker (Only needed by fellow validateers).author_getUntrustedUrl(no params): Retrieves the untrusted ws url of the worker (Only needed by fellow validateers).
The server response is a json rpc response containing a hex encoded RpcReturnValue as param:
#![allow(unused)]
fn main() {
pub struct RpcReturnValue {
	pub value: Vec<u8>, // Encoded return value, depends on the called function and status.
	pub do_watch: bool, // If not true, the connection is meant to be closed after this answer.
	pub status: DirectRequestStatus, // Indicates the status of the request.
}
}
The DirectRequestState indicates the following: If the status is an Error, the value is an encoded String error message. If Ok is returned, the value will also contain an encoded String, containing the requested response, be it an url or a shielding key. TrustedOperationStatus is used for a TrustedCall submission response (see the following chapter).
Trusted Calls
Like in substrate, the state changing calls are first stored in a pool. The following rpc methods are available:
author_submitAndWatchExtrinsic, params:Vec<String>(hex encodedRequest). The server will keep the wss connection open and send status updates.author_submitExtrinsic, params:Vec<String>(hex encodedRequest). The server will close the connection immediately after the first response.author_pendingExtrinsics, params:Vec<String>(Vector of base58 shards as strings). Returns all pending operations of the listed shards in the top pool.
Request
All rpc params are expected to be a hex encoded (with substrate codec) Request:
#![allow(unused)]
fn main() {
pub struct Request {
	pub shard: ShardIdentifier, // Hash (H256) of a state
	pub cyphertext: Vec<u8>, // With the shielding key encrypted `TrustedOperation`.
}
}
To be able to support multiple states within one worker, each call submissions needs to be accompanied by a state defining shard. Currently, all calls need to be wrapped in a TrustedOperation wrapper. To be able to support fully featured privacy, all trusted operations are expected to be encrypted with the shielding key that can be retrieved with author_getShieldingKey.
The TrustedOperation is a wrapper around a TrustedCallSigned which consists of three components:
#![allow(unused)]
fn main() {
pub struct TrustedCallSigned {
	pub call: TrustedCall,
	pub nonce: Index, // To prevent replay attacks.
	pub signature: Signature, // Consists TrustedCall, the nonce, mrenclave and the shard.
}
}
The current implementation of the TrustedCall supports the following calls:
balance_set_balanceset the balance of an account (signer, beneficary, free balance, reserved balance)balance_transfertransfer balance from first account to second accountbalance_unshieldtransfer balance from sidechain (incognito) account to parentchain (public) account.balance_shieldtransfer balance from parentchain (public) account to sidechain (incognito) account. and several evm smart contract calls.
This struct can be easily extended to fit each individual use case.
Response
For the response for a TrustedCall what has been explained in chapter General hold true. However, the DirectRequestStatus holds a slightly different meaning:
DirectRequestStatus::Errorindicates anvaluethat is an encoded Error response String.DirectRequestStatus::TrustedOperationStatusindicates the current status of the Operation. E.g.SubmittedorInSidechainBlock. Thevaluefield then contains the encoded Hash of the correspondingTrustedOperation.
Getter
A Getter is submitted to an RPC function called state_executeGetter. It expects a Request which consists of the chosen shard and a codec encoded Getter. There is no encryption with the shielding key necessary, because the RPC server - client connection is protected with TLS. The RPC function call will immediately return the result of the getter as
#![allow(unused)]
fn main() {
RpcReturnValue {
    do_watch: false,
    value: state_getter_value.encode(),
    status: DirectRequestStatus::Ok,
}
}
where the the value is an encoded Option containing the encoded expected return value. The balance getter for example would be an encoded Balance.
Extend the RPC interface
You can, of course, also add your own RPC functions by extending the IoHandler here. Note that all JSON strings, incoming parameters and outgoing results, are expected to be hex encoded.
An example of a new RPC method called my_own_rpc_method, added to the IoHandler io :
#![allow(unused)]
fn main() {
io.add_sync_method("my_own_rpc_method", move |params: Params| {

    // Get the hex encoded parameters (if any, otherwise skip this).
    let hex_encoded_params = params.parse::<Vec<String>>().map_err(|e| format!("{:?}", e))?;

    // Decode the parameters to your desired concrete object (`Request` in this example),
    // taken from the first parameter that was provided.
	let request =
	    Request::from_hex(&hex_encoded_params[0].clone()).map_err(|e| format!("{:?}", e))?;

    // Process the request and generate response
    let result = call_my_function(request);

    // Return
	Ok(json!(result.to_hex()))
});
}
4.4.7 Integritee Parachain Integration
Coming soon, stay tuned!
4.5 Attesteer
⚠️ Warning:️ The recently published WireTap attack affects the security of the Attesteer. Please carefully review the threat model for your application.
The Integritee Attesteer is an API service to interface with the decentralized DCAP attestation on the Integritee Network.
Advantages of using the Attesteer:
- No need for a license with Intel
- Your end-users can verify remote attestation themselves and authenticate your enclave (client side) thanks to our public Integritee Network.
- Unstoppable: remote attestation on Integritee Network doesn't rely on the consent or availability of Intel or data centers hosting your SGX machine.
- Hassle-free remote attestation
Three Ways to do Remote Attestation on Integritee Network
- If you build your enclave based on our SDK, you don't need the Attesteer because your enclave will be sovereign; it can interact with the Integritee Network to do DCAP attestation independently.
- If you build your enclave with Gramine and deploy it with securitee.tech, you need not worry. The attestation on the Integritee Network will happen automatically, managed by marblerun as a part of the Securitee service.
- In case you build a custom enclave yourself from scratch, the Attesteer JSON-RPC is your easy-to-use gateway API to the Integritee Network. See instructions below on how to do that.
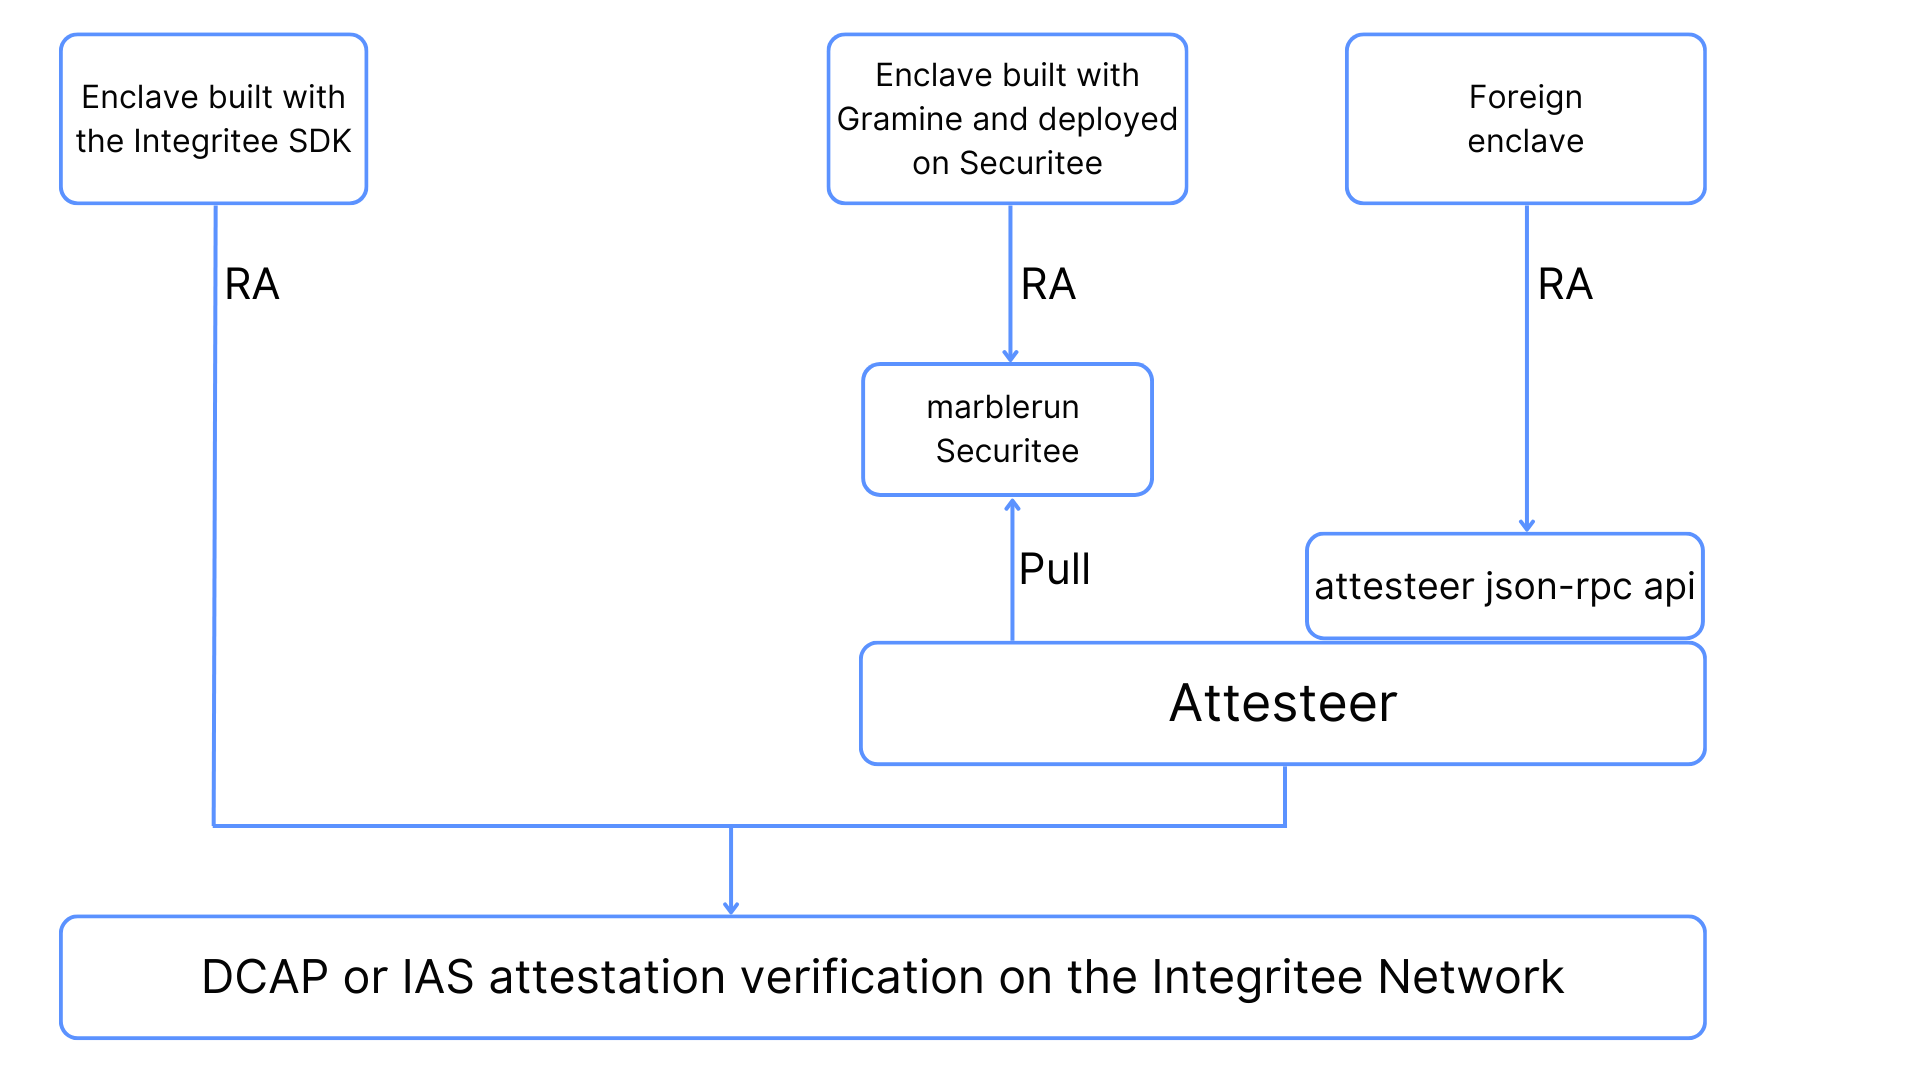
How to use the Attesteer
The Attesteer acts as a proxy for remote attestation for enclaves that are not sovereign (i.e. can't send RA transaction to the Integritee Network by themselves). For Intel SGX enclaves, this is really just a proxy forwarding service, which would not even need to run in an enclave.
For enclaves not built with our SDK and not managed by MarbleRun on securitee.tech, the Attesteer exposes an API, which will forward attestation quotes for you.
obtain a quote
We will show here step by step how this works with Intel's sample enclave.
In the following, we assume that you
- have the Intel SGX SDK installed
- have a working build environment
- are working on a real Intel SGX enabled machine with correct BIOS settings and recent security patches applied
{% code overflow="wrap" lineNumbers="true" %}
git clone git@github.com:intel/SGXDataCenterAttestationPrimitives.git
cd SGXDataCenterAttestationPrimitives
git checkout DCAP_1.16
cd SampleCode/QuoteGenerationSample
make
./app
xxd -plain quote.dat | tr -d '[[:blank:][:space:]]' > quote_single_line.hex
{% endcode %}
The output quote_single_line.hex can now be sent to the attesteer by two different methods:
Method 1 - JSON API for Attesteer Kusama
To utilize the Integritee JSON API, you will need obtain a personal bearer token in the future. For now, the token can be any word of your choosing, for instance: YOURTOKEN.
Check API availability: Retrieving Methods
To retrieve a list of available methods, use the following cURL command:
{% code overflow="wrap" lineNumbers="true" %}
curl -X 'GET' \
https://services.integritee.network/v1/attesteer/get_methods \
-H 'accept: */*' \
-H 'Authorization: Bearer YOURTOKEN'
{% endcode %}
The response should be similar to
{% code overflow="wrap" lineNumbers="true" %}
{
"data": "{\"jsonrpc\":\"2.0\",\"result\":\"methods: [attesteer_forwardDcapQuote, attesteer_forwardIasAttestationReport, author_getShieldingKey, author_getUntrustedUrl, author_pendingExtrinsics, author_pendingTrustedCallsFor, author_submitAndWatchExtrinsic, author_submitExtrinsic, system_health, system_name, system_version]\",\"id\":1}",
"error_code": 0,
"error_message": "null"
}
{% endcode %}
Forwarding a DCAP Quote
To forward your DCAP quote, use the following cURL command:
{% code overflow="wrap" lineNumbers="true" %}
curl -X 'POST' \
'https://services.integritee.network/v1/attesteer/forward_dcap_quote' \
-H 'accept: */*' \
-H 'Authorization: Bearer YOURTOKEN' \
-H 'Content-Type: application/json' \
-d "{ \"quote\": \"$(<quote_single_line.hex)\", \"url\": \"yourdomain.com\" }"
{% endcode %}
Response:
{% code overflow="wrap" lineNumbers="true" %}
{
"data": "{\"jsonrpc\":\"2.0\",\"result\":\"0x.....\",\"id\":1}",
"error_code": 0,
"error_message": "null"
}
{% endcode %}
Method 2 - Websocat Directly into Enclave
for advanced users only. The direct enclave API may be discontinued in the future
The API endpoints of the attesteer enclaves are (json-rpc over secure websocket):
- Mainnet: attesteer-kusama.integritee.network:2000
- Testnet on Paseo: attesteer-paseo.integritee.network:3000
Check API availability: Retrieving Methods
For test purposes, you could send this request with websocat (replace the JSON request with your own. The one below just fetches the available methods):
You will need to setup a Rust build environment for this
{% code overflow="wrap" lineNumbers="true" %}
cargo install websocat
echo '{"jsonrpc":"2.0","method":"rpc_methods","params":[],"id":1}' > request.json
echo "$(cat request.json | tr -d '\n' )" | websocat wss://attesteer-paseo.integritee.network:3000 --insecure
{% endcode %}
Submitting a DCAP Quote directly to Attesteer Enclave
From the output quote_single_line.hex you generated above, you can build your JSON-RPC request like this:
{% code overflow="wrap" lineNumbers="true" %}
quote=$(<quote_single_line.hex)
echo '{
    "jsonrpc":"2.0",
    "method":"attesteer_forwardDcapQuote",
    "params":[
        "QUOTE",
        "myenclave.com"
    ],
    "id": 1
}' | sed "s/\"QUOTE\"/\"$quote\"/g" > request.json
echo "$(cat request.json | tr -d '\n' )" | websocat wss://attesteer-paseo.integritee.network:3000 --insecure
{% endcode %}
You can see in the above snippet that there is an optional parameter for the public URL myenclave.com of your enclave. In the next section, we will explain why this is important for public auditability.
Onchain Teerex Registry
If the request is correct, the Attesteer will send the quote to the Integritee Network for verification and your enclave will be recorded in the teerex registry, where everyone can look up your enclave's attributes:
- the MRENCLAVE
- the signing key (if you provide it as SGX_REPORT_DATA when you build your enclave)
- the URL where your enclave is reachable (optional)
The full information in the teerex registry is:
- the MRENCLAVE in the case of Intel SGX
fingerprint: 0x8a2faa318ac37bd3895979188d86a1514bd66ce024a169f20f92640ec4f158f9 - the attesteer's account:
registrar: 2JqMzr1BanEZQ4xG3mGCWcmXdoiEPWMkiuf2XqVn1qmuQy4w - the public key for users to do enclave authentication with
signer: { Opaque: 0x3792475ef5e50be41e68a2b48c85d92c4245e97f17b21b6d2d9000ee8c4bfc5a00000000000000000000000000000000000000000000000000000000000000000000 } - timestamp of quote verification:
timestamp: 1,691,754,696,185 - the public url of your enclave:
url: my.enclave.com - SGX-specific stuff
- the MRSIGNER who signed the enclave build (vendor):
mrSigner: 0x43361affedeb75affee9baec7e054a5e14883213e5a121b67d74a0e12e9d2b7a - SGX_MODE:
buildMode: Production - Attestation SGX_STATUS:
status: Ok
- the MRSIGNER who signed the enclave build (vendor):
Dashboard
For convenience, we provide a dashboard where you can browse the contents of the teerex registry and verify your enclave has been attested successfully.
- Enclave Registry Dashboard for mainnet
- please bear in mind that mainnet will reject enclaves built in SGX debug mode
- Enclave Registry Dashboard for testnet on Paseo
Enclave Authentication
The Integritee Network's promise of public auditability is only meaningful if end users can look up your enclave on the Integritee Network and find the enclave's authentication public key together with the URL to initiate communication with your enclave.
In the best case, the enclave's key should be generated within the enclave itself as an initialization step and then provided as SGX_REPORT_DATA when generating the quote. In the sample code we used above, you could introduce the public key on this line.
We make no assumptions whatsoever about the cryptography you use for this, nor the protocol you use to talk to your enclave. It is up to you to communicate to your users how they should authenticate your enclaves.
4.6 Demos
Table of Content:
- 4.6.1 Sidechain demo
- 4.6.2 TOCW demo
- 4.6.3 TEEracle demo
- 4.6.4 Foreign Parachain Private Transactions demo
4.6.1 Sidechain demo
The sidechain demo can be a good starting point in understanding how the services and components in a sidechain interact. The demo sets up an Integritee Node (layer 1 chain) and runs 2 workers that synchronize with a sidechain. The CLI client (called by a script) is then used to perform transactions and query state for the Alice and Bob accounts.
The sequence is as follows:
- Issue funds to Alice's incognito account
(worker 1) - Query Alice's incognito balance to verify balance
(worker 1) - Transfer funds from Alice's incognito account to Bob's incognito account
(worker 1) - Transfer funds from Alice's incognito account to Bob's incognito account
(worker 2) - Query Alice's incognito balance to verify both transfers above have happened
(worker 1) - Query Bob's incognito balance to verify both transfer above have happened
(worker 2)
Each call is direct invocation, the invocation target is noted in brackets: e.g. (worker 1). Because we're running a sidechain, it is not relevant to which worker we send the direct invocation request, the result of the transaction will be shared across workers using the sidechain.
Run the sidechain demo
The demo is executed in docker to set up the the Integritee node and the workers, but it essentially runs the demo_sidechain.sh script to interact with the sidechain.
In order to run the demo, clone the worker repository:
git clone https://github.com/integritee-network/worker.git
Change directory to
cd docker
Build all necessary images in the docker-compose setup, with (takes upwards of 10 minutes, depending on your hardware):
{% code overflow="wrap" lineNumbers="true" %}
COMPOSE_DOCKER_CLI_BUILD=1 DOCKER_BUILDKIT=1 docker compose -f <(envsubst < docker-compose.yml) -f <(envsubst < demo-sidechain.yml) build --build-arg WORKER_MODE_ARG=sidechain --build-arg ADDITIONAL_FEATURES_ARG=dcap --build-arg SGX_MODE=SW
{% endcode %}
Run the demo in the docker-compose setup
{% code overflow="wrap" lineNumbers="true" %}
export ADDITIONAL_RUNTIME_FLAGS="--skip-ra"
docker compose -f <(envsubst < docker-compose.yml) -f <(envsubst < demo-sidechain.yml) up demo-sidechain --exit-code-from demo-sidechain
{% endcode %}
You will see log output from the two workers and the demo service. First worker 1 will startup and initialize. Worker 2 waits until worker 1 is fully up and running and then starts up. The demo service again waits for worker 2 to be fully up before running. This whole process can take a couple of minutes and will automatically shut down once the demo script ran through.
Output like
integritee-worker-2 | 2022/07/20 13:50:56 Waiting for http://integritee-worker-1:4645/is_initialized: unexpected HTTP status code: 404.
is to be expected, it results from the service integritee-worker-2 polling and waiting until integritee-worker-1 is initialized (the same will appear for the demo service, with respect to worker-2).
To see the logs of a specific container, use
docker logs fd-integritee-worker-1--1 -f
docker logs fd-demo-sidechain-1 -f
A successful demo run will show
integritee-sidechain-demo | * Verifying Alice's balance
integritee-sidechain-demo | Alice's balance is correct (10000000000)
integritee-sidechain-demo |
integritee-sidechain-demo | * Verifying Bob's balance
integritee-sidechain-demo | Bob's balance is correct (40000000000)
integritee-sidechain-demo |
integritee-sidechain-demo exited with code 0
at the end of the log output, before the docker containers are stopped.
Use
{% code overflow="wrap" lineNumbers="true" %}
docker-compose -f <(envsubst < docker-compose.yml) -f <(envsubst < demo-sidechain.yml) down
{% endcode %}
to clean up all the container context (including logs).
4.6.2 TOCW demo
The offchain-worker demo shows indirect invocation with 2 offchain-worker instances running. The demo sets up an Integritee Node (layer 1 chain) and runs 2 workers that both execute transactions submitted to the layer 1 chain (parentchain) - which is called indirect invocation.
The CLI client (called by a script) is then used to perform transactions and query state for the Alice and Bob accounts. Transactions like balance_transfer are encrypted and then submitted to the parentchain. An offchain-worker then imports the parentchain block (upon finalization), decrypts and executes any transactions it finds. Both offchain-workers execute these transactions in parallel, there is no exchange of state or transaction information (like there is for the sidechain validateer).
The sequence in the demo is as follows:
- Create incognito accounts for Alice and Bob, these are not disclosed to the public
- Shield funds on Alice's account, i.e. moving funds from Alice's public, on-chain account to her incognito account
- Transfer a fraction of the funds on Alice's incognito account to Bob's incognito account
- Un-shield the remaining funds on Alice's incognito account, moving them back to Alice's on-chain account
- Check balances on Alice's public on-chain account and her incognito account
The demo executes this sequence twice and verifies the balances are correct after each run.
For those who are interested in the demo script, can find it here.
Run the off**-**chain-worker demo
The demo is executed in docker to set up the the Integritee node and the workers, but it essentially runs the demo_indirect_invocation.sh script to interact with the off-chain workers.
In order to run the demo, clone the worker repository:
git clone https://github.com/integritee-network/worker.git
Change directory to
cd docker
Build all necessary images in the docker-compose setup, with (takes upwards of 10 minutes, depending on your hardware):
{% code overflow="wrap" lineNumbers="true" %}
COMPOSE_DOCKER_CLI_BUILD=1 DOCKER_BUILDKIT=1 docker compose -f <(envsubst < docker-compose.yml) -f <(envsubst < demo-indirect-invocation.yml) build --build-arg WORKER_MODE_ARG=offchain-worker --build-arg ADDITIONAL_FEATURES_ARG=dcap --build-arg SGX_MODE=SW
{% endcode %}
Run the demo in the docker-compose setup
{% code overflow="wrap" lineNumbers="true" %}
export ADDITIONAL_RUNTIME_FLAGS="--skip-ra"
export FLAVOR_ID=offchain-worker
docker compose -f <(envsubst < docker-compose.yml) -f <(envsubst < demo-indirect-invocation.yml) up demo-indirect-invocation --exit-code-from demo-indirect-invocation
{% endcode %}
You will see log output from the two workers and the demo service. First worker 1 will startup and initialize. Worker 2 waits until worker 1 is fully up and running and then starts up. The demo service again waits for worker 2 to be fully up before running. This whole process can take a couple of minutes and will automatically shut down once the demo script ran through.
Output like
integritee-worker-2 | 2022/07/20 13:50:56 Waiting for http://integritee-worker-1:4645/is_initialized: unexpected HTTP status code: 404.
is to be expected, it results from the service integritee-worker-2 polling and waiting until integritee-worker-1 is initialized (the same will appear for the demo service, with respect to worker-2).
To see the logs of a specific container, use
docker logs fd-integritee-worker-1--1 -f
docker logs fd-demo-indirect-invocation-1 -f
A successful demo run will show
fd-demo-indirect-invocation-1  | -----------------------
fd-demo-indirect-invocation-1  | ✔ The second test passed!
fd-demo-indirect-invocation-1  | -----------------------
at the end of the log output, before the docker containers are stopped.
Use
{% code overflow="wrap" lineNumbers="true" %}
docker-compose -f <(envsubst < docker-compose.yml) -f <(envsubst < demo-indirect-invocation.yml) down
{% endcode %}
to clean up all the container context (including logs).
4.6.3 TEEracle demo
The TEEracle demo can be a good starting point for understanding how the TEEracle service provides a trustworthy oracle to an Integritee Node.
The demo sets up an Integritee Node (layer 1 chain) and runs 1 worker that provides the TEER-USD exchange rate. The exchange rate will be updated on the Integritee Node only when it comes from audited code:
- The enclave is registered in the Integritee Node in the teerex pallet -> Proof that the oracle runs on an SGX device.
- The enclave is in the teeracle whitelist -> The running code is reliable because Sudo or the technical committee have audited it.
The CLI client (called by a script) is used to count the ExchangeRateUpdated events and added the enclave to the whitelist.
The sequence is as following:
- Count the exchange rate updates when the enclave is not in the whitelist.
- Add the enclave to the whitelist for the source https://api.coingecko.com/.
- Count the exchange rate updates for that oracle source.
- Add the enclave in the whitelist for a second source, https://pro-api.coinmarketcap.com/
- Count the exchange rate updates for the two oracle sources.
The test passed if
- There are no exchange rate updates before the enclave is added to the whitelist
- The number of exchange rate updates with one trusted oracle > Minimum expected number of events with a single oracle.
- The number of exchange rate updates with two trusted oracles > Minimum expected number of events with two oracles
Run the TEEracle demo
The demo is executed in docker to set up the the Integritee node and the teeracle, but it essentially runs the demo_teeracle_whitelist.sh script for teeracle's registration process.
In order to run the demo, clone the worker repository:
git clone https://github.com/integritee-network/worker.git
Change directory to
cd docker
Build all necessary images in the docker-compose setup (takes upwards of 10 minutes, depending on your hardware):
{% code overflow="wrap" lineNumbers="true" %}
COMPOSE_DOCKER_CLI_BUILD=1 DOCKER_BUILDKIT=1 docker compose -f <(envsubst < docker-compose.yml) -f <(envsubst < demo-teeracle.yml) build --build-arg WORKER_MODE_ARG=teeracle --build-arg ADDITIONAL_FEATURES_ARG=dcap --build-arg SGX_MODE=SW
{% endcode %}
Run the demo in the docker-compose setup:
{% code overflow="wrap" lineNumbers="true" %}
export ADDITIONAL_RUNTIME_FLAGS="--skip-ra"
export TEERACLE_INTERVAL_SECONDS=10
export COINMARKETCAP_KEY=<your own api key. optional>
docker compose -f <(envsubst < docker-compose.yml) -f <(envsubst < demo-teeracle.yml) up demo-teeracle --exit-code-from demo-teeracle
{% endcode %}
You will see log output from the worker and the demo service. The first worker is started. The demo service waits for worker to be fully initialized before running. This whole process can take a couple of minutes and will automatically shut down once the demo script ran through.
To see the logs of a specific container, use
docker logs fd-integritee-teeracle-worker--1 -f
The output:
integritee-teeracle-demo | 2022/09/01 08:57:58 Waiting for http://integritee-teeracle-worker:4645/is_initialized: unexpected HTTP status code: 404.
is expected. It results from the demo service integritee-teeracle-demo polling and waiting until teeracle-worker:4645 is initialized.
The demo run will show :
integritee-teeracle-demo  | Minimum expected number of events with a single oracle: 3
integritee-teeracle-demo  | Minimum expected number of events with two oracles: 6
...
integritee-teeracle-demo  | Got 0 exchange rate updates when no trusted oracle source is in the whitelist
...
integritee-teeracle-demo  | MRENCLAVE in whitelist for https://api.coingecko.com/
...
integritee-teeracle-demo  | Got 4 exchange rate updates from the trusted oracle source in 21 second(s)
...
integritee-teeracle-demo  | MRENCLAVE in whitelist for https://pro-api.coinmarketcap.com/
...
integritee-teeracle-demo  | Got 7 exchange rate updates from 2 trusted oracle sources in 21 second(s)
The number of events can be different. A successful demo run will show
integritee-teeracle-demo  |
integritee-teeracle-demo  | Results :
integritee-teeracle-demo  | test passed
integritee-teeracle-demo exited with code 0
at the end of the log output, before the docker containers are stopped.
The test can fail for various reasons:
integritee-teeracle-demo | The test ran through but we received ExchangeRateUpdated events before the enclave was added to the whitelist. Was the enclave previously whitelisted? Perhaps by another teeracle?
or
integritee-teeracle-demo | test failed: Not enough events received for single oracle source: $EVENTS_COUNT. Should be greater than $MIN_EXPECTED_NUM_OF_EVENTS
or
integritee-teeracle-demo |test failed: Not enough events received for 2 oracle sources: $EVENTS_COUNT_2. Should be greater than $MIN_EXPECTED_NUM_OF_EVENTS_2
Clean up the container context (including logs):
{% code overflow="wrap" lineNumbers="true" %}
docker-compose -f <(envsubst < docker-compose.yml) -f <(envsubst < demo-teeracle.yml) down
{% endcode %}
4.6.3 Foreign Parachain Private Transactions Sidechain
The previous demos used a single L1 blockchain, the Integritee Network. But what if you'd like to deploy a sidechain on the Polkadot AssetHub and provide private transactions of DOT and all other assets? We have demonstrated such a system in this video with high level explanations and a UI mock. This tutorial lets you reproduce that demo.
We will
- launch a rococo-local relaychain with two parachains using zombienet: 2. parachain 1 is Integritee Network with TEER as its native token where our SCV registers their enclaves and finalize sidechain blocks 3. parachain 2 is any substrate based chain using frame with the balances pallet. Let this be the AssetHub with DOT as its native token.
- launch a sidechain with a single validateer (SCV)
- shield DOT from AssetHub to Sidechain
- transfer DOT privately on sidechain
- unshield DOT back to AssetHub
Setup
We will launch the chains on a linux host and run the sidechain in a docker environment emulating Intel SGX so that you don't need any specific hardware to follow this tutorial.
Please follow our explanations to
- Set up dev environment
- Install Zombienet on host
- build polkadot and parachains binaries. check our zombienet spec to see where each binary is expected to be located
Launch Relay- and Parachains
On the host, run
zombienet-linux-x64 spawn --provider native zombienet/rococo-local-with-privacy-sidechain-demo-setup.toml
You can now use js/apps or other frontends to watch chain activity for
- Integritee Network at port 9944
- AssetHub at port 9954
Launch sidechain
Inside docker, open two consoles with tmux -u and launch one sidechain validateer:
./integritee-service -c -u ws://172.17.0.1 --target-a-parentchain-rpc-url ws://172.17.0.1 --target-a-parentchain-rpc-port 9954 run --skip-ra --dev
wait until you see a ProxyAdded event on Integritee Network
should you wish to add a second validateer to make it more realistic, add another console and run
./integritee-service -u ws://172.17.0.1 --target-a-parentchain-rpc-url ws://172.17.0.1 --target-a-parentchain-rpc-port 9954 -r 3444 -P 2100 -h 2110 -w 2101 -i 8788 -c -d /tmp/worker2 run --skip-ra --dev
Perform Private Transactions on the Sidechain
in the second terminal we will perform wallet actions:
for readability, let's define a few aliases and prepare accounts
alias integritee="../target/release/integritee-cli -u ws://172.17.0.1"
alias assethub="../target/release/integritee-cli -u ws://172.17.0.1 -p 9954"
read MRENCLAVE <<< $(integritee list-workers | awk '/  MRENCLAVE: / { print $2; exit }')
alias incognitee="../target/release/integritee-cli -u ws://172.17.0.1 trusted --mrenclave $MRENCLAVE"
assethub transfer //Alice //Laura 100000000000000
incognitee get-shard-vault
read VAULT <<< $(incognitee get-shard-vault)
then you can reproduce our entire demo with the following commands:
assethub balance //Laura
incognitee balance //Laura
incognitee get-shard-vault
assethub transfer //Laura $VAULT 50000000000000
assethub balance //Laura
incognitee balance //Laura

incognitee balance //Julian
incognitee --direct transfer //Laura //Julian 10000000000000
incognitee balance //Laura
incognitee balance //Julian

assethub balance //Edward
incognitee --direct unshield-funds //Julian //Edward 9000000000000
assethub balance //Edward
incognitee balance //Julian
More Logs Please
You can play with log levels to get more insight into what's happening. For worker and cli, use
RUST_LOG=info,substrate_api_client=warn,ws=warn,mio=warn,ac_node_api=warn,sp_io=warn,tungstenite=warn
of course, you can go down to debug or even trace as default log level. For production deployments, logs from the enclave will be disabled to avoid data leaks.
4.7 Performance Benchmarking
The goal of benchmarking is to find limits to the following measures:
- Throughput: How many transactions per second (tps) can we process on a sidechain for different blocktimes (300ms, 6s)?
- Number of concurrent connected clients
- Size of the state (and #Accounts)
In order to reproduce benchmarks, please follow our benchmarking instructions
Results
for sdk-v0.10.0-polkadot-v0.9.27, running on Intel(R) Xeon(R) E-2176G CPU @ 3.70GHz with 32 GB RAM
- With a 300ms blocktime we can process up to 1900 tps and at least 38 tps at a state size of 4000 accounts
- With a 6s blocktime we can process up to 900 tps and at least 10 tps at a state size of 100’000 accounts (around 20MB)
- typical throughput is 500 tps
- At least 250 clients can connect to one validateer concurrently and send at least on tx per block
With identified state handling improvements, we should be able to improve state size degratation by 6x:
- With a 300ms blocktime 38 tps at a state size of 24'000 accounts
Sidechain Datasheet
- down to 300ms block time
- 500 tps typical per sidechain, degrading above 5’000 accounts state size
- 250 wss concurrent client connections per validateer
- overall sharded throughput of integritee network currently extrapolates to 50k tps (improvements of polkadot protocol and our sidechain finality can potentially push this towards an estimated 1-4M tps)
****
4.8 Hardware Diversification
As of the time of writing, Intel SGX is the only TEE that allows remote attestation. This dependency on Intel is a single point of failure and as such undesirable for Integritee.
The Integritee team is investigating ways to provide remote attestation for ARM TrustZone and open source TEEs like Keystone.
Diversification would have a positive effect on TEE integrity because a vulnerability in one type of TEE would only affect a fraction of all TEEs. A pretty simple consensus algorithm could ensure integrity even in presence of large-scale attacks exploiting that vulnerability.
However, diversification could have a negative impact on confidentiality. If secrets are provisioned to several types of TEEs, it only takes a single TEE to leak the secret to compromise it for all.
Table of Content:
4.8.1. Distributor-Level Remote Attestation
If manufaturers don't offer remote attestation, the HW distributor could jump in as the second trusted entity in the supply chain.
4.8.2 Concept
The goal of remote attestation is to enable the verifier to trust a member. The verifier wants to trust the hardware and software, which is physically at the member's site. The assumption is that the verifier has never accessed the hardware of the member. Therefore, other parties offer a root of trust, which is implanted in the hardware. In the picture below are three other parties, where most important one is the provision entity. She is a distributor of hardware and has also the ability to program the devices. So, they take hardware from the official manufacturers and combine it with software from a source, which is trusted by the verifier. Afterwards, this bundle is purchasable by everyone, who wants to participate. In conclusion, if somebody wants to become a member of the service, he has to buy a device from provision entity. These devices are ready to perform remote attestation.
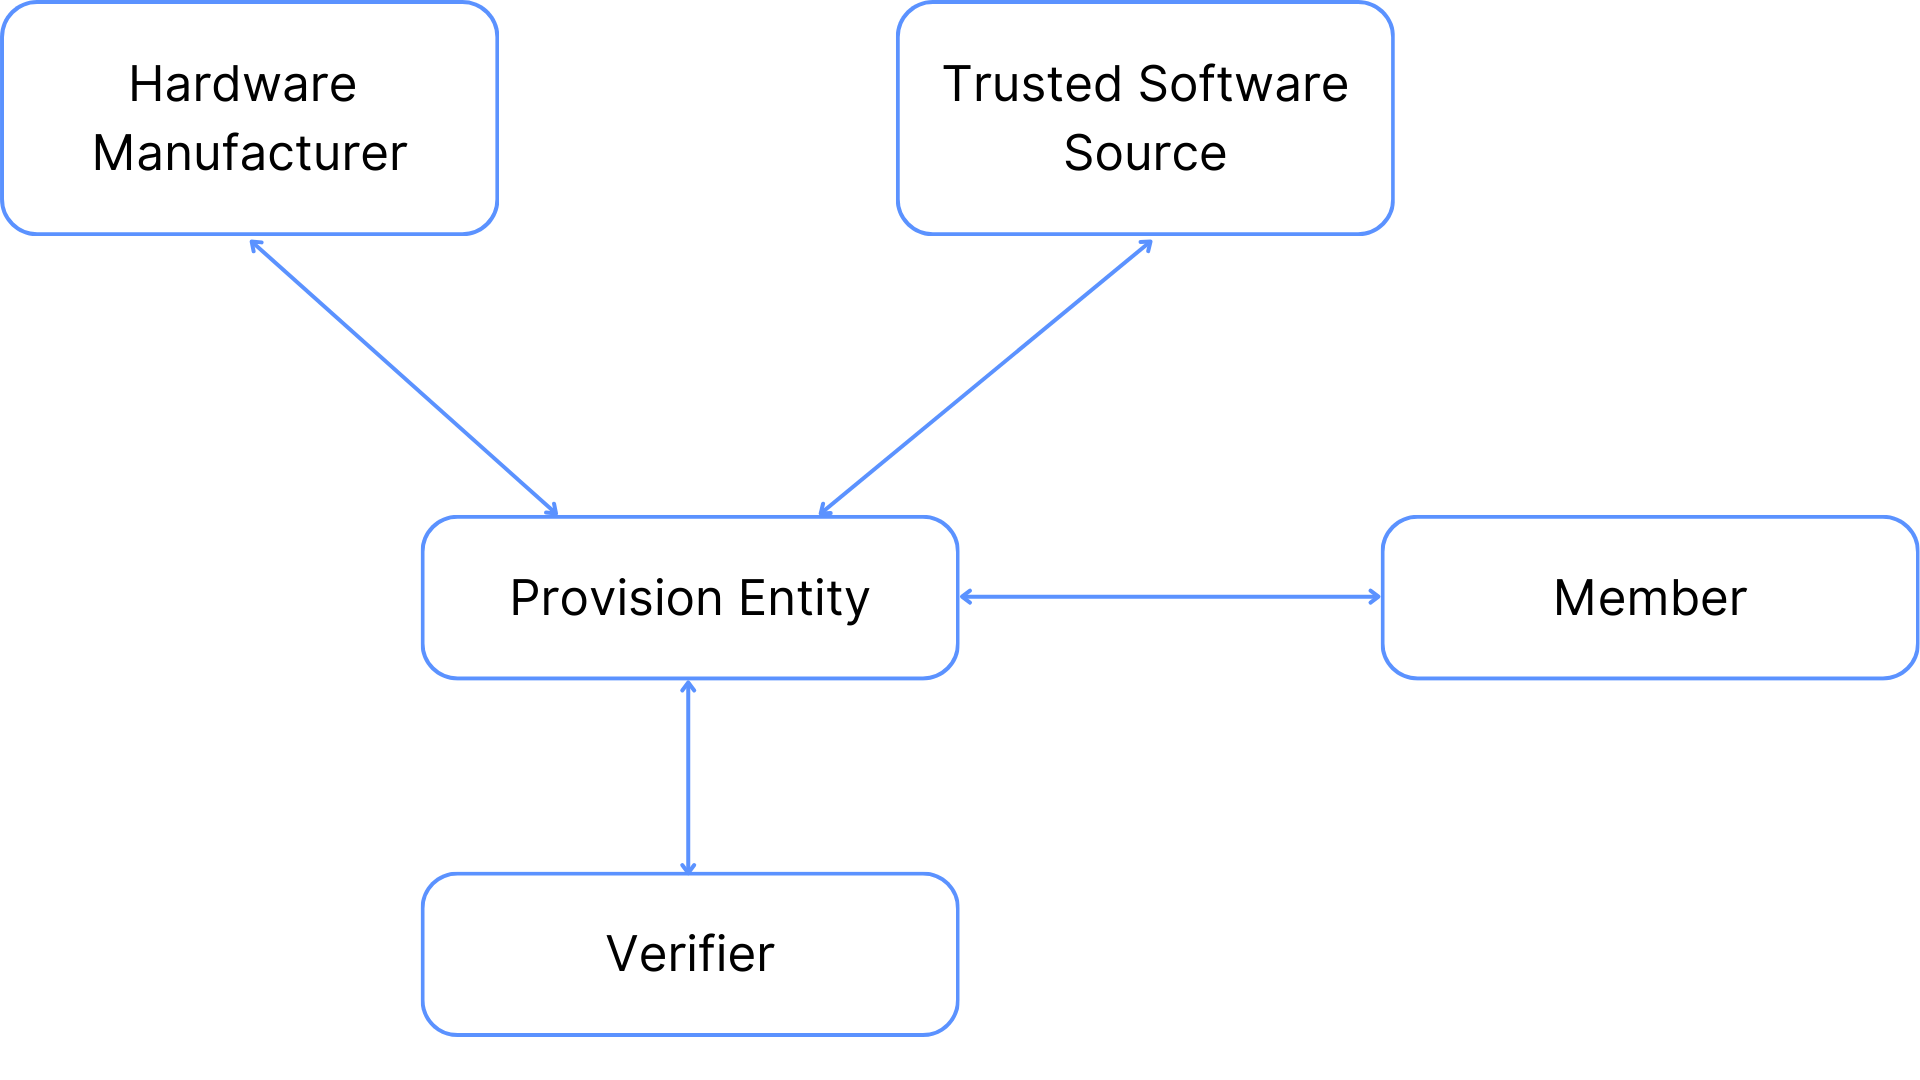
The verifier is concerned about integrity and confidentiality and requires a proof that:
- Member’s hardware is genuine, attested by the provision entity in a manner that the verifier is able to identify devices in the field by secure cryptographic methods
- Member’s hardware runs exactly the code as published open source by the Trusted Software Source
- Data supplied to the TEE is treated confidentially
To fulfill these requirements each role is specified in the following sections.
4.8.3 Roles
- Hardware Manufacturer: produces hardware
- Trusted Software Source: writes open source software that is supposed to be run on TEEs
- Provision Entity: Distributor with the possibility to provision devices
- Member: operates TEE hardware on their own premises and always has physical access to it
- Verifier: wants to run software from the Trusted Software Source with its own confidential data on member's hardware
Table of Content:
- 4.8.3.1 Hardware Manufacturer
- 4.8.3.2 Trusted Software Source
- 4.8.3.3 Provision Entity
- 4.8.3.4 Member
- 4.8.3.5 Verifier
4.8.3.1 Hardware Manufacture
The hardware manufacturer has to be trusted.
4.8.3.2 Trusted Software Source
To generate an open source flash image, which is signed, is problematic. Because the one who is signing is a new root of trust. Therefore, in this concept this root is spread over a multiple participants to get to an open source like root of trust. The parties should be as independent as possible. The diagram below visualizes our approach. On the left side is the open source code visible for everyone. Everything that follows is constructed under the assumption that the parties have established secure communication channels. All parties (Web3, SCS, ...) collaborate in the Multi-Party-Computation (MPC) RSA generation. As a result, everyone receives the public key and a part of the private key. Therefore, they can only together generate a signature. This is used to build a binary that only can be signed by all parties together. They take the source code and build it deterministically. Afterwards, they sign their binary and exchange it with each other. Then, they check the binaries from the other parties, if they are the same, they combine the signatures to the final signature. This signature can be verified with the public key.
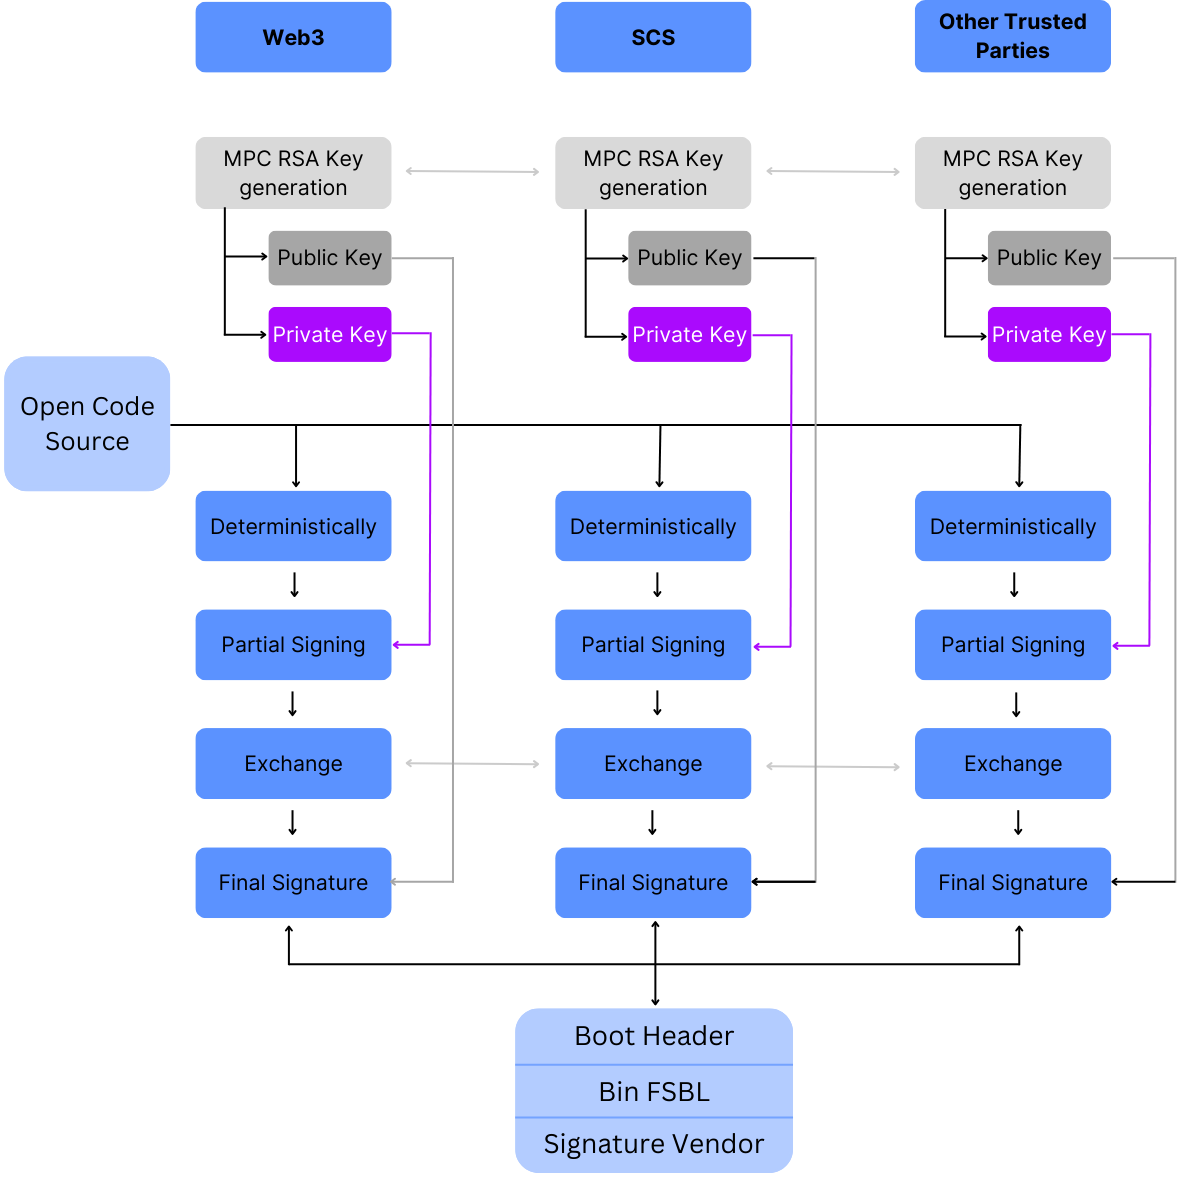
4.8.3.3 Provision Entity
The provision entity has the task to prepare the devices for remote attestation. This makes her the main root of trust. Therefore she has to be trustworthy and she also needs appropriate hardware. Which means that she needs at least HSM (Hardware Security Module). Better she has an access authorisation system for the facilities. To provision devices, the provision entity has to execute the following steps.
- Get hardware from the hardware manufacturer
- Get the software from the trusted software source
- Check the hardware and the software
- Enable secure boot
- Generate the attestation data
- Sell the devices publicly
.png)
The first two steps are obvious. Get the hard and software from the corresponding sources. The next step is important. The provision entity has to check, if the hardware is not tampered. Because later, with her signature, she states that the hardware is trustworthy.
The next step is to enable secure boot. This means that the provision entity takes the public key from the trusted software source (the one generated in the MPC process) burn it into the devices. Also eFuses are burnt to harden the device. This step is hardware dependent. In some devices only the hash of this public key is burnt in, but its enough to enable secure boot. In the literature this key is often referred as the vendor key.
Afterwards, the attestation data is made. The provision entity generates with the HSM a per device unique key pair. This key pair is called the Attestation Identifier Key, because it is used to identify the device for attestation. Then also a device unique key called Endorsement Key (EK) is used. The origin of this key is hardware dependent. In some devices this key is already embedded in the device. And in others the key can be chosen and written to OTP (One Time Programmable Memory). Where it is impossible to read it back and only accessible through the on chip crypto engine. The EK is then used to encrypt the private part of the AIK. Then the public AIK and the encrypted private AIK are signed with the provision entity Key (PE-Key). These three parts form the attestation data.
The PE-Key is certified by a root CA and the public part of this key has to be publicly available. The verifier later needs this key.
The attestation data is added to the device. Because the attestation data is not confidential. It can be saved anywhere on the device.
Another important point is that the provision entity has to guarantee that she forget the EK and the AIK. In some devices the provision entity has never access to the EK. This is good nor bad, because it just shifts trust from the provision entity to the hardware manufacturer.
The last step is to sell the provisioned devices to people who want to operate the hardware. They are called members, because they can become a part of the network.
.png)
4.8.3.4 Member
The member buys a device from the provision entity. This device can only boot from signed images, which are signed by the trusted software source. These images then perform a secure boot. This image sets up a system, that is split in two halves. In one half starts a rich OS, which is considered untrusted. In the other half starts a secure OS. This half is protected from the other side with ARM Trust Zone. The secure OS such as OPTEE, is able to host different TEEs in parallel and ensures encapsulation of these TEEs.

4.8.3.5 Verifier
To do an actual remote attestation, the verifier needs at first the public key from the provision entity. Then the verifier waits on request from the member. When he wants to join, he send his request, the attestation data. The verifier then validates the attestation data. If the data is valid, he knows the public AKI. To validate the public AIK, he generates a challenge. The simplest challenge is a random number. This number is sent to the member. The member decrypts the private AIK and signs the random number with it. Afterwards he sends the signature back with some system measurements. The verifier can validate the signature. If the signature is valid, the verifier can make the following assumptions:
- The private AIK used to forge the signature belongs to the public AIK from the attestation data, therefore there a valid key pair
- The AIK was generated by the provision entity, because it is signed with the PE-Key
- The device is a provisioned hardware, because the hardware is the only one which knows the EK and is able to decrypt the private AIK.
- The hardware has booted a trustful system, because the eFuses were burnt by the provision entity

4.9 Development environment
Everyone knows it: setting up a development environment is always a hassle, especially when it comes to SGX. So this section aims to help with this. Our developers usually work with an SGX capable hardware, see 5.2, develop within a Docker container, or just execute the build with Docker.
Two ways to work are presented here:
- Run worker and clients in docker but chain(s) and on host
- Run everything inside a docker container
Run worker and clients in docker but chain(s) and on host
We open a range of ports to the host such that the services inside docker can talk to multiple chains running on the host
docker run --name integritee-dev-worker -it --expose 9944-9999 -v $(pwd):/home/ubuntu/worker -e MYUID=$(id -u) -e MYGUID=$(id -g) integritee/integritee-dev:0.2.2 /bin/bash
Use tmux -u to run several things in parallel inside the container
to re-enter docker later:
docker start -a -i integritee-dev-worker
Run everything inside a Docker container
The paradigm here is that the files are living on the host file system, but they are mounted into the Docker container. The build commands are executed from within the Docker container.
This is the Docker image we use: https://hub.docker.com/r/integritee/integritee-dev.
In general, we have two repositories that are relevant for running a complete test-setup:
The launch scripts assume that those two repositories reside in the same directory.
Steps to get a running setup:
- Mount the current directory containing the integritee-worker and integritee-node into the Docker container and start a bash session inside:
docker run -it --mount "type=bind,src=$(pwd),dst=/opt/shared" --workdir /opt/shared integritee/integritee-dev:0.2.2 /bin/bash

# If you want to expose the default ports of the services to the host, you can supply some `-p` args:
docker run -it --mount "type=bind,src=$(pwd),dst=/opt/shared" --workdir /opt/shared -p 9944:9944 -p 2000:2000 -p 3443:3443 integritee/integritee-dev:0.2.2 /bin/bash
- Now you have access to the shell in the Docker container. So you can start the builds.
# First build the node

# See documentation for the build flags in: https://github.com/integritee-network/integritee-node#build-and-run
cd integritee-node
git checkout sdk-v0.13.0-polkadot-v0.9.42
cargo build --release --features "skip-extrinsic-filtering"

# Go to parent-directory.
cd ../

# Build the worker: in this example we compile it in the offchain worker mode.
cd worker
git checkout sdk-v0.13.0-polkadot-v0.9.42

# Build the offchain-worker in software mode if you don't have the SGX hardware set up.
# How to enable hardware mode in Docker can be found here in chapter 5.2.3.3.
SGX_MODE=SW WORKER_MODE=offchain-worker WORKER_FEATURES=dcap make

# The output file will be in the ./bin folder.

# Then you can spawn two workers and the integritee-node with the launch script.
./local-setup/launch.py ./local-setup/config/two-workers.json

# Enter the same Docker container with a bash session.
docker exec -it <container-id> bash

# Have a look at the logs with the handy tmux scripts (the logs are only populated if the launch.py was used).
cd worker/local-setup
./tmux_logger.sh

# The demo scripts can be executed in yet another terminal session where you enter the same running Docker container.
# Replace the <container-id> with the value returned upon container creation with the above command.
docker exec -it <container-id> bash

# This script also shows what kind of commands you can execute with the CLI.
cd worker/cli
# Match the ports that are defined in the simple config
FLAVOR_ID=offchain-worker TEST=first ./demo_shielding_unshielding.sh -p 9944 -P 2000

# Check available commands of the CLI.
cd ./bin
./integritee-cli --help

# For trusted commands to talk with an enclave.
./integritee-cli trusted --help
Hints
- The rust build cache is preserved when you exit the container. Hence, when you continue to develop you can just type
docker start <container-id>and thendocker exec -it <container-id> bashto re-enter the build environment as you left it!
5 Nodes & Infrastructure
Table of Contents:
- 5.1 How to set up and run Integritee Nodes
- 5.2 How to set up and run a Sidechain Validator Node
- 5.3 How to deploy
5.1 How to set up and run Integritee Network Nodes
Table of Content:
5.1.1 Full Node
Integritee is a parachain on Kusama and Polkadot with all of its network security and consensus provided by Kusama's & Polkadots Validator set. As a Substrate-based chain, most of Integritee's integration points are the same as Kusama and Polkadot. As a parachain specifically though, the key differences will be outlined in this document.
5.1.1.1 Parachain on Kusama
The Integritee parachains are compatible with the polkadot-omni-node, therefore, there is no need to use Integritee's collator release. Instead, we recommend to use the latest polkadot-omni-node.
due to a bug in our early chain history, the sync will stall at block #38220. See Troubleshooting for a fix.
Spec Requirement
We suggest to meet these minimal requirements although slightly weaker HW may work as well:
- 2TB NVMe SSD.
- seq. write performance should be > 1000 MB/s. Consider that SSD's get slower the more full they get. Also, they wear out with intense usage)
- 16GB RAM
- CPU won't matter much, but go for maximum single-core performance rather than many cores.
Build the Omni-Node
Skip this step if you want to use the pre-built binary.
We assume you're building on ubuntu 22.04
sudo apt update && sudo apt upgrade
sudo apt install -y build-essential clang curl git jq libssl-dev pkg-config protobuf-compiler
curl --proto '=https' --tlsv1.2 -sSf https://sh.rustup.rs | sh
source $HOME/.cargo/env
rustup target add wasm32-unknown-unknown
cargo install polkadot-omni-node
Run Collator as a Systemd Service
We assume you use ubuntu 22.04.
Download
Create /etc/systemd/system/integritee-kusama-collator.service with the following content:
[Unit]
Description=Integritee Kusama Collator

[Service]
User=integritee
Group=collators

ExecStart=/path/to/polkadot-omni-node \
  # only if you intend to produce blocks
  --validator \
  --chain=/home/integritee/integritee-kusama/integritee-kusama.json \
  # adjust
  --name my-fancy-integritee-node \
  # we recommend to both these endpoints
  --telemetry-url "wss://telemetry.polkadot.io/submit/ 0"
  --telemetry-url 'wss://shard.telemetry.integritee.io/submit/ 1' \
  # adjust the base path to your needs
  --base-path '/opt/integritee' \
  # archive pruning is recommended if you want to run indexers on the node
  --state-pruning archive \
  --blocks-pruning archive \
  --pool-type=fork-aware \
    -- \
  --sync=warp \
  --chain kusama \
  --telemetry-url "wss://telemetry.polkadot.io/submit/ 0"
  # adjust the base path to your needs
  --base-path '/opt/integritee' \

Restart=always
RestartSec=60

[Install]
WantedBy=multi-user.target
Using Docker
use image: parity/polkadot-omni-node
Download
- ìntegritee-kusama.spec` from here
{% code overflow="wrap" lineNumbers="true" %}
docker pull parity/polkadot-omni-node
docker run parity/polkadot-omni-node --chain=integritee-kusama.json -- --chain=kusama`
{% endcode %}
For additional cli args, see above.
Starting from a Snapshot
We provide our latest snapshots for you to reduce your sync time.
- RocksDb, pruning=archive (145GB unpacked, 87GB download)
- RocksDb, pruning=256 blocks (15GB unpacked, 6 GB download)
- ParityDb, pruning=archive (166GB unpacked, 45GB download)
- ParityDb, pruning=256 (64GB unpacked, 17GB download)
To download and extract on the fly, use e.g.:
curl -o - -L https://pub-84166bba27804f48a67cf8cc4f3cd0a6.r2.dev/integritee-kusama-snapshot-20250314-rocksdb-archive.tar.lz4 | lz4 -c -d - | tar -x -C /path/chains/integritee-kusama/
For relaychain snapshots, please see: https://snapshots.polkadot.io/
Troubleshooting
Due to a configuration error, a sync from scratch stalls at block #38220. More info: https://github.com/integritee-network/parachain/issues/84
The solution is straightforward and - if required - trustless. Please select one of the options below:
The Fix
Trustless: Build the fix yourself
- Checkout our fix branch https://github.com/integritee-network/parachain/tree/skip-signature-verification
- Build the code as it is described in Run from source code section
- Once the sync left #38220 one should stop it and continue with the latest polkadot-omni-node.
As the fix hasn't been upgraded with later PolkadotSDK versions, here's the old cli syntax to run the fix and sync an initial RocksDb:
./integritee-collator-accept-all-signatures \
  --base-path '<add your path or delete this line>' \
  --pruning archive \
  --chain=integritee-kusama \
  -- \
  --base-path '<add your path or delete this line>' \
  --chain=kusama \
Using our pre-built binary
- Download https://github.com/integritee-network/parachain/releases/download/1.5.15/integritee-collator-accept-all-signatures , replace it with integritee binary. Follow the instructions above to run the fix.
- Once the sync left #38220 one should stop it and continue with the latest polkadot-omni-node.
Start from a Snapshot
Start with one of our snapshots generated later than block #48375.
5.1.1.2 Parachain on Polkadot
The Integritee parachains are compatible with the polkadot-omni-node, therefore, there is no need to use Integritee's collator release. Instead, we recommend to use the latest polkadot-omni-node.
Spec Requirement
We suggest to meet these minimal requirements although slightly weaker HW may work as well:
- 2TB NVMe SSD.
- seq. write performance should be > 1000 MB/s. Consider that SSD's get slower the more full they get. Also, they wear out with intense usage)
- 16GB RAM
- CPU won't matter much, but go for maximum single-core performance rather than many cores.
Build the Omni-Node
Skip this step if you want to use the pre-built binary.
We assume you're building on ubuntu 22.04
sudo apt update && sudo apt upgrade
sudo apt install -y build-essential clang curl git jq libssl-dev pkg-config protobuf-compiler
curl --proto '=https' --tlsv1.2 -sSf https://sh.rustup.rs | sh
source $HOME/.cargo/env
rustup target add wasm32-unknown-unknown
cargo install polkadot-omni-node
Run Collator as a Systemd Service
We assume you use ubuntu 22.04.
Download
Create /etc/systemd/system/integritee-polkadot-collator.service with the following content:
[Unit]
Description=Integritee Polkadot Collator

[Service]
User=integritee
Group=collators

ExecStart=/path/to/polkadot-omni-node \
  # only if you intend to produce blocks
  --validator \
  --chain=/home/integritee/integritee-polkadot/integritee-polkadot.json \
  # adjust
  --name my-fancy-integritee-node \
  # we recommend to both these endpoints
  --telemetry-url "wss://telemetry.polkadot.io/submit/ 0"
  --telemetry-url 'wss://shard.telemetry.integritee.io/submit/ 1' \
  # adjust the base path to your needs
  --base-path '/opt/integritee' \
  # archive pruning is recommended if you want to run indexers on the node
  --state-pruning archive \
  --blocks-pruning archive \
  --pool-type=fork-aware \
    -- \
  --sync=warp \
  --chain polkadot \
  --telemetry-url "wss://telemetry.polkadot.io/submit/ 0"
  # adjust the base path to your needs
  --base-path '/opt/integritee' \

Restart=always
RestartSec=60

[Install]
WantedBy=multi-user.target
Using Docker
use image: parity/polkadot-omni-node
Download
- ìntegritee-polkadot.spec` from here
{% code overflow="wrap" lineNumbers="true" %}
docker pull parity/polkadot-omni-node
docker run parity/polkadot-omni-node --chain=integritee-polkadot.json -- --chain=polkadot`
{% endcode %}
For additional cli args, see above.
Starting from a Snapshot
We provide our latest snapshots for you to reduce your sync time.
- RocksDb, pruning=archive (88GB unpacked, 34GB download)
- RocksDb, pruning=256 (3.2GB unpacked, 2.2GB download)
- ParityDb, pruning=archive (63GB unpacked, 22GB download)
- ParityDb, pruning=256 (25GB unpacked, 8GB download)
To download and extract on the fly, use e.g.:
curl -o - -L https://pub-84166bba27804f48a67cf8cc4f3cd0a6.r2.dev/integritee-polkadot-snapshot-20250316-rocksdb-archive.tar.lz4 | lz4 -c -d - | tar -x -C /path/chains/integritee-polkadot/
For relaychain snapshots, please see: https://snapshots.polkadot.io/
5.1.2 Collator Node
Collators are the parachain nodes which collect pending transactions, order them and propose new blocks on Integritee Network. Their operation is critical for availability, but not for security. The latter is provided by the validators of the Polkadot and Kusama relay chains.
Who can run collators?
Integritee’s aura consensus is based on a quasi-static set of authorities which can be mutated every 6 hours. This collator set consists of permanent, invulnerable nodes and a dynamic, unpermissioned set of nodes. Anyone can join the set of unpermissioned collators by submitting a candidacy and bonding some stake in TEER. Candidates are selected based on their stake until the desired set is full.
Run a Collator Node
See the above chapter on how to run a full-node. There is only one difference: The parachain CLI (the part before the --) needs the --collator flag.
Generate an Authority Key
Collators need to manage two types of keys:
- A session key which is used to sign blocks. this key must always be online and is therefore not considered highly secure. It should be rotated regularly.
- An authority key which used to submit candidacy, bond funds and change session keys. This key isn't needed very often and should be kept secure.
To generate an authority key, please follow the steps in How to set up a wallet. In the following, we assume that you use a browser extension to keep your authority key safe.
Rotate Session Key
The best way to rotate session keys is to let the collator itself do this. The author_rotateKeys rpc call will generate a new key and print the public key. On your collator machine, run the following command:
curl -H "Content-Type: application/json" -d '{"id":1, "jsonrpc":"2.0", "method": "author_rotateKeys", "params":[]}' http://localhost:9944
Take note of the fresh public key in hex format which is returned returned as json response.
Register Session Key
Use the session.setKeys call to register your key.
keys: your session key in hex format with0xprefixproof: not needed. just put0x
Submit Candidacy
Use your authority key to call collatorSelection.registerAsCandidate. This will bond 500 TEER. Please make sure your free balance is higher than that.
Your collator should appear on the collator dashboard. In any case, you'll need to wait for the next session (up to 6 hours)
When there are more candidates than desired nodes, preference will be given to the candidates with highest bonds. If you wish to update your bond, please call collatorSelection.updateBond
Should you be selected into the set of active collators, any downtime can lead to degraded block times. Should your node fail to propose blocks, you may be removed for the upcoming session.
5.2 How to set up and run a Sidechain Validator Node
Assuming that you are happy with your custom business logic, you can start preparing your binary for production use.
Table of Content:
- 5.2.1 Hardware Requirements
- 5.2.2 Intel SGX Licences
- 5.2.3 Software requirements
- 5.2.4 Build the binaries
\
5.2.1 Hardware Requirements
SGX will be deprecated on user hardware, which means that you need server hardware to run SGX. There are many possible options, but we can suggest a Dell PowerEdge R340 Server, where the CPU must be an Intel(R) Xeon(R) E-2276G CPU @ 3.80 GHz.
Enable SGX Support in the BIOS
Enter the Dell BIOS, go to System Security, and set the following values:
Intel SGX=onSGX Launch Control Policy=Unlocked
5.2.2 Intel SGX Licences
{% hint style="info" %} Thanks to DCAP on the Integritee Network and the Attesteer, you do not need a production license with intel anymore. We keep this chapter for reference only {% endhint %}
In order to perform a remote attestation of the enclave, an Intel SGX Attestation Enhanced Service Privacy ID (EPID) is needed. We use unlinkable quotes in our code with enhanced privacy.
Development Access
Development access is free and merely needs an Intel Development Access Account. After registration, you can copy your SPID and the primary or secondary subscription key to:
bin/spid.txtbin/key.txt
Note: You need to use Linux line endings in these files.
The enclave will be signed with the development key found under enclave-runtime/Enclave_private.pem and uses the configuration found under enclave-runtime/Enclave.config.xml.
Production Access
You need a commercial license with Intel to run your enclaves in production mode (the only mode that really is confidential). Only legal entities can get a commercial license with Intel. Get in touch with them to obtain one. Please note that this whole process will soon be obsolete, as you can perform remote attestation with Integritee as an intermediary. So you only need to get in touch with us! Stay tuned for updates here!
After registration, you can copy your SPID and the primary or secondary subscription key to:
bin/spid_production.txtbin/key_production.txt
Note: You need to use Linux line endings in these files.
The enclave will be signed with the private key that was also registered and whitelisted at Intel's (in the process of obtaining a commercial license). Make sure that this key is exported as an environment variable called SGX_COMMERCIAL_KEY.
The enclave in production mode uses the configuration found under enclave-runtime/Enclave.config.production.xml. The only difference is that the option DisableDebug is set to 1.
5.2.3 Software requirements
In short, you need to install the following components to start developing and compiling the code:
However, we strongly recommend either using Ansible or Docker to set up the environment.
Table of Content:
5.2.3.1 Ansible
We have prepared a template Ansible playbook here. You can follow the instructions there to customize it with your personal setup.
5.2.3.2 Docker
We also provide docker images with all the tools installed, you can find them on Docker Hub. These are Ubuntu 22.04 images with the above tools installed.
Execute the following command to get the docker image.
docker pull integritee/integritee-dev:0.2.2
The following command enters the docker image and starts a bash session inside the container, mounting the current directory pwd into /home/ubuntu/work inside the docker image. Hence, we recommend running the command either in the SDK’s root directory or in its parent directory if you also want to mount other projects inside the docker container.
{% code overflow="wrap" lineNumbers="true" %}
docker run --name integritee-dev -it -v $(pwd):/home/ubuntu/work -e MYUID=$(id -u) -e MYGUID=$(id -g) integritee/integritee-dev:0.2.2 /bin/bash
{% endcode %}
Inside the docker
cd work
make
exit
It is useful to only stop the container instead of tearing it down in between sessions if you are developing because the cargo build cache is preserved. To restart and re-enter the docker container created above, you can execute the following command.
docker start -a -i integritee-dev
5.2.3.3 Enabling SGX Hardware support in Docker
If you are on a platform that supports SGX, you can enable HW support by:
- Enabling SGX support as described above
- Installing the Intel SGX Driver and the Intel SGX SDK and make sure that
/dev/isgxappears. - Start the docker with SGX device support:
{% code overflow="wrap" lineNumbers="true" %}
docker run -it -v $(pwd):/root/work --device /dev/isgx integritee/integritee-dev:0.1.12 /bin/bash
{% endcode %}
- Start the aesm service inside the docker:
{% code overflow="wrap" lineNumbers="true" %}
LD_LIBRARY_PATH=/opt/intel/sgx-aesm-service/aesm/ /opt/intel/sgx-aesm-service/aesm/aesm_service &
{% endcode %}
If you run the Hardware Mode on a platform that does not support SGX or has it misconfigured, you get the following error from the process:
{% code overflow="wrap" lineNumbers="true" %}
*** Start the enclave
[2019-05-15T05:15:03Z ERROR integritee::enclave_wrappers] [-] Init Enclave Failed SGX_ERROR_NO_DEVICE!
{% endcode %}
5.2.4 Build the binaries
This is explained in the respective SDKs section. In all cases, you can either build the binary directly or create a docker image with the binary as an entry point. See the next section for how to deploy your code.
5.3 How to deploy
Table of Content:
- 5.3.1 Why deploy on Integritee Network
- 5.3.2 Why use bare-metal cloud for TEE instances?
- 5.3.3 Securitee Offering
5.3.1 Why deploy on Integritee Network
Regardless of your product of choice, you’d probably want to deploy it on the Integritee network. The Integritee Network serves as the public registry of remotely attested enclaves, which your clients can consult to verify that you have a bullet-proof setup and are not tampering with your servers. Of course, you don’t need to do that, but then your customers need to verify themselves the certificate and proof of Intel, i.e, the remote attestation. Further, to request a remote attestation from Intel, they’d need to register with Intel’s IAS, while with our network, it boils down to a single web request.
So why not use another blockchain? First, most of the blockchains lack the crypto primitives to verify such certificates, like the EVM. Second, we will offer stable USD transaction fees, which means that your operational costs are perfectly predictable, a requirement for an industrial business case in our opinion. Moreover, deploying on Integritee allows you to leverage the trust Integritee Network builds as a reliable registry of trusted execution and you save on maintenance of L1 attestation logic and whitelisting
5.3.2 Why use bare-metal cloud for TEE instances?
It is generally advised for SGX users to run their machine in the cloud, as some attack vectors are only possible if you have physical access to the machine. Having them in the cloud does already enhance the trust guarantees that you can give to your customers. Renting a bare-metal cloud means that a dedicated hardware server instance is allocated to you. It is exclusively yours, you can set it up from scratch, and you don’t run in a virtual machine (VM). This contrasts with traditional cloud server offerings where your software ends up in a VM on some server that is shared with other users, and you also might change between servers. This multi-tenant architecture increases the security risk and doesn’t give you performance guarantees.
Conclusively, a bare-metal cloud is what you want if you care about security and constant performance.
OVHcloud is a cloud provider offering SGX-enabled bare-metal machines. A setup on such a machine would be comprised of the following:
- Make sure SGX is enabled in the bios
- Install the necessary SGX drivers
- Install the SGX-SDK according to GitHub - intel/linux-sgx: Intel SGX for Linux*
- Deploy your binary/docker image
5.3.3 Securitee Offering
Securitee, our subsidiary, offers the required secure infrastructure to run sidechain validator nodes and off-chain workers (incl. workers for oracles built with Integritee’s oracle framework Teeracle). Clients can choose from different server types and subscription plans with various parameter configuration options to meet the specific needs of any use case. Available product plans are designed to accomodate any use case built with Integritee’s SDK, so that users of Integritee’s SDK do not have to worry about choosing the right infrastructure. Deployment on Securitee is done in a few simple steps:
(1) Register and log in to Securitee’s portal here:  Login to Securitee
(2) Inside the portal, select and book the secure infrastructure required for your specific use case in the section 'Products - Order product'. We recommend the following product plans depending on your use case:
- For low-medium-high frequency oracles built with the Teeracle framework: Securitee 1-Standard
- For low-frequency sidechains (block production times of at least one minute) built with Integritee’s SDK: Securitee 2-Standard with at 3-5 servers
- For medium-high frequency sidechains (block production times of less than a minute / up to sub-second block production times): Securitee 3-Enterprise with at least 3-5 servers
(3) Technical steps (containerization, connecting to cluster, deploy containers, etc.) to deployment after purchasing the correct server infrastructure to be detailed as next steps here.
Securitee’s infrastructure is hosted in the open, reversible, scalable, and reliable cloud infrastructure of OVHcloud, Europe’s leading cloud provider. The specific location for the storage and processing of data can be selected, ensuring compliance with local legislations. Securitee is part of the Open trusted Cloud (OTC) program, which allows to offer the infrastructure at the highest security and quality standards, including:
- Compliance with the CISPE code of conduct on data protection
- Compliance with SWIPO IaaS, ISO 27701, 27001, 27018
- Certifications such as HDS, CSA, EBA, PCI DSS, and SOC1,2,3
6 Misc
Table of Contents:
6.1 Glossary
We know it might not be easy to navigate the blockchain – and Polkadot – world at first. We've come up with a glossary that helps everyone grasp some essential concepts regarding our project and the universe it lives in.
Attesteer
Attesteer is a service offered by Integritee. Relevant to users of Trusted Execution Environments (TEEs), it aims to provide them with public auditability and an integrable service. It delivers the same proof as Intel SGX with the additional benefit of verifying the software running in the TEEs hasn't been modified. All the information delivered by the Attesteer is registered on Integritee's blockchain.
Blockchain
Though it is a broad term, it most often refers to a network of computers that uses a common protocol to maintain consensus on data in such a way that, after being sequenced, ensures it can't be modified by anyone dishonest user. It creates a trusted record using cryptography.
Crowdloan
Polkadot allows parachains to source tokens for their parachain bids in a decentralised crowdloan.
Anyone who has registered a parachain can create a new crowdloan campaign for a slot by depositing a specified number of tokens. A campaign is configured as a range of slots (i.e. the duration of the parachain will bid for), a cap, and a duration. The duration can last over several auctions, meaning that the team will not need to restart the campaign just because they do not secure a slot on their first attempt.
More information here: Starting a Crowdloan Campaign
Decentralization
In blockchain, decentralization refers to the transfer of control and decision-making from a centralized entity (individual, organization, or group thereof) to a distributed network.
Decentralization ensures that the blockchain is not governed by an individual, group, or even the government. It is distributed in a systematic digital network so that nobody can meddle with the transactions. Other securities are managed by specific individuals that lead to a possibility of human error and bias.
GDPR
The General Data Protection Regulation is a regulation in EU law on data protection and privacy in the European Union and the European Economic Area. The GDPR is an important component of EU privacy law and of human rights law, in particular Article 8 of the Charter of Fundamental Rights of the European Union.
Governance
Blockchain governance refers to the formal structure that a blockchain ecosystem maintains to ensure the long-term integrity, transparency, and technical innovation of the project. An equitable governance structure involves different methodologies for voting on platform technology, strategy, updates, and rules. Blockchain governance typically includes both on-chain governance (like cryptographic algorithms that govern the network's computational architecture and consensus mechanism) and off-chain governance (like interpersonal decision-making that is not written in computer code).
Integritee
Integritee is a parachain on Kusama and Polkadot, and the most scalable public blockchain solution for securely processing sensitive business or personal data.
Intel SGX
Intel Software Guard Extensions is a set of security-related instruction codes that are built into some Intel central processing units. They allow user-level and operating system code to define private regions of memory, called enclaves, whose contents is inaccessible from the outside.
More information here: TEE 101: How Intel SGX works and why we use it at Integritee
Kusama
Kusama is a scalable network of specialized blockchains built using Substrate and nearly the same codebase as Polkadot. The network is an experimental development environment for teams who want to move fast and innovate on Kusama, or prepare for deployment on Polkadot.
Kusama was founded in 2019 by Gavin Wood, founder of Polkadot and co-founder and former CTO of Ethereum.
More information here: Kusama Network
Oracle
An oracle is a third-party information service provides that sends real-word data to a blockchain protocol. They are used to empower a blockchain network's protocol by securing, verifying, and strengthening the validity of data that said network receives and makes use of. There are different kinds of oracles and they can be centralized or decentralised. One of the most common uses for oracles is providing prices and data needed for financial mechanisms in the decentralised finance (DeFi) industry.
OVH
Cloud infrastructures, dedicated hosting, domain names, e-commerce, storage and archiving and virtual servers; OVH is a solution to develop IT projects. OVH offers a wide range of IT services to companies, and to individuals passionate about tech.
Website: OVH Cloud
Parachain
Parachains are Polkadot-based independent blockchains that connect to and run off of the Polkadot network’s main Relay Chain Parachains can also be considered shards (with entire blockchains inside them). Parachains run in parallel to the Relay Chan and process transactions through parallelization by using sharding and exhibit extremely fast transaction times. Parachains are able to host their own blockchain-based tokenized assets within their independent network and control their own governance processes by paying to use a parachain slot by attaching to the main Relay Chain. Parachains also run on the Rococo Relay Chain on the Kusama network (both the Polkadot and Kusama networks have the capacity to operate 100 parachains via their corresponding Relay Chain).
Polkadot
Polkadot is a software that seeks to incentivize a global network of computers to operate a blockchain on top of which users can launch and operate their own blockchain.
Polkadot is a protocol that connects blockchains — allowing value and data to be sent across previously incompatible networks (Bitcoin and Ethereum, for example). It’s also designed to be fast and scalable. The DOT token is used for staking and governance; it can be bought or sold on Coinbase and other exchanges.
More information here: Polkadot Network & What is Polkadot? YT
Relay Chain
The Relay Chain is the central chain that is used by the Polkadot network. Polkadot is a heterogeneous multi-chain and translation architecture that allows specialized blockchains and public blockchains to connect within a unified network.
SDK
The SDK – Software Development Kit is a tool created by Integritee. It enables developers to build high-performance, scalable, second-layer blockchain solutions quickly, easily, and optimized for any use case. You can add privacy features to your solution and freely decide which information to keep confidential and which to make public.
The SDK is relevant to any Substrate (the blockchain framework that underlies Polkadot) developer in need for low latencies, scalability and/or confidentiality. Both existing Substrate-based projects and developers who want to build a new application from scratch can leverage the benefits of our SDK. Substrate pallets, which are the pre-built modules of the Substrate framework, can be reused and instantiated inside an Integritee Sidechain with just a few lines of glue code. Develop your use case on Substrate, write your own pallets and integrate any of them seamlessly (without modification) into the Sidechain SDK to benefit from low latencies, scalability, and confidentiality.
The SDK provides all the groundwork for trusted execution by setting up Sidechain validators within TEEs, thereby enabling confidential state transition functions and greatly reducing the complexity of the consensus protocol. Sidechains connected to our Parachain benefit from a service called remote attestation, which delivers a public (i.e., verifiable by any third party) cryptographic proof of the TEEs’ and process’ integrity.
Sidechain
A sidechain is a separate blockchain network that connects to another blockchain – called a parent blockchain or mainnet – via a two-way peg.
The Polkadot platform offers highly competitive scalability balanced with security and flexibility. However, some use cases require transaction privacy, high transaction throughput, or low latency. Integritee sidechains are ideally suited to processing sensitive data at scale, or for any blockchain use case that requires ultra-fast response times.
More information here: Sidechain 101: What are sidechains and why do we need them on Polkadot?
Substrate (Polkadot Development Framework)
Substrate is a blockchain integration platform and application development framework that was designed by Parity Technologies, the creator of blockchain interoperability pioneer Polkadot. The purpose of Substrate is to help simplify the process of building dApps or independent blockchains that run on the Polkadot network. Substrate accomplishes this by offering a fully adaptable blockchain design framework that features software development in numerous languages, forkless upgradability, light-client architecture, and multifaceted development tools. As a result, Substrate is one of the most powerful components of the Polkadot ecosystem. However, blockchains on the Polkadot network do not need to be built with Substrate.
TEER
The TEER token is the fuel that drives the Integritee platform — a common token across both Kusama and Polkadot parachains. Integritee users will require TEER to pay for Integritee services. Given the growing consumer and regulatory pressure for data services that protect user privacy, technologies like Integritee are rapidly becoming essential for firms. The value of TEER is directly linked to our core competitive advantage as well as other features of the economic system, such as the burn mechanism and lockdrop, are designed to drive long-term growth in TEER value.
Teeracle
The TEEracle is a customizable framework to easily build trusted oracles that provide API data to any Substrate-based blockchain in a secure and efficient way. Source-authenticated data is served to our Integritee Parachain and can subsequently be retrieved by any other blockchain through cross-chain messaging (XCM). The TEEracle allows to implement timestamped (to show the actuality of the data), custom oracle services, i.e., queries can be customized according to your specific needs.
Trusted Execution Environment
A secure area of a main processor. It guarantees code and data loaded inside to be protected with respect to confidentiality and integrity, Data integrity — prevents unauthorized entities from altering data when any entity outside the TEE processes data, Code integrity — the code in the TEE cannot be replaced or modified by unauthorized entities. This is done by implementing unique, immutable, and confidential architectural security such as Intel® Software Guard Extensions (Intel® SGX) which offers hardware-based memory encryption that isolates specific application code and data in memory.
XCM Integration
XCM integrations – cross-consensus messaging – enable connections between the different parachains of the Polkadot ecosystems. XCM is, in a way, a universal language that enables different systems (in this case, projects) to speak to each other. This integration allows different projects to connect, which enables the exchange of tokens, the use of certain applications, and much more. XCM integrations represent a step toward interoperability in the Polkadot and Kusama networks.
Wallet
A wallet address is a string of letters and numbers from which cryptocurrencies or NFTs can be sent to and from. A wallet address is also known as a public key and can be shared with different contacts like an email address.
Web3
Web3 (also known as Web 3.0 and sometimes stylized as web3) is an idea for a new iteration of the World Wide Web based on blockchain technology, which incorporates concepts such as decentralization and token-based economics.
Web3 hosts decentralized apps that run on blockchain technology. Web3 advocates emphasize user privacy and ownership of data.
6.2 Visual Materials
Logo Assets
We provide developers and other professionals with visual materials such as videos, logos, fonts, and more. You can access them in our Media Kit here.
Integritee welcomes partnerships of different sorts. If you have an idea you believe is worth sharing with us, contact our team by sending an email to hello@integritee.network.
Logos
L1. Primary Logo
.png)
L2. Secondary Logo
.png)
L3. Token Icons
.png)
Choice of Color
- On a white background, the "blue text" logo is preferred.
- On a dark background, the "white text" logo is preferred. This logo can be found in our Media Kit linked above, with a transparent background.
.png)
Token Asset
TEER ![]()
Color scheme
Palette of Integritee colors

6.3 Community Info & Links
1. Our Most imortant Link:
:deciduous_tree: LinkTree https://linktr.ee/Integritee
2. Our Social Media Links:
3. Technical Links and other Platforms
6.4 Bug Bounty Program
The Integritee Bug Bounty Program
By outsourcing hackers to proactively identify and address vulnerabilities, enhance trust and credibility, and engage the global security community, we can ensure the Integritee platform remains robust and secure. This commitment to security not only protects Integritee's assets and reputation but also builds confidence among its users and partners, ultimately contributing to the project's long-term success and sustainability.
How it works
We will post our bounty bug program on Immunefi, one of the largest Bug Bounty Platforms for web3 projects. You will be able to earn up to 10,000 USD in TEER tokens.
We’ve established four levels of vulnerability severity (low, medium, high, and critical) for the Blockchain/DLT category, and participants will be rewarded with USD 1,000, 2,000, 5,000, and 10,000 depending on the kind of issue detected. Note that Proof of Concept is required for any of the tasks mentioned above, and must comply with Immunefi’s guidelines.
If you’re interested in participating in the program, don’t hesitate to check them out on Immunefi .
\
7. Quickstart
Learn how to build an Integritee Dapp
Step 1 - Read the intro about our SDK and what it offers
Step 2 - Play through our Sidechain tutorial to get a local setup working
Step 3 - Write your own logic
Step 4 - Deploy your dApp publicly